Buying or borrowing a projector for a family movie night is a great way to capture some of that movie magic, but if you've ever tried to project on to a bed sheet or a blank wall, you know that the image quality can be pretty awful, but spending the cash for a high-end projection screen doesn't always make sense.
I'm Donald Bell and in today's How To I'm going to show you how to build your own gigantic projection screen for just $100.
Now if you check the home theatre forums you're gonna find dozens of very strong opinions on the best materials to use for your DIY projection screen.
Some people use blackout cloth, some people use reflective paint.
Some people square by white vinyl, but what I use for my experiment was white spandex.
White pearlized spandex is a projection material that gets used a lot in theatrical productions.
It's relatively affordable.
It's reflective enough to catch the projection light, and because it's stretchy you can really dream big when it comes to your projection
size.
The only problem is that it can be difficult to track down the good stuff.
I got this from a company called Rose Brand that specializes in theatrical fabrics.
This is their Tendo style fabric, comes in a 10-foot width and I got 2 yards of it for about $50.
Now it's the most expensive part of this whole equation, but it's also the most critical.
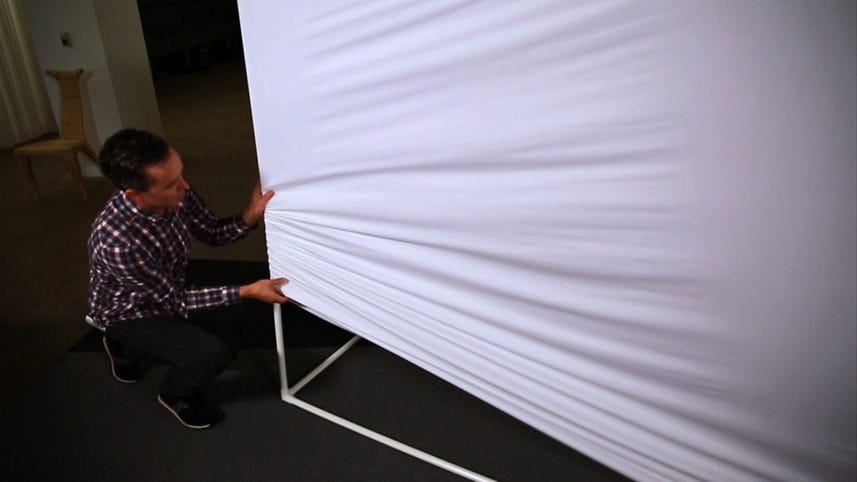
So my idea was instead of hanging this up and putting holes in my wall, I could create a frame and pull the spandex over the frame and for that I use PVC pipe.
It took some planning and some trial and error, but $45 worth of three-quarter inch PVC pipes and joints gave me a fairly solid, self-standing, 10-foot wide framework for my screen.
You can find photos and a bill of materials over at my full post at howto.cnet.com.
So for the next step I had to try to figure out how to stretch the spandex over the frame.
My first idea was to use bed sheet clips on the corners, but the end result got the screen all bunched up and looked pretty ugly.
So my bright idea was
to actually fold the spandex in half and create a pocket by sealing the edges and I'm pulling that over the frame.
The only problem is I don't know how to sew and I wasn't about to get started on $50 with the spandex.
So instead I used this, this is fabric adhesive tape, also called Stitch Witch.
With this and an iron and about 20 minutes on the floor I was able to get a reasonable stitch on this and seal off both edges like a giant envelope.
Now the stitch doesn't have to be perfect.
It's all gonna get stretched out anyways, and if you turn it inside out
like a t-shirt it actually looks pretty decent.
Looks better than you'd think.
So the final step is to pull the spandex over the frame, but before we do that I just wanna point out one thing here on the design that I learned the hard way.
When I first made this there was a bar going right down the middle, but because it was flushed against the fabric and the fabric had a little transparency to it, it caused a shadow on the screen right in the middle and it was a total deal breaker.
So to fix that I moved this middle support bar back away from the screen so that you're no longer getting that shadow.
It takes a little
extra tinkering and a few extra pieces, but it's totally worth it.
Now if you're trying to do this by yourself I would recommend tackling one corner at a time, going back and forth.
You can try to pull the fabric tight to take out any of the creases or wrinkles that might be in the fabric and then tighten things up in the back by pulling it over that hump in the back there and then pulling it down tight and then you're gonna have a pretty good-looking screen hopefully, and just realize that once the lights go out you're not gonna see a lot of the wrinkles and creases you'll see in
the light of day.
So there you go.
This is the final result, a 10-foot wide screen that you can take anywhere all for just 100 bucks, and the best part is you can break it down and store it in your closet.
It doesn't have to hang out in your house all the time.
It may not be cinemaphile quality but I'm pretty proud of it.
For more How To's like this you can head over to howto.cnet.com, and for more on projectors like this Epson 5020UB you can go to CNET.com/projectors.
I'm Donald Bell for CNET.
Go out there and
make something cool.