[MUSIC]
Hey welcome to Cnet's Cracking Open.
I'm Jason Hiner with Bill Detwiler.
Today we're here to crack open the Samsung Galaxy Note 9, one of the most anticipated high end android devices of the year.
This device looks a lot like last year's Note 8 on the outside, but it has a lot of upgrades To the inside, including the processor, the battery, and much more.
It also has the bluetooth S pen which acts like a remote control and has a number of interesting features and of course it was the first android phone to get Fortnite.
So Bill, tell us a little bit more about why we're so excited to crack this one open.
Yes, so we're really excited about this one because of all the hardware advancement.
It will be really nice to see the new Qualcomm 845 processor.
Yes.
It will also be really cool To see the higher capacity battery.
It's got this 40,000 milliamp hour battery, it's like a 15 watt hour battery.
I'd like to see just how large that is compared to previous versions.
Also, I've always been impressed with Samsung's engineering, now.
The Note 7 sort of not withstanding and the battery issues there.
But I've been cracking open Samsung devices for over a decade and inside the devices they're usually easy to take apart.
They use standard sized Phillips screws most of the time and so we're expecting this to kind of be a pleasure to take apart.
So just really excited to get started Excellent, so what are we going to do to crack this one open?
Well, what we're going to do is we're going to use a heat gun.
The big guns.
That's right.
This one allows me to control the heat and control the speed of the fan.
Now you have to careful with this, these will get very hot, these are designed to remove paint.
So you have to make sure that you have it set low enough that we do not melt the plastic.
And that we don't damage the internal components either.
So with that, let's go ahead, let's get started.
All right, so the first thing we're gonna do is we're gonna remove this SIM card.
[BLANK_AUDIO]
Or the SIM card holder.
And then we're gonna go ahead, turn our heat gun on.
And I'm gonna make sure that it doesn't get too hot so that we don't melt the plastic or damage the internal components.
[BLANK_AUDIO]
Now as I heat this up, if you've ever watched our cracking open videos you'll notice that I don't usually wear an anti-static, or ESD wrist strap.
And generally that's a good thing that you want to do.
Since we're not necessarily concerned as much about damaging the internal components, and I'm super-careful about touching metal inside the device or touching the contacts, and I use ESD-safe tools most of the time when I'm doing the delicate work on the circuitboards.
I don't ususally wear one.
I would highly recommend that you do if you're working on someone else's hardware, or even your own.
While we're heating the back of this up, we're going to apply a suction cup here that will help us pull up on the back cover and maybe make it a little easier to get a One of our thin prying tools inside the device.
[BLANK_AUDIO]
[BLANK_AUDIO]
[SOUND]
[BLANK_AUDIO]
We're gonna be very, very careful as we work our way around the edge of the back cover.
There will be a thin cable that connects the fingerprint sensor on the back panel to the circuit board and we don't want to damage that
[BLANK_AUDIO]
[SOUND] And thats what happens if you put a little bit too much pressure on these.
You manage to crack the back cover.
[BLANK_AUDIO]
[SOUND]
[BLANK_AUDIO]
Luckily, when this happens, it won't affect the functioning of the phone on the internals, and we'll be able to order a back cover replacement and put it on there, but it's sometimes happens.
One of the things thats changed over the years.
Is that as the devices have gotten increasingly more resistant to dust and to water.
They've also gotten increasinglymore difficult to actually take apart.
[MUSIC]
And we can lift it off like that.
And it looks like actually this is the cable that I wanted to try not to break.
This is the fingerprint sensor here, so.
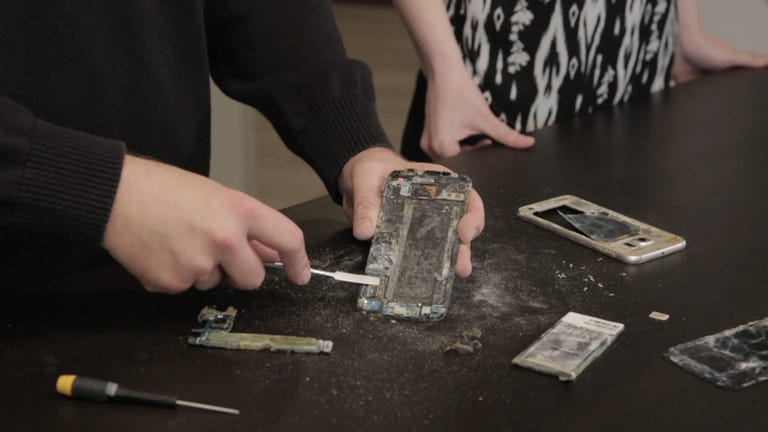
So Bill, we're back.
And I see that we've got a first casualty of our early cracking open here.
What happened?
On the outside.
Yeah, we always try to take these devices apart, doing a way that lets us put it back together again and working in order-
I can count on one hand a lot of times you've broken something.
Yeah, we've actually broken something beyond repair.
Yes.
So in my haste to try to get it back off especially when we're doing it on camera, I applied a little bit too much Force and we cracked the back panel.
Now, this won't affect the functioning of the phone.
Yeah.
It won't affect even the fingerprint sensor, which is attached to the back of that panel-
Okay.
There.
But still it's a cosmetic issue, could be a safety issue.
So we'll order a new back panel from Samsung, we'll put it on the phone, and you'll never be the wiser.
Very good.
So what are you gonna do next with the device?
Yeah so, what we're reallt interested in seeing inside the device, we talked about the battery, we talked about the logic board which would be behind here.
What I always enjoy about taking apart samsung devices is, they're pretty easy to take apart once you get inside.
These are standard phillips- Either double zero or triple zero ****.
So it shouldn't be a problem to remove those.
We will have to be mindful, again, of the adhesive that's holding on.
These are the NFC, or the charging coils.
Yeah.
Here, I suspect on the back.
So we'll have to be careful not to damage those.
And then, you'll have a speaker and your port assembly down at the bottom that we'll wanna make sure, is take out very carefully as well.
Very good.
All right.
All right, let's keep going here.
[MUSIC]
All right, sweet.
[MUSIC]
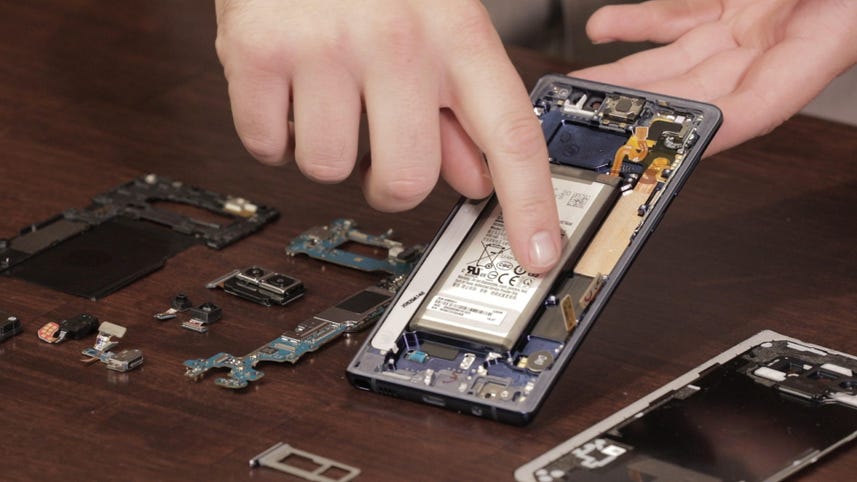
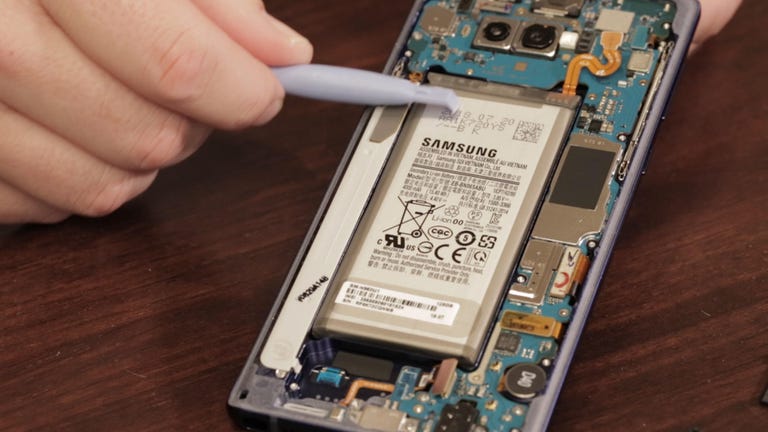
[SOUND] So now that we're inside the phone, we can see a better picture of the layout.
We can see the system board here along the side.
And here at the top, we can see the cameras and we can see the entire battery.
We can also see the sleeve.
For the s-pin here, we're gonna have to, looks like there's a few more screws, and several connectors that we'll need to detach before we can go any further.
And whenever I'm doing this I always like to make sure that we detach.
As soon as I can, the battery.
That'll prevent power from flowing through the circuits and make things a little safer to disconnect.
[SOUND] Somtimes when you do detach The connectors, we can actually move the component.
This is the 8 megapixel, I believe, front facing camera.
Now I think what we can do with all the cables disconnected, and all the screws removed, we're actually gonna go ahead and remove the circuit board Without removing the battery first.
The battery is gonna be glued to the body here.
And so I'm gonna leave that in if I can.
[BLANK_AUDIO]
[BLANK_AUDIO]
Have to be very gentle when you lift this out, not to tear any of the cables.
And there we go.
[BLANK_AUDIO]
The remaining components we're gonna try and move are the 3.5 millimeter headphone jack, and then the USB port at the bottom.
[BLANK_AUDIO]
There is the USB port.
And then here is the three and a half millimeter headphone jack, Jason's favorite part.
Turning our attention to the main system board We're going to go ahead and remove the camera assembly from the back.
[MUSIC]
[MUSIC]
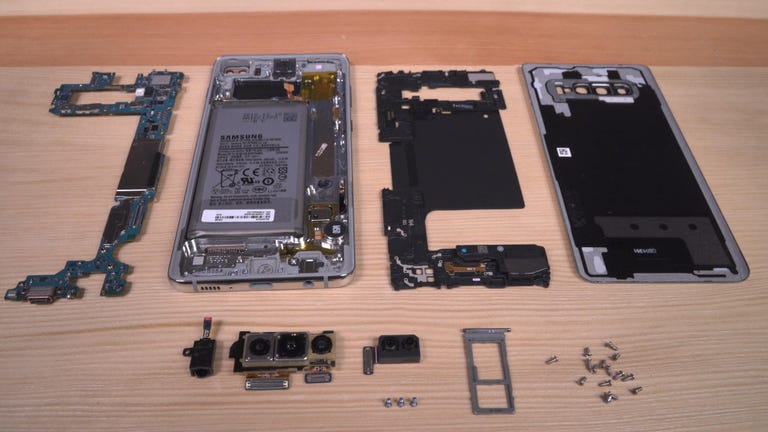
All right, so Bill you've got the Galaxy Note 9 apart.
Tell us what we're looking at.
Yes, so this was a challenging tear down to get inside.
But once we're inside it's fairly typical of these devices.
On the body we left some of the components still attached because They're glued to the body and I didn't want to damage them removing them.
We left the vibration motor.
We left the battery and then we left the front-facing speaker also attached to the body there.
One of the things that's really interesting.
The heat pipe here that's beside the battery is bigger than we have seen on previous phones and maybe a nod to the more powerful processor.
Speaking of the processors, We unfortunately can't see that
Okay.
The main system board, the metal shields that cover the chips are solded to the board I don't wanna remove those, cause doing so will lightly damage the board beyond repai.
We do wanna put these back together now, do know because of the specs that SAMSUNG has published That it either has 8 gigs or a 6 gigs of RAM, it either has a 128 or 512 gigs of storage, and of course we know it has the Qualcomm's Snapdragon 845 processor hidden under here too.
We can also see the pair of 12 megapixel cameras, there's the 8 megapixel front camera We have the USBC connector here.
Your favorite, the three-and-a-half-inch headphone jack, and then we have the speaker assembly here and then the charging coils here.
So even without taking the shields off the circuit or the main circuit board, we still have a good sense of what's inside the device.
And the very cool thing is with that upgraded top end version that has 512 gigs of storage, you can also then add, it has the expandable storage.
You can add the 512 gig SD card and this becomes the first terabyte Storage phone.
Indeed.
Yeah.
And of course, the first Android phone with Fortnite.
[NOISE]
All right, that's it for the Samsung Galaxy Note 9. If you have other devices you'd like to see us crack open, please let us know.
Post in the comments on CNET or on YouTube, and we will be happy to take a look.
We're always looking for good stuff that we can crack open, learn from.
And share it with you.
So that's it for Build That [UNKNOWN] I'm Jason Hiner.
Thanks for tuning in.
See you next time.
[MUSIC]