It's been almost five years and that one's brand new Mac mini may not look so good.
I bet you wished -- what was a bigger hard drive.
-- -- has filled up or simply died is known you spend your hard earned cash on a new model are paying public spotlight -- faulty one.
I'm getting -- down on I'm gonna show you how to replace the hard drive in Mac mini models from two -- out of pocket you have nine.
The Mac -- -- like Apple's forgotten stepchild.
The company redesigned small computer -- 2010 adding some new ports along with removable cover that gives users quick and easy access to the memory hard drive.
-- to process to get as high as little more typical for older models it's nothing you can't handle.
To get the job done and you'll need to their paint scraper or putty knife.
A small Phillips head screw driver a pair of tweezers and a replacement 2.5 inch hard drive or solid state drive.
I also recommend pick up a can of compressed air to clean -- -- that -- that has been building up all these years.
Make sure to work and I static resurfaced like this would cable and -- discharge an electrostatic -- -- before handle in the internal components.
You should also track your old -- to a new hard drive by using a program like time machine or super duper.
The cover on a Mac mini is held in place with small clips that must be dislodged the putty knife.
Gently she -- in between the cover in the case -- slowly working your way around the devices for edges.
Once the clips on three sides are dislodge you can lift up the cover.
On the inside the device you must remove three antennas that you on the left simply lift out what the larger one a right is held in place a small clip.
That must be squeezed from the bottom to be removed.
Under each antenna or springs don't losing that are required for re assembling the device for an -- replaced them side.
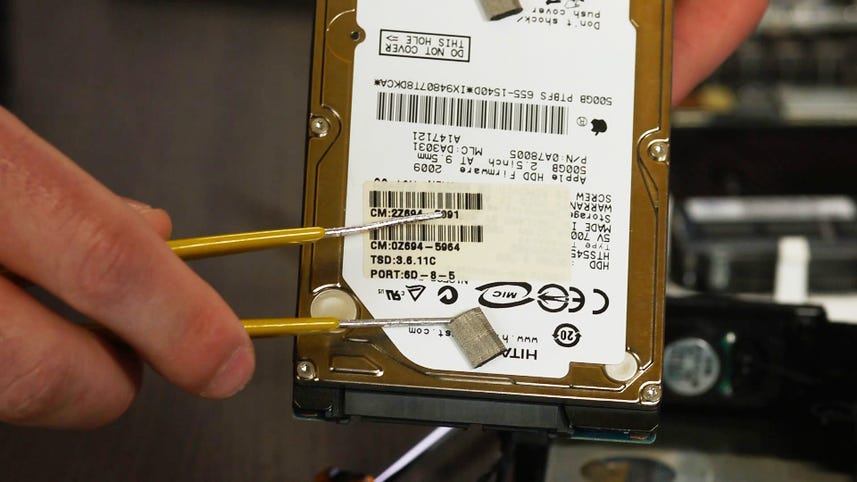
Four screws which can be found here here here and here must be unscrew to remove the CD drive.
Before you pop the drive out be -- detach the ribbon cable using your fingernail or tweezers.
The hard drive is located on the back with CD drive -- held in place with we're screws.
After an -- that removed the temperature -- on the top of the device then using the tweezers for help gently lift the drive out of its socket.
Once it's removed don't get appeal -- -- anti static cushions off or drive and place them on your new one.
Then slide the new drive into the slot replace the force grows every -- heat sensor.
Place the CD drive into the case and secure with a -- spruce.
The three spring should be placed on their corresponding antenna post followed by the antenna themselves.
Also remember to reattach the ribbon cable to the CD drive.
Replace the cover pushed down evenly around the edges of the device until clips these.
For more information check out my article on how to do that cnet.com and feel -- -- -- on Twitter with any questions or comments I'm doing right now for CNET thanks for watching.