Fix Your iPhone Screen With Apple's Self-Service Repair Kit
Phones
Speaker 1: It can happen to the best of us, a shattered iPhone screen until now fixing a problem like this probably met a trip to the apple store or a third party repair shop to get your screen replaced, unless you are brave enough to do it yourself companies like I fix it and others have offered at home repair kits for a while now, though, the aftermarket parts available, don't always measure up to the quality provided by apple authorized repair centers. But that was before now, Apple's self-service repair program offers iPhone users with broken devices, the opportunity to make repairs at home using genuine apple parts state-of-the-art [00:00:30] tools and official repair guides provided by the company itself. Today. I'm gonna show you what it's like to replace the broken screen on my iPhone se using the apple self-service repair kit. Obviously this iPhone has seen better days, but this phone didn't get destroyed just cuz I was clumsy.
Speaker 1: This third generation iPhone se was the victim of one of our patented CNET drop tests. A while back, you can see how the se went from this to this by checking out that drop test video and see how it compares to other phones. Over the years, I'll put links in the description so you can enjoy the carnage yourself before [00:01:00] I can make this iPhone usable. Again, I need to get a new screen and some tools. So let's head over to the repair store website. We'll start our repair journey at self-service repair.com. Before you even think about ordering any new parts or tools, apple encourages you to download and read the repair manual for the phone. You're looking to fix click on manuals at the top of the page and you'll be sent to an apple support page. Look for the phone. You're trying to repair and click on it.
Speaker 1: So here's the repair manual for the iPhone se and it's only 79 pages [00:01:30] long. You don't have to read the whole thing right now, but I do recommend taking a look at the first few sections to see what you're getting into. Since I'm looking to order parts and tools, I'll click right here under product, choose iPhone. Currently the only option next select which iPhone model you're interested in, repairing parts and tools are available for the iPhone 12 and 13 series and the latest version of the iPhone se, which is the one I'll be working on. Now select the type of repair you wanna do the service isn't just for screen repairs. You can replace the battery bottom speaker, camera, [00:02:00] SIM tray, and the tap engine inside. Choose one. And you'll be presented with a list of options for the parts you may need to do the job and the required tools available for purchase or for rent.
Speaker 1: These are the parts you'll need. If you're replacing the screen, I'm looking for this recommended display bundle, which includes the new glass adhesive and screws prices vary from phone to phone. This display bundle is $129 and 56 cents plus tax. This is about what it would cost to get your screen repaired by apple, but without the sense of accomplishment of doing it yourself, apple does offer a credit for returning [00:02:30] the part you're replacing. So if I send my broken glass back, my price should come down to around a hundred bucks for parts. So let's click add to cart. And on this screen, I need to enter two pieces of information. First enter the serial number or I M E I number to identify the phone that you're working on second to ensure you've read the repair manual and understand what you're getting yourself into. You need to enter a six digit code found somewhere in the manual.
Speaker 1: I'm not gonna tell you where to find the code in the manual because I think it's a good idea to read the instructions before you dive in, but it's not that hard to find. So find [00:03:00] the code and enter it here. And if you've got two green check marks hit continue, and those items will be added to your cart onto the tools section, depending on your experience as a tinkerer, you might already have some of these items at home. So you can just order the remaining tools you need. And of course there are other tools on the market that you can buy that might end up being cheaper than the ones offered here. But unless you plan on doing repairs like this fairly often, which I don't, I think rent a complete kit is the way to go for $49. You get all the tools you need to do the job. And the kit is specific to the iPhone model you're working on. [00:03:30] But before I add it to my cart, let's look at this rental information link. As we can see here, the price is $49 including shipping, which is pretty nice. It's a seven day rental, which seems like a reasonable amount of time to get this done. And right here, in addition to the $49 for the rental, a hold will be placed on my credit card for the full replacement value of the tools inside. Interesting.
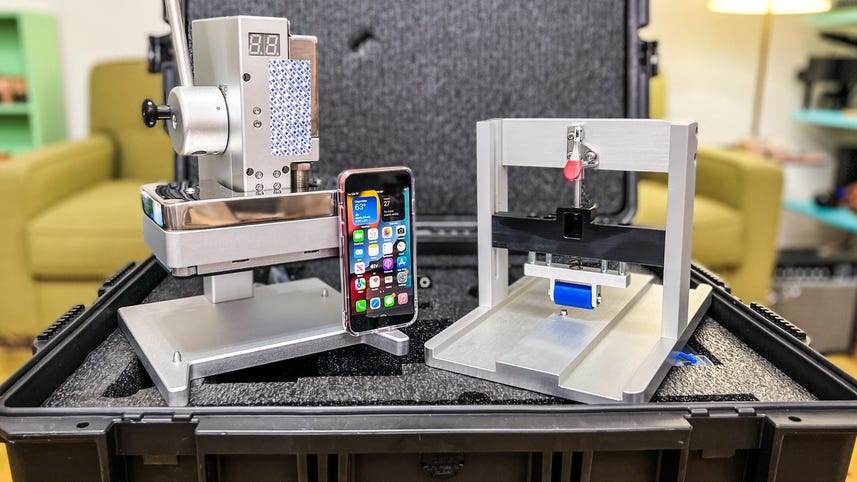
Speaker 1: So now I'll go back and add the kit to my cart, agree to terms and conditions, and then click on the shopping cart here to check out. [00:04:00] So I'm looking at $178 for the parts in the toolkit rental and a $1,200 hold for the cost of the toolkit. Yikes, that seems like a lot to put on the credit card. The fine front says that once the kit is returned within seven days complete and undamaged, the hold will be released within five to seven days. Well, it's too late to turn back now. So I'll go to check out and here's my grand total $1,500. I sure hope I don't break any of those tools. I'll hit place order and there's my confirmation number. Nothing else [00:04:30] to do now, but wait for my shipment and read that repair manual. Of course. So after an unspecified amount of time, I've received these two items from ups. The small box contains all the parts I need to replace my display, the new display itself, the adhesive to hold it in place. And two of the tiniest screws I've ever seen. The big case is the rental tool kit,
Speaker 1: Including this cool looking display, press this battery press, which we're not gonna [00:05:00] need, but it's included in the kit and other assorted screwdrivers and other tools for comparison, I fix it sent me one of their kits for replacing the screen on the iPhone 12 for around $250, you can get the replacement screen and all of I fix its tools. You need to complete the job. And of course the tools are yours to keep for any other electronics jobs that come up. My iPhone 12 is in pretty good shape, but if you wanna see me replace the screen or the battery with the I Fixit kit, let me know. But for this job, I'm sticking to the apple repair kit though. In addition to the tools that come in the case, the instruction manual also recommends [00:05:30] having these supplies on hand for your convenience and safety, they include safety goggles, cut resistant gloves, and an electrostatic discharge wrist strap and work map. I'm not gonna go over all the safety precautions outlined in the repair manual, but I don't need to, since you've all read the manual already. Right? Right. So let me get my work area set up and we'll get started
Speaker 1: To prep my iPhone for surgery. I need to deal with this shattered glass. I'll vacuum up any loose broken glass from the phone in the work mat. [00:06:00] I'll apply this protective cover to secure the broken screen and get it stuck on there as good as I can get it. And since the back glass is broken too, I'll insert it into this support frame. So now it's finally time to open up the iPhone. And of course the first thing I notice is that it's upside down in this tray. So I gotta take it outta here to get to the screws. [00:06:30] These are very tiny, tiny. Now I can put it back in the tray. Now it's time for this. The universal display removal adapter. This is the first time I'm doing this. Of course. So it's a little tricky to figure out exactly how it works, but I think you squeezed everything together, [00:07:00] tightened down the suction cups and then start screwing this open until you start to see it, pull it apart. I have a feeling this tray in here might not be doing me any favors. So now I think I'm gonna try without this support tray in here. If we can get it out.
Speaker 1: [00:07:30] Okay. Set the phone here. Will that pry up the glass? No. All right, come on. Fingers crossed. Now I can't tell if it's trying to lift off the protective cover or if it's actually lifting up the glass itself. [00:08:00] Let me see if I can get this adhesive cutter to do anything. Just gonna get rid of this cover, cuz it doesn't seem to be doing any good. I know this isn't exactly what they had in mind, but this is gonna be the only way I can get this off here. I think, well, there we go. Now I have a lip I can work with. So [00:08:30] now I can go back to the adhesive cutter. Now it's coming off. I'm gonna slide this forward to release the clips inside.
Speaker 2: Nope.
Speaker 1: Well there we go. I've loosened it up enough. So now I can tilt it to the side as instructed. Now we're gonna transition from the support tray to the repair tray, [00:09:00] set the phone in here like this, and then I'm gonna use the suction cup to hold up the screen while I'm working inside. So now it looks like this. So here's the battery which we could replace, but we're not going to today. Also the taptic engine, which is a replaceable part, the camera's up here under this cover, but to continue replacing the screen, I need to remove this silver piece called a cowling. [00:09:30] So I'll undo these four screws. They're so small. Make sure these don't get lost. Oh, so now while I'm in here, I need to disconnect the battery flex cable, which is right here. Don't know if you can see that. There we go. [00:10:00] Then the one for the display, pop that up and then the one for the home button and there we go. They come off pretty easy. You shouldn't have to pry too hard. Now I have three more screws who remove up here at the top by the camera. The pictures in the manual are very helpful to find what you're looking for. Lift that,
Speaker 1: Find those screws. I'm gonna disconnect this cable for the front facing camera [00:10:30] and we're free. I'm gonna try and get rid of all this old adhesive using this black stick. Ah, there we go. Another good, big hunk. You can also use an alcohol or ethanol wipe to remove some more of the residue. Just make sure you're not getting liquid into the phone body itself. It's looking good [00:11:00] to me. Nice and clean inside. I will take a moment to vacuum up some of this broken glass without taking care of. I think we're ready to put on the new screen. I managed to remove the broken screen without totally screwing up the phone. So let's see how I do installing the new one. I decided to dispense with the gloves and goggles for right now. So I can actually see and feel what I'm doing. Here's the new display that I'm gonna be installing handy replacement screws in case I lost [00:11:30] any along the way. This is two pieces of adhesive, I guess in case I mess one up and two replacement safety screws, but I did manage to hold onto those first. I'm gonna apply the new adhesives so that the new display stays in place. So you start by removing this or starting to remove this bottom pink liner once you have it lined up.
Speaker 1: And of course that didn't go exactly the way it's supposed to. [00:12:00] So I got a little bit of that adhesive stuck on my finger. So now I'm gonna remove this and hope for the best with the second one. So now I gotta clean this all off again. Luckily it's not really stuck on there very well yet. It's this thin little black line of adhesive that I'm worried about first. So let's try that one more time and let's do it without touching it. All right. That looks better. Those little Ridge [00:12:30] around edge around the frame. So we'll use this black stick to get that right where it needs to be. There's more pieces of the release liner. So we'll pull that off in the right order. There's a ring of plastic there still to protect the black adhesive that we applied. Here's the brand new display covered in protective plastic. And now it's just like getting a new iPhone where you get to peel that plastic off. [00:13:00] Gonna line this up on here. Now it's a matter of reconnecting the cables that we disconnected before. So here's the one for the camera. Go ahead and use up the replacement screws that I got. If I can do this without losing them too first, we'll put the cowling back on. Now I'll attach the home button and the display cables [00:13:30] reconnect the battery, satisfying little click and now to replace this cowling
Speaker 1: And everything's reattached, I'll remove this last liner. That's protecting the adhesive disconnect, the suction cup, which actually worked this time. [00:14:00] Now press down on the four corners to get it all seated. That's looking pretty straight. Now. It's time to bring out this big boy, the display press leaving it in the tray, align the holes with the posts on the press and then pull down on the lever until it locks. We'll wait 30 seconds for the timer. [00:14:30] I guess that beep is gonna stop. So we'll unlock it. All right, take this out. Put this big boy away. Remove it from the repair tray. One last thing is to insert the two new safety screws.
Speaker 1: Okay. Look at that. Well, it's looking pretty good to [00:15:00] me and I'm tempted to plug it in and turn it on, but there's one more step listed and I'm not sure what's supposed to happen. Next. The repair manual indicates that after performing a display replacement, you will need to contact the self-service repair store support team by chat or phone to initiate system configuration. Let's see if I can reach someone via that chat. I'll put in my name and email address and tell them I'm looking for help with my system configuration, the support agent will ask you some questions about your order number to identify your phone and the type of repair you're working on. You'd [00:15:30] think they could figure this out based on your order number. But I guess it's safer to check. Now the moment of truth, the agent will ask you to make sure your phone powers on and has enough battery to complete the process. When I plug mine in success, the screen actually works, but I'm not done just yet. The agent will walk you through the process of putting your phone into diagnostics mode, where they will complete the system configuration
Speaker 1: After a final restart. That's it, the repair is complete. [00:16:00] The screen looks great. The home button and fingerprint sensor work perfectly and there's no smoke coming out of the phone. So I'm gonna call this a win. I couldn't do anything about the broken glass on the back, but throw a case on it. And this broken phone is as good as new
Speaker 1: Overall. I'd say that. Replacing the screen on my iPhone se using the apple self service repair kit worked out just fine. The screen works. So I'm basically happy though, besides the display press, I'm not sure this big toolkit was worth the effort, the display removal fixture didn't work for me though. It could be because the [00:16:30] screen was so damaged in the first place. I only ended up needing two of the four screwdriver bits and I probably have them around here somewhere already, but the support manual was very helpful and told me exactly what I needed to do. Even if I did bundle a couple of steps along the way. Well, now that that's over, it's time to pack everything back into the toolbox
Speaker 1: Slip, the provided return label into the slot, zip tie, the case closed and get it over to the ups store to make sure I'm not charged $1,200 for keeping it too long. And I'm not sure if this old display is going to qualify for [00:17:00] the recycling credit, but it's worth sending it back. Just in case you can find instructions on returning your replace part on the support page. But if you look up your order, you should find a button here to start the return process. We'll see if I get my 30 bucks back, hopefully after watching this video, you might at least feel empowered to attempt your own at home repairs. But what do you think, will you give it a shot after watching me walk you through the process? It's debatable, whether it's any cheaper than paying someone else to do it, and it's definitely harder, but at least you have the option. Thanks for watching and we'll see you next time.