^M00:00:01
[ Music ]
^M00:00:08
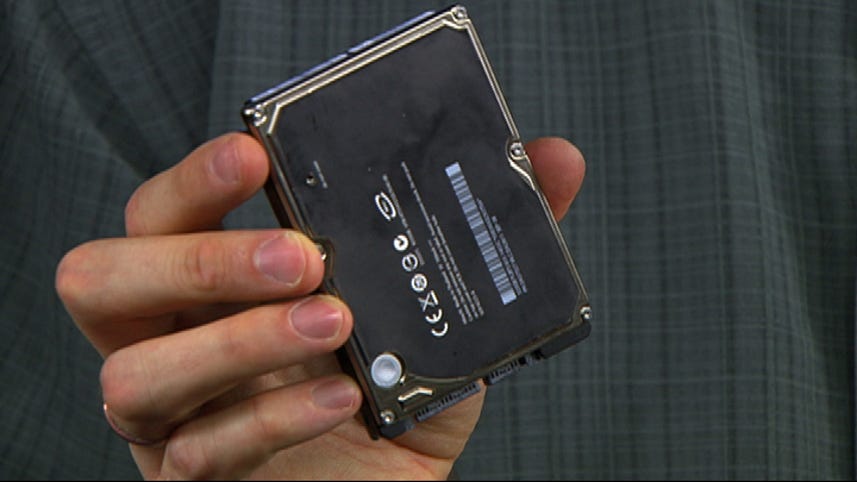
>> When you buy a laptop you usually get the biggest hard drive you can afford right? But at some point it's going to start to seem small; it's probably all those episodes of Bencher Brothers you downloaded. Here's how to upgrade your laptop to a bigger hard drive--give yourself some breathing room. First you need to find a hard drive. Look online for the best deals; obviously you want to pick one with more gigabytes of storage space than the one you have now but pay attention to RPM too. That tells you how fast the hard drive spins; and the faster the hard drive the better some programs are going to work especially if you spend a lot of time writing data to the hard drive. I also recommend getting a hard drive enclosure that way you can clone your current drive, then you can just put the clone drive in the laptop and boot up. That's what I'm going to show you how to do. And if you don't want to use an enclosure and don't want to buy one, you'll have to do a clean install of the operating system on a blank drive and then restore your data from a backup. I'm going to show you the cloning method here; the procedure is pretty much the same for Mac or PC. First you need cloning software. For Windows I've got two options--Clonzilla is less prone to errors but you have to burn it to CD and boot off it rendering your PC unusable for anything else during the cloning process. Macream Reflect [assumed spelling] can image the drive while you're still using Windows. Don't go changing significant amounts of data while it's running or that data will be lost. For Macs Carbon Copy cloner from Bondage Software is super easy to use and clones the drive while OSX is running; again don't change too much while it's running. In both cases, you're making a bootable copy of your current hard drive onto the new drive. Now it's time to put the new drive into its enclosure and plug it into the laptop. Now, launch your preferred program or boot from the CD if you're using Clonzilla; make sure you're making a bootable copy to start things off. This can take several hours for larger drives. My 300 gigabyte drive here took 4 and one half hours to image. Once you have the drive copied, you'll need to take out your old drive and put in the new one. The procedure varies for different computers; I'm going to show you two examples; we'll start with a Windows machine. Make sure the computer is off and unplugged; touch something metal to make sure you don't still carry a charge. In this old think pad the hard drive is in a slot on the side, you have to actually keep it open like this. You unscrew one screw and the carriage will slide out and in this one you pull this casing off and you get a little tab right there, and you should be able to just slide it out. Now you get these little rubber bumpers here on the side, they just pull off, they're not actually attached, they're gummed or anything like that; and you'll see there's a carriage. Almost every laptop hard drive is going to come in some sort of carriage. It's attached by four screws on either side so you'll need to unscrew those screws and you just pull the hard drive out of the little carriage; there's that carriage. Now I've already got my new hard drive out of its case so I'm just going to pop that one back in there and you screw it all back up just the way it was before. Now the one thing to make sure of while you're doing this is that you have the pins facing out like that. I've done it before where I've put it in the carriage backwards. It's easier on this one because they give you this flap so you can remember which side is which; but if a flap like that isn't there make sure you pay attention to how you're screwing it back in. Put your little baby buggy bumpers back on the side here, and again make sure you've got those pins started the right way, slide it back on in, it should fit in nice, you can tuck that flap out of the way, reattach the plastic case, screw in the retaining few because you know you don't want it to fall out while you're using your computer; then boot it up. It should start just like normal but with a lot more space on the hard drive. Now let's switch to a Mac. Again, make sure it's off and unplugged and then touch something metal to discharge any static electricity you carry. On this 15-inch Mac Book Pro, the hard drive is underneath. So you're going to slide this little lever to open up this compartment here and your hard drive is right there. Now you'll open up this one retaining screw, it actually doesn't come all the way out; it's embedded in this little black plastic piece. You set that to the side and you've got a nice little flap here, you just pull this open, unhook it from the pin and you'll see there's actually no carriage with the Mac. All they do is they give you four Torx-T6screws; that's what holds it in the compartment so you're going to need a Torx-T6 screwdriver for this one. You'll unscrew those four screws and in typical Apple style the entire carriage is four screws. Now I'm actually and you don't have to do this but I'm going to pull this tab off and reuse it because there's not one on the hard drive I'm replacing it with. So I've pulled that out of the case and then again right into the side of the new hard drive you screw these four T6 screws. Once you've got the four screws back in you can put your new tab, it's still got enough stickiness on the side there and plug this back into the pin holder so that it's actually connected. And this is why you need to go through the exercise of the four screws. You can see in here there's four little screw shaped compartments that the screws set right in. That's how the hard drive is kept stable right there. Once you've got that back in, put your retaining wall piece back in the side; it's not T6. So remember you're going to have to use both kinds of screwdrivers here, screw it back in, the piece goes on this side down, props there and then as you move the lever, close it up, turn it over. You might want to plug it in and boot it up. It should boot just like normal. Now for your particular laptop you might want to consult the manual or website like ifixit.com but this should give you an idea of how it goes. Now all you have to do is figure out what you're going to do to fill up all that extra space. I'm Tom Merritt, cnet.com.