[ Music ]
>> This episode of System is brought to you by the
United States Air Force, Netflix, and Godaddy.com.
>> Everyone is out today, so it's just me and the
intern. No, no, no, really. It's going to be an
awesome episode. It turns out that the segue building
intern here, Daniel has an awesome mod for turning that
old Nintendo 64 sitting in your closet into a portable
gaming unit so you can play anywhere, any time. Hacking
your N 64 into a portable gaming system, on this episode
of System.
^M00:00:34
[ Music ]
^M00:00:53
>> Video gaming, like PC technology, progresses at a
pretty astonishing rate. So it's more than likely that
you'll have one of those old school Nintendo 64s sitting
somewhere in the basement, attic, basement, you know,
somewhere. That old gaming console has a lot of life in
it. So much life, that you could probably take it, mod
it, and turn it into a portable gaming unit. One that
doesn't need a TV, a power outlet, you can play it in
the car, on the bus, cruise line, whatever. Here to
show us how to do it -- Daniel.
[ Multiple voices speaking ]
>> What kind of possessed you into building this thing
in the first place?
>> Well, there are a bunch of [Inaudible] gadget, bunch
of the [Inaudible] where everyone was making their hacks
for the portable 360 laptop, Xbox 360 laptop, PS3, and
there was a bunch of really cool ones I saw for the
Nintendo 64, and I had [Inaudible] around and it was
pretty much my childhood. So I thought it would be a
pretty cool project to take on and make it into a little
hand held.
>> In fact, it actually requires a few extra parts other
than a Nintendo 64. What do you need?
>> What you need to do, basically, the Nintendo 64,
obviously. And a little screen that will actually play
the video. And what you can use for that, works really
great, is the PS1 screen. Which was sold with the
original PS -- the small PlayStation unit. And they
made a little scene for that. And what happens with
that is just one wire is analog in, which you can take
from the Nintendo, just wire that up.
>> Now could you use another LCD screen. Could you use
one, say from a portable DVD player, or one of those
little small portable TVs.
>> You can basically use any screen you find that has
analog input.
>> So the key feature that you need in any kind of
screen that you do put up has to have an analog
composite input into the screen.
>> Yes, you want to have that input plus somewhere --
voltage range around 7 volts or so, because that's what
you can get off a battery pack. Something that doesn't
run off 120 volts like a small tiny TV or something like
that.
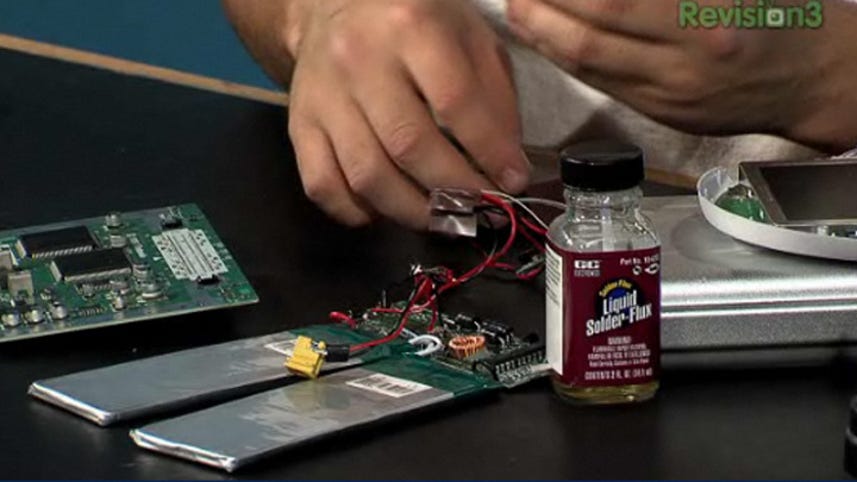
>> I see these batteries that you have right here. Now
where did you get these, are these something that you
can buy off an electronic's store or --
>> You could buy those at an electronic's store, but
what I did was we actually got a DVD player, and the
portable DVD players have a little tiny screen which is
what we're going to be running on the Nintendo. And
what's excellent about buying the premade package with
the battery and the circuit and all that stuff is that
you'll actually get the circuit. That circuit will do
the charging for you by just plugging it in through a
little power supply that comes with the DVD player,
rather than buying the batteries themselves and trying
to pull them out every time, hook up to a separate
charger and all that other stuff.
>> So was there a particular model DVD player that you
have to buy, or is it something that you can, like, pick
out one of the generic ones on the market.
>> What works really well is the Polaroid DVD players
have a great line of small -- small little packages with
great battery life. And the P D -- the P D V 0700 is
the great -- best model. This is the model we used.
Maybe not the best model, but you can basically use
anything that has a replaceable battery pack.
>> Now having actually signed the check -- or the credit
card receipt for this, this is actually pretty cheap.
We got it second hand. I think we picked it up for 30
-- 30, $40.
>> Yeah somewhere around there, on Amazon. [Inaudible]
go on eBay too, to find something.
>> Really, inexpensive. The great thing, as you
mentioned, it already has the controller board on it, so
you don't have to develop anything or --
[ Multiple voices speaking ]
>> It has the balancing and all that stuff too. So you
actually have the safe circuit rather than having
something -- polymer batteries in there, and you always
hear about the laptop battery explosions, all that
stuff. With the circuit it will actually help out with
restricting it from the battery voltage getting too low
or something shorting out.
>> Now in terms of the board itself, was there any
additional capacitors, resistors, or anything you
needed?
>> We had to get a power supply. Because what's going
on with the Nintendo, it takes a -- 3.3 -- 3.3 volt in
on one side and then 12 volts in on the other side. So
we -- our battery pack is 7.4 volts, and we can actually
set that down with a voltage regulator, and get the 3.3
volts it needs as well. So we had to get a little chip
from Texas Instruments, and that was the PTH 08080 WAZ.
And what's great about this is you can actually get it
for free. Texas Instruments actually sends them out --
sends out samples. So you can order a sample off the
web site. And besides the board, you'll also need a
hundred microferin capacitor and a small resistor,
depending on the value for the application, 3.3 volts.
It's 1.1 K, which is [Inaudible] I believe.
>> Not to sound too ignorant, what does this thing do?
>> Say you have -- this is 12 volts, say it's 12 volts.
And the line in for the board is 12 volts, and there's a
separate line for 3.3 volts. We actually need to step
that down to 3.3 volts. So this is actually like a
little power supply like you have on your laptops that
you carry around with you. So instead of having the 120
volts A C adaptor --
[ Multiple voices speaking ]
>> Got it.
>> All right. And finally you nineteenth something to
put everything in, I mean, because you can't really use
the case it came in, because it's so big.
>> You could use the -- there's been some pretty cool
cases that people have actually taken the actual
Nintendo 64 case, with a really cool handle, the whole
thing with buttons and screens. Basically make the
screen out of whatever you want. What we did here was
we took the hard drive case and hacked it up, put the
screen on there --
>> Wait, wait, wait, wait. The hard drive case. Wait a
minute, isn't this the one I was looking for the other
day.
>> No, I don't think so.
>> But you also mentioned something about an electronic
project kit box.
>> Yeah, project box. What's great about the art of
hobbyists, [Inaudible] like that, there's a bunch of
places Radio Shack, Fries Electronics [Assumed spelling]
or you can go on line and get little things like project
boxes, which are great for just doing any kind of
electronics project. They're a plastic box, screws on
there [Inaudible] sometimes, and basically it's made for
coming apart, drilling holes, and putting buttons in for
your application.
>> Cool. Now the only other things we need to worry
about are sound, and, like, control, right?
>> Sound and control, yes. Sound -- what's great about
the PS1 screen it actually comes with speakers, and it
has [Inaudible] audio. So not only do you get the video
but you get the audio.
>> I see why it's such a popular item for this mod.
>> Yeah. It's the biggest one for all little hand held
mods. As great. And for the controller what we could
have done is take buttons, put them in there, reroute
all the wiring. But instead of going through all that
-- the little -- little -- little wires and little
traces and coming through --
[ Multiple voices speaking ]
>> Yeah, yeah. I tried that out, and it didn't work the
first time because the board I had, well, cutting it
apart and trying to reroute all the traces didn't really
work out. So what we're doing here for this one, we
will have these little game ports that came right off
the -- right off the Nintendo, have that going off the
side and then just plug the controller in. And use the
controller holding it. And already have a nicely made
--
>> Now was the biggest issue the cutting portion that
severed your connection and made it unusable, or was it
the fact that soldering the traces was kind of
unreliable.
>> There were two big issues. One of them was actually
going out and cutting it an breaking apart, rewiring and
rerouting all the traces. And the second part was
actually to find a way to get the buttons actually on
the surface that you're using. Because they're all
[Inaudible] molded parts that form perfectly to the
shape of the controller. So getting that to apply,
moving it over to your new case, or even just mounting
them with the buttons being able to go up and down was a
little difficult.
>> All right. So we have all our tools, you had a
soldering iron, use the screw driver to take the case
off, and you also mentioned a Dremel tool and a hot glue
gun.
>> Yeah, a Dremel tool and a hot glue gun are just
really great tools for having around, if you're trying
to hack together a case. Because there's going to be a
lot of cutting on the case, a lot of glues, mending
things together. Hot glue is not a bad way to go if you
don't overdue it. It's perfect for putting the screen
on to this case, stuff like that.
>> I used to use hot glue to connect LEDs to my computer
because I was too lazy to affix it to the case in any
normal way. So just take a glob of glue and you glue it
in there [Inaudible] --
[ Multiple voices speaking ]
>> Something I'd produce.
[ Music ]
>> Time to thank one of the sponsors of the show.
Godaddy.com if you want to make an impact on line,
godaddy.com has what you need. Starting at less than $5
a month, web hosting from godaddy.com includes 99.9% up
time, 24/7 support, and free access to Go Daddy Hosting
Connection, the place to quickly install over 50 free
applications like Word Press, Juma, [Inaudible] OS
Commerce, and more. Godaddy.com makes it easy to
customize your own virtual dedicated server. Choose one
of three popular plans, or select your own Windows of
LINUX server with all the client options you need. Plus
enter code SNS 5, that's S-N-S-5 when you check out and
save an additional $10 off any order of $40 or more.
Some restrictions apply, see the site for details. Get
your piece of the Internet at godaddy.com. Support us
by supporting them.
[ Music ]
>> Now I noticed that you actually have the shell here,
Daniel, of the N 64 that you used.
>> See, we actually took it apart and set it all up to
make sure that it will work before we spent all the time
on this show taking it apart and making everything.
>> Now there was essentially -- you only had to unscrew
the bottom, right?
>> To get the case apart we had to unscrew the bottom
and there were a few more screws under the board. What
we did was -- there -- Nintendo has these crazy little
screws, they're actually just like a little round mound
with a bunch of little ridges around it. So what
[Inaudible] it's really hard to get into those things,
you actually have to go in there with pliers and
actually twist them around and try to get all the stuff
out. What works really well is if you get a Bic pen --
>> What do you do with this Bic pen?
>> The Bic pen, and you find the top [Inaudible] there,
just the tip where the ink is stored, and you pull that
out with pliers. So you pull that out, and then you can
actually use that tip and then just jamb it, and it just
unscrews.
>> So what you're telling me, you take a Bic pen, you
take out the actual pen portion of the pen, take the
casing, you do this, you stick it in and --
>> And you unscrew.
>> You unscrew?
>> Yeah.
>> Oh wow.
>> Or you can go and buy a $10 tool.
>> That's go MacGyver, dude. That's like the MacGyver
award right there. Now once you get this thing apart, I
mean, do you need any of the pieces left in here once
you take off the --
>> One piece you might want to keep is the heat sync
that's actually bolted on the board. And when you take
it off, it's pretty obvious what you need to unscrew to
get the parts off. There's some screws that actually
bolt onto the board itself, which have heat sync, and
that keeps everything cool, the processor and all the
memory and all that stuff. You can take that off, but
you want to make sure you replace it with something that
will transfer the heat pretty well when you make your
new case.
>> Do you just slap it into something, or what do you do
next.
>> Oh, well, you start -- you need to start conjoining
all the parts together. So after you get the Nintendo
apart, you want to do the same thing with the DVD player
and the PS1 screen.
>> So from the DVD player we get this fabulous dual
battery and controller --
>> Two Lithium cells there, with the -- with the control
board, with the charger and the balancing and all of
that stuff.
>> And all you did was literally unscrew the unit and
pull this out.
>> Yeah, it's more trying to get the case, like,
wiggling it out. It kind of snaps together with a
couple screws holding it together.
>> But you didn't have to desolder anything to get
connect --
[ Multiple voices speaking ]
>> You have to desolder one thing, which is the tip of
the connector. There's a big connector, that one up
there. That was actually a pad, so when you add the
replacement battery pack it actually would just snap in.
And this is -- as everything that's inside there.
[ Multiple voices speaking ]
>> So we took off the little connector and just put
wires on there instead of having little pads that were
string-loaded.
>> Ah, and so you actually soldered these two bits on
yourself. And this is so you have a separate switch
that you can actually remotely locate onto the case.
>> Exactly. And then using the charging port we just
hack together a little connector that would go into the
power supply that came with the DVD battery. So the
little guy that the cartridge goes into sticks out a
bit. And instead of -- you don't actually go in there
to -- if you look on the side, too, you see that there
is this two different sides, the bottom expansion port
which was on the [Inaudible] which I don't even need to
know what happened to that. And the front, which the
game actually goes into. And what's great, this came
apart, the front will actually pull right out.
>> So this portion --
>> You can go ahead and just pull it right out of there.
>> You can pull it out. I don't want to break it.
Broken enough things -- oh. That's nice.
>> It's got little pins, just pulls right out. And then
that's great for -- if you want to relocate that
cartridge itself somewhere else on the case, you can
just mount it with screws and then just solder a bunch
of wires going in, or find a plug.
>> So you're telling me you got to -- if you want to
mount this remotely --
[ Multiple voices speaking ]
>> You have to take -- you have to connect each pin back
to the pad on the board?
>> You have to do that. You can go in there and
actually solder all 51, which I did the first time on
the other board because we didn't have any connectors
for it. Or you can go on to Digitikey or some other
electronics or Radio Shack probably doesn't have them,
but just a plug that will actually -- has the right
pitch of the spacing of the pins, and the plug will go
on there and you will have ribbon cable going on.
>> So other than batteries, the other thing you had to
dissemble besides the Nintendo 64 and the DVD player was
the PS1 screen. Now the PS1 screen actually comes as a
screen. It has a little tab has it's supposed to mount
on the PSX.
>> Yes. It actually has little screws to screw onto the
PSX with little receptacles that go right in there, put
a few plugs in.
>> Pretty hard. Was it just basically unscrew a few
things and
[ Multiple voices speaking ]
>> There were a couple hidden screws. Under the speaker
covers there were a couple screws hidden under there, so
you actually needed to peel it back, it was actually a
little sticker. And little rubber grommets that you had
to take out pliers or a knife to get it out.
>> Now what are these wire leads that are coming out the
base of the screen.
>> Those are actually the wire leads that will be going
into the Nintendo 64.
>> Were those ones you put in there are were those --
[ Multiple voices speaking ]
>> We had to solder in there.
>> So how many -- [Inaudible] sodering power, video --
>> We're doing power, video, and audio.
>> Okay. So that was a total of how many -- five, six
--
>> There's six leads total.
>> Ow.
>> So there's four for the power, audio -- four leads
for the video, audio, and ground, and then power and
ground.
>> Now was there anything special in terms of -- because
I noticed it's kind of at an odd angle, so you actually
had to pull the screen off to solder down --
>> You had to take the case apart. What you can
actually do -- pull this top guy off. And this is the
actual insides of the screen. And then --
>> You take the screen, you take the bezel off the
screen off?
>> We don't take the bezel, we take this whole thing.
The bezel with the board. The board that has the driver
and all the power for it.
>> So you take it off the plastic case.
>> Take it off the plastic case, and you can see there's
the two little receptacles for little wires that would
actually go into the video in, the way the board was
actually made. Because we're not using all those, I
just soldered on the 30 tiny 30-gauge wire onto the
pads.
>> What's next?
>> After you wired in and you actually solder
everything, and then you solder it to here, just make
sure your connections are all straight. Especially with
this -- want to use this tiny wire here. It's more
important if you're doing it with actually soldering
onto the pads, because I had a lot of points where it
looks like it's soldered on but it actually just comes
off when you put everything together, and then you have
to --
>> Cold solder?
>> Yeah, yeah. So just make sure that everything's
connected well, and test everything.
>> You mentioned earlier we needed to connect this power
supply as one of the first things we did, to connect the
board and the battery.
>> Yes, to the battery, the board, and the screen. So
this power supply, once we hook this guy up, once you
get it all soldered up with the capacitor an the
resistor, and like I said there will be schematics on
there on how to do it and where everything is supposed
to be soldered, but plug in the battery to it and turn
the battery on if you have a switch, or plug in --
solder it straight onto the battery and make sure you're
getting 3.3 volts out of this system. Make sure it's
wired up as well, and test it out. Once you know that
you have 3.3 volts coming out of here you want to wire
the 3.3 volts into the board on the Nintendo 64 where
the power receptacle was. So where the little plug was
that the big power brick went into, you want to -- you
want to actually solder these on back.
>> So up in the corner --
>> Yeah, there's actually a -- markings on the back of
the board which will tell you these pads are 3.3 volts,
these ones are ground, this one is 12 volts. So wire up
the 3.3 volts coming out of the regulator to the board
where it says 3 .3 volts to go. And we'll put the
schematic up there so you can see exactly. Then the
battery needs to also plug into the Nintendo 64 with
just the 7.4 volts. Not with just the 3.3 volts. So
basically the battery has two lines going in to the
board. One going to the regulator to drop down the
voltage and one going in, giving it the higher 7.4
volts.
^M00:18:06
[ Music ]
^M00:18:08
>> We'd like to take a moment now for a short message
from the United States Air Force.
>> I'm Airman First Class John [Inaudible].
>> I'm an aerospace propulsion apprentice. What that
means is I'm a jet engine mechanic in the Air Force.
We're about to start the engine up. Pretty intense, a
lot of wind, a lot of noise.
[ Background noise ]
^M00:18:29
[ Music ]
^M00:18:31
>> Okay cool. So what is our next step, something about
a red light?
>> Yes. So once you hook up the power to everything you
want to make sure that the parts are actually getting
the power. So you -- since we're not going through all
the rest of the wiring now, we're at the point where
we're soldering on the video, so we won't know if
anything's actually turning on. But the way we'll do
that is we'll actually plug everything in and make sure
that your board and your screen are getting power, and
I'll correct myself actually, [Inaudible] on because
there's the red light on the Nintendo that will turn on
if the Nintendo is getting power.
>> So if this little thing goes up like Rudolph's noise
--
>> Exactly.
>> -- it should be an A-okay.
>> It should be an A-okay if you get the light on. Then
everything should be fine and you're not shorting
anything out.
>> Now that came with the system, that's not something
that --
[ Multiple voices speaking ]
>> That's just a little light that turns on when you
turn on the system. And then the screen actually has
buttons on there which are used for volume and
brightness, and even though you're not getting a video
feed, but if the screen itself is getting power you can
still use those buttons and a little graph will appear.
>> Oh, I see. Essentially you play around with these
buttons you can see the screen itself come up with the
low onscreen menu --
[ Multiple voices speaking ]
>> And then you know you've got juice into --
>> And then you know your power is set up fine through
the battery, the power regulator, the board, and the
screen. What I'm going to do here is set up power from
the battery going over to the regulator and the screen.
So that's where I was talking about earlier, how we're
going to take the battery and have three different pairs
of wires coming out of it. So let's see, here I'm going
to go -- [Inaudible] up the wires on the three -- three
pairs that we need here. I'm just going to go and
[Inaudible] them by putting some solder on there to make
it easier to solder everything else [Inaudible] held
together. [Inaudible] now the little 30-gauge wire,
it's going to be a little tricky to solder on there, so
what I do first is I go and I get some rosin or some
flux here, and actually just paste it onto the wires,
kind of do a little coat on there. And we'll go -- with
the soldering iron, and tend them a little bit.
>> Now the rosin will let you do -- the flux will let
you do what?
>> The flux, yes. It helps with the solder sticking
onto the wire. So it's great for a lot of the small
pads where you need more the solder to -- just doesn't
stick that well. So you just paste -- [Inaudible] paste
over some flux and then will be a -- make it a little
easier.
^M00:20:55
[ Music ]
^M00:21:03
>> Definitely a thing to be aware of, too, just while
you're putting together the case and everything else,
that if you're having all these open electronics without
the cases on them you're going to have a lot of open
leads, so you want to make sure that you cover all the
special leads, a lot of the power things just get
electrical tape and cover up the boards. Especially if
you're putting in a metal case like we are over here.
^M00:21:24
[ Music ]
^M00:21:41
>> Let's see, now that we have the wires all split up,
let's see, let's connect the power regulator to the --
to the Nintendo itself. Let's see, pads 4, 5, and 1 are
ground. And you'll see that when you take apart the
board.
>> So it's labelled -- it's silk-screened on to the
board.
>> Yeah, it's silk-screened on [Inaudible] -- yeah. 1,
3, 4, and 6 [Inaudible] are silk-screened. So the
bottom row is 1, 2, 3, and the top is 4, 5, and 6. So
1, 5 are ground. While 3 and 2 are the 3.2 volts which
is what you're feeding to the -- feeding to the power
regulator. And you actually don't need to go and fill
up both pins. If you'll see -- if you look on the board
you can actually see where -- where the two pins are
connected. So just the ones 2 and 3 are connected to
each one, so you only need solder to one of the pins out
of the 2 or 3 for the 3.3 volts. The same for the 12
volt line.
^M00:22:48
[ Music ]
^M00:22:55
>> All right, so now we have the power all wired up for
the system. And let's go ahead and try to see if this
will turn on. It's not turning on right now. Let's go
and check everything, make sure [Inaudible] is right.
So let's see, so pull up the [Inaudible] meter, and
because it's not working right now, we go ahead and
check for any voltage. So first we go to the battery
pack. And we are getting 8 volts off of that. So it's
actually fine. [Inaudible] there. Oh, another switch
installed. This is the final thing we had to do, put
the power switch [Inaudible] we actually took this off
which we didn't show earlier, but I took off this power
switch from the Nintendo board itself, and that's the
little slider that you have on the case to turn the
whole system on and off. So make sure you have that in
there, and that's turned on. And then you get your red
light, and it turns on. It's separate from the actual
power switch from the battery pack and the whole system.
>> So does that mean when you try to play this you have
to flip two switches to turn it on.
>> You can either do that -- the first reason why I took
this off was so we can just -- so I can put the pins --
put wires across the pins so it's permanently on. But
we didn't go ahead and do that, so just solder back on
the switch and now we have --
[ Multiple voices speaking ]
>> But you could potentially have basically just
soldered it constantly on?
>> Yes, yeah.
>> All right, so we have everything wired together, we
have power to the main board, we have power to the
screen.
>> That's right.
>> So what's left that we have to do.
>> Now it's a matter of turning it on. Since we got the
power set up on both sides we can just -- let's see, we
install our switch for the battery pack that's going to
the Nintendo and to the screen. And if we turn it on
we'll get that red light over here on the Nintendo. And
let's see, we'll just turn this around. You should be
able to see something going on your screen. You'll at
least see the back light go up, and what you can do is
-- you might not have the video feed set up yet but you
can actually just press the buttons and see the little
lower thirds, the brightness [Inaudible] and that will
tell you that you have the power on, the screen is
working the way it should be. Now after we took
everything apart we took out the game cartridge holder
which is this little receptacle that unplugs right out,
and we also take out, we took out the little expansion
card. And that's basically like the memory for the --
[ Multiple voices speaking ]
>> That was the N 64 expanded 2 -- or 4 mega [Inaudible]
--
[ Multiple voices speaking ]
>> This one is just basically a little card that just
replaces -- just a dead card. Doesn't do anything. But
just let's you know something is plugged in there. So
you want to make sure that you have that in. What that
normally comes in though is the case that we took it out
of. A little black case has heat sync on there. We
took it out to save space on our own system case.
>> Cool.
>> So make sure you plug this guy back in here.
>> All right.
>> And we'll plug the little cartridge receptacle
receiver in here.
>> Nice, nice.
>> And then we'll grab a game and this is my favorite
game, [Inaudible] first what we do is plug in the
controller.
>> Ah.
>> So we took these little guys off. We're going solder
these guys back on, and you can just --
>> Solder it to this -- back on the board --
[ Multiple voices speaking ]
>> So we took these off, and because we're going to
relocate these somewhere else, just solder on three
wires on to there and you can --
>> And these are any three wires, but just color coded
them for power, ground --
>> Power, ground, signal. Yeah. And you actually don't
even need to use that receptacle. If you're going build
your controller into your case or something like that
you can actually just get the three pins coming out of
the controller that would normally plug into this guy,
take off the connector, and just solder those three pins
right onto the board itself.
>> Now for the second controller, is it the --
[ Multiple voices speaking ]
>> Is it on the opposite end or is it right next to it.
>> It's on the same end, right next to it. There's
actually -- let's see. There's six, eight, there's
actually eight solder points, but two of them are
actually only to hold the little plastic [Inaudible]
little metal case that goes around what the solder is
in. So you don't have to worry about that. You only
have to worry about the six cables that these pins would
fit into, and it's pretty obvious, you'll see where they
go.
>> Nice.
>> And so let's see, we have this plugged in. We have
our controller right here. So I just want to plug this
in there.
>> Oh.
>> [Inaudible] game.
>> So exciting. Having actually never owned an N 64 in
my life.
>> That is a problem, Roger.
>> Well, maybe.
>> All right, so -- let's see if we power it on. And we
get it all --
>> Oh.
>> So there we are.
>> So let's point that up to the -- [Inaudible] screen
there. Get it on.
>> So you see the game is loading up all fine, and
[Inaudible] --
[ Multiple voices speaking ]
>> If I can do anything. Oops. I think it's working, I
think it's working.
>> It's working.
>> You played this when you were six?
>> Yeah. [Inaudible] press a Z. This little bird comes
out of your back pack. [Inaudible] --
>> Oh, I see. Oh nice. [Inaudible] how long will this
last on these batteries?
>> With this system -- the set up of these batteries on
the DVD player it will actually last [Inaudible] --
pause --
>> But yeah, so like if you were playing this, how long
would you be able to get out of this entire unit?
>> You can get around two hours off a battery pack,
because the system itself draws a bit of current, the
LCD doesn't draw much current at all. But with these
battery packs they're somewhere around 2,000 milliamps
each, I believe. I'm not sure about that, so don't
quote me. But with a DVD player, they last around two
hours, and some other people use these on Nintendo 64
systems with the PS1 screen and they got about two hours
out of it.
>> Okay, cool. So the rest of it is literally sliding
it into the case.
>> Yeah, just sliding it in, rearranging it, and we'll
do that real quick so you can see what the finished unit
looks like.
>> Nice.
>> But now that we tested it all outside the case, this
is which is what you kind of want to do. Just make sure
it all works before you tie it all up, screw it in, glue
everything down, because then having to rework stuff is
a real pain.
>> Which is interesting, we actually did have an issue
with the screen earlier, and originally we thought we
fried the driver board. But it turns out it was just a
fuse. But the fuse is actually a surface-mounted
component, right?
>> Yeah, yeah. So what happened is we somehow -- we
shorted out something that was going into the screen.
We shorted something out there and it blew the fuse.
And it's this tiny 402 size service mount part which is
-- you can only read under a microscope, you have to use
tweezers to solder it on. What I did was just got a
ball of solder, went over there, and then just heated up
both sides of the fuse, took it off, and then put a
little wiring in between it and just fill it up with
solder. So we don't have the production of the fuse on
the screen. So if we do short it out again, something
bad could happen and we could mess up the actual
components. But after we blew a fuse we were able to
get it going again by just replacing that.
>> Let's try popping this and see how well it packages
into the case.
>> All right. Let's do it.
^M00:29:50
[ Music ]
^M00:29:58
>> All right, so now we have the board in there. We
want to plug these guys in, because both the game
receiver and the little memory card comes right out. In
our case we don't have enough space to completely
enclose them, so we had to drill these little holes and
auger out the material to get it to fit in.
>> So all told, you've spent -- actually we collectively
spent about, what, 200?
>> Yeah. It was --
>> Less than 200, because the flat screen was about 50,
60 bucks, and the DVD player was about 40, 50 bucks.
>> Yeah, somewhere around there. And then the Nintendo
system was -- we get it on line for about 15 bucks or
so.
>> Yeah.
>> And yeah, so it's all pretty cheap. And because the
Nintendo is a pretty old system you probably have it
around your own place or a friend --
>> You can get it real cheap.
>> Yeah, you can get it real cheap. All right, now we
got these guys plugged in. We have [Inaudible] and as
you can see, we have our switch -- or a charging port.
Which -- the charging port was actually just we took the
power supply that was used for the DVD player and we
just put the two connectors that were off -- this is
actually off the screen for the Sony screen. But you
can actually take off the connectors from the -- from
the DVD player, and you have a matching receptacle. And
then all you have to do is plug them in, and it will
[Inaudible] the whole system, which is nice. So you
don't have to carry this around with you, though,
because it has a battery pack and you can run it all by
itself. So let's just tuck some of these wires in here.
>> Well, packaging, I mean, once you get it this far
it's just a small matter of figuring out additional
packaging design considerations.
>> Yeah, it's all about just doing an elegant job at
wiring everything together. You want to make sure that
everything is soldered together really well, nothing's
going to come off, and that all of your wiring is really
nice and neat. In our case, it's not all nice and neat,
it worked for now, but making a case you want to make --
[ Multiple voices speaking ]
>> Probably pop -- if we were to do this, probably pop
this as a maybe make an end cap for both ends, maybe
drill --
[ Multiple voices speaking ]
>> There's some really cases that people have made where
they have C and C wooden [Inaudible] and they
vacuum-formed sheets to go over it, and they have all
the control ports on the side.
>> And it's conceivable to take this actually out of
this bezel and mount it directly on.
>> Oh yeah, you can definitely take this off of the case
itself. And you just need to relocate the buttons
somehow or have some access to the buttons. In our
case, we just glued the screen right on there.
>> See if it turns on.
>> All right, let's see.
>> There it goes.
>> So we have our whole Nintendo 64 unit in the --
[ Multiple voices speaking ]
>> Let's just show them, there's no wires everywhere
except for the controller.
>> Exactly. The battery is all in there, and it's
running just fine.
>> That is so cool. Awesome. That is awesome work,
dude.
>> Thank you.
>> Not only does he build segues he [Inaudible] N 64s.
[ Music ]
>> It's time now for our Netflix sponsored movie pick of
the week. This week, the Wizard. This kid-friendly
flick centers around three run away children as they
travel to California so that the youngest, afflicted
with a mental disorder that makes him emotionally
withdrawn, can compete in the Nintendo world video game
championships, featuring child stars Fred savage, Luke
Edwards, and Jenny Lewis, who now fronts several Indie
bands. The wizard is a fascinating take on Nintendo's
almost omnipotent reign during the '80s and early '90s.
And don't forget to check out the other 89,999 titles
Netflix has to offer, including Blu-Ray. You're bound
to find any title you're looking for. Plus with 40
shipping centers, almost all deliveries happen in just
one business day. And shipping both ways is free. Plus
if you're an Xbox Gold viewer, you can receive Netflix
on your Xbox 360. That's right, no discs or mailbox
required. Your movie is instantly streamed over your
broad band connection straight to your Xbox 360. Plans
start at $4.99, but as a system viewer you can get a
free trial by signing up today at
www.netflix.com/system.
^M00:34:02
[ Music ]
^M00:34:04
>> All right Danny, I think we're pretty much done. Any
final words, any words of caution for people?
>> Yeah, one thing that you would definitely want to
consider is if you're carrying around this Nintendo 64
unit you could take the video out cable and the audio
out cable that we plugged right into the screen, those
three wires, it's the red -- right, left, and then the
video, and you can make those into a -- you can solder
on little connectors, RCA connectors, and actually plug
that into a computer screen.
>> So standard R C jack --
[ Multiple voices speaking ]
>> And then you can plug them straight into a TV.
>> Yeah. Exactly. So you can carry around an entire
system and have it run off batteries, or bring the
charger with you and just plug in the charger. And then
--
>> Still be able to play --
>> Still be able to play it, and play it off the TV.
And then you can have a whole Nintendo 64 unit that you
can play on the train or in the car, and just stop at
your friend's house and plug it in.
>> Wow, that's pretty sweet. Awesome. All right. If
you have any ideas, suggests, or comments about this
project, or any previous project, please e-mail us,
system@revision3.com, and don't forget to visit the form
set at revision3.com/forms. And if you want to catch up
on old episodes you can visit our archives at
revision3.com/system. That's it for this show, I'm
Roger change --
>> And I'm Danny Racubba [Assumed spelling].
>> Till next week, this has been System.
^M00:35:17
[ Music ]