[MUSIC]
Cleaning your house can be pretty boring, basically because it eats into your photography time.
So I'm going to show you a way to combine both cleaning and photography.
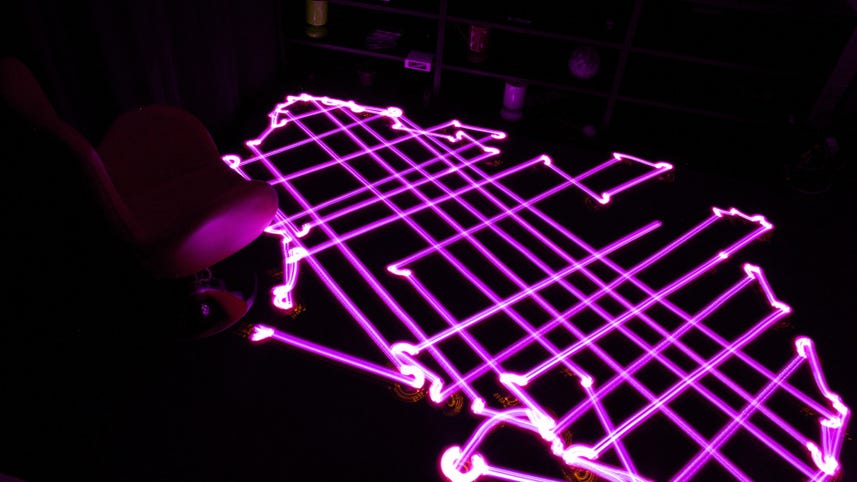
We're going to be doing light painting with robot vacuum cleaners.
So for this, obviously, you'll need a robot vacuum cleaner.
We're using a Samsung Navibot because it's got some LED lights on the top, but any other robot vacuum cleaner you have access to should be fine.
A DSLR and a wide angled lens.
For this tutorial, I'm using a 24 millimeter lens, but you can also use the kit 18-55 millimeter lesson that came with your DSLR.
Just use it around the 18-25 milimeter mark.
You'll also need a remote shutter release.
This is because you'll be shooting in bulb mode, and you're going to need to release the shutter remotely.
Finally, you'll need a tripod or something steady to keep your camera on while it's taking photos over the course of a couple of minutes.
Next step is to set up your DSLR.
Put it on the tripod and find Bulb mode.
On some cameras, this is found in your manual exposure mode.
Keep flicking.
The shutter speed dial until you find the B. On other cameras there's a specific mode dial that is denoted by B.
Find this and turn it on.
Then you'll set your aperture.
You probably want to set something between F8 and F11 to get started with.
You want it reasonably narrow so you're not letting in too much extra light.
Just getting the light from the robot vacuum cleaner.
Then, your shutter speed is obviously determined by your shutter release.
Now, for this particular how-to, you're gonna be using a shutter release where you can lock the shutter button down using the remote.
Now it's time to turn off the lights and start taking photos.
There's no particular best time to leave your shutter.
Try an experiment around 2 to 3 minutes to get started and see what kind light trails your cleaner is leaving.
If you're finding that you're not seeing enough of the light trails, you might want to open up your aperture.
So move it down to something like f 5.6 or even lower, if your lens will let you.
Now we've played around with some of the effects that are given from using the built-in LED lights on the robot vacuum cleaner.
We can get a bit more creative.
Think about buying a battery-powered LED.
Now this is a little bit stronger, and you can attach it to the top of your robot vacuum cleaner and let it go.
And, finally, if you want to get.
Super creative and you've got access to two or more robot vacuum cleaners.
Think about putting them both on the floor at the same time, letting them go, and you can even do some cool experiments like putting colored cellophane on top of the light to give different colored light effects.
So this is saying how to do light painting effects with a robot vacuum cleaner.
Hopefully you've had fun.
Made you think.
A bit more about the tools you can use for light painting, I'm Alexi Sabin for CNET make sure to check out the full text of this tutorial over at the website.
[MUSIC]