What's up, everybody?
This is Antuan Goodwin, Associate Editor of Car Tech here at CNET and today we're taking a look at the Garmin HUD, a little device that's supposed to make navigating your car a little bit safer.
Now HUD stands for Head-Up Display and you'll actually mount this little LED display on your dashboard so that it'll project those turn-by-turn directions right up into your line of sight where you can see them without looking away from the road.
In the box you'll actually get a plastic reflector shield
and a reflective film that you can choose from to reflect these directions off of so they kind of look like little holograms floating in front of you.
Now this is the reflective plastic lens and it actually with a little bit of difficulty snaps on, and when you view the directions through the shield you can actually see the directions right side up and floating sort of in mid-air right before your eyes.
Now the way the Garmin would actually like you to experience the HUD is through this transparent plastic film that they included in the box
that you'll actually attach to your windshield to project those turn-by-turn directions upon.
Now they only put one of these in the box and it's a little tricky to install so you're gonna have to get it right the first time.
You first gonna wanna figure out where on the windshield you want it to be.
The next thing you're going to do is wet the windshield down really good so that we can move it around a little bit as we install.
The next step is actually peel off the backing that's marked with a white flag, just kind of peel that off and then start applying the HUD to your windshield.
Now when the
windshield is wet, you still get a little bit of leeway in repositioning it.
So here's your time to kind of figure out where exactly you want it to be.
Once you got it lined up, you're gonna wanna take a credit card or something and actually sort of squeegee all the bubbles out from under it so that it's perfectly flat to the windshield.
And then the last step is just grab the green tab and pull off the front protective film.
Now the last fit is actually the easiest part, just peel off the protective backing to expose the sticky back panel on the HUD and then you take it
and actually just put it on your dashboard so that the numbers reflect up through the thing.
Now the HUD's base actually has a little bit of swivel and a little bit of twist to give you some flexibility to mounting.
This flexible pad also bends a little bit to better contour around your dashboard so that it'll actually help you get it good and secure so that it doesn't go flying if you actually have to make a quick turn.
Now on the unit itself you've actually got a power cable right here that plugs into the
12-volt adaptor.
That adaptor has a built-in USB port on the back of it so you can keep your smartphone charged while you navigate.
Over on the other side you've got a small power button which you probably won't have to worry about that much because when your vehicle turns on and off when it's plugged into your cigarette lighter, the HUD should actually turn on and off with it, so generally speaking you don't really have to flex with this much after you've got it set up.
Now on the front you've got a photo sill right here that's gonna measure the amount of ambient light so that the display doesn't get blown out during the day time but it
doesn't dazzle you during the night.
It'll automatically adjust its brightness as needed.
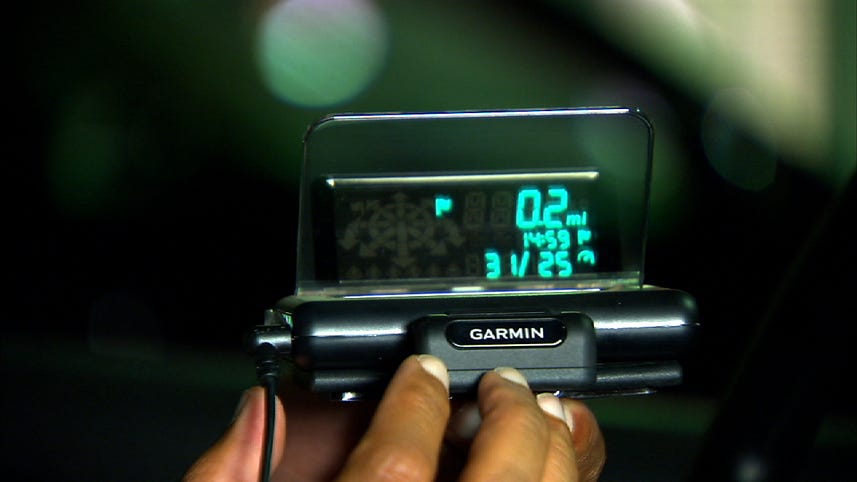
Now what sort of information will you see?
You'll actually see an arrow that will show you where you need to go and what direction your upcoming turn is.
It's a pretty complex arrow.
Beneath it, you'll see lane guidance information that will show you what lane is valid for the route that you've chosen so you don't have to worry about very quickly jumping across 4 lanes.
You'll already know where you need to be on the road.
For the next column we've got the number of feet or miles to the
upcoming turn as well as your time for reaching your destination.
Below that you've got the current speed limit and your actual speed right there.
Now if you run into traffic or there's red light cameras, you'll actually get a little red LED right here that will show you to expect those things.
Now while all of this is going on, the Navigon or Garmin StreetPilot app is gonna be running on your smartphone giving you the turn-by-turn directions, it's applying them to the Garmin HUD.
The verbal part of those turn-by-turn corrections will either come out of your smartphone
or if you're paired to your car stereo via Bluetooth or an auxiliary cable through your car speakers so you can kind of get it both ways here.
Now the Garmin HUD has an MSRP of $149.99 and the Garmin StreetPilot or Navigon app that you're gonna need to actually run it is gonna run you an extra 50 bucks so that's about $200 to get going with this Head-Up Display navigation.
At that price, this is a bit more gee whiz than it actually is useful but in my opinion any increase in safety no matter how small is a good one.
I've been
Antuan Goodwin with CNET.com and we've been taking a look at the Garmin Head-Up Display or the HUD.