-Wireless charging is making its way into the market, but it's still not on some of the most popular phones like the Samsung Galaxy S3, but with a little bit of hacking, I was able to take the parts from the old retired Palm Pixi wireless charging kit and make it work with the Samsung Galaxy S3.
What's great about the palm Pixi case is that
when attached to the phone all you have to is place it on touch stone is will start charging the phone.
So, what we're gonna do is take those wireless charging parts out of this case, put them in the S3, so when we're done, you'll be able to put this phone on the Touchstone and the phone will charge.
Here's what you'll need to get started.
You'll the Palm Touchstone charger, the Palm Pixi wireless charging case, some copper tape,
Scotch tape, sticky notes, and some sort of flat tool to pry off the parts from the case.
So the first thing we have to do is remove the parts from this Pixi case and to do that we'll remove the black lining.
We should be able to do that with you finger.
All right set that aside, you might want it later and as you can see all of those wireless charging components are exposed.
Before you remove anything though, grab a small piece of paper
and plot where the components are to make a little template including the little metal disc.
You will refer to it again in a bit.
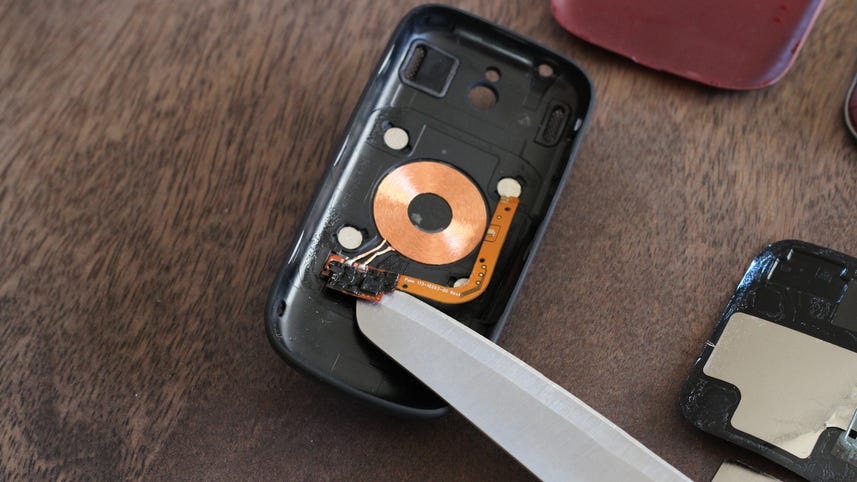
Grab a small knife and carefully remove the circuit board, then the silver adhesive, and finally, the coper coil.
These are the parts that all you phone's battery to receive a wireless charge.
Finally, remove the metal disc.
It might take a little extra muscle for this part.
At this point, I've turned apart the palm Pixi case, which is not even more useless than already was, and now my task is to take these components and put them in the back plate of my Samsung Galaxy S3.
So, let's do it.
Grab the coil and place it upside down onto the inside of the back plate, so that the black part of the circuit board is facing down.
Make sure the whole thing is positioned about half inch from the bottom edge of the cover.
Now, bend the L shape circuit board up,
This put it in a position that allows it to make contact with your phones battery replacing metallic adhesive over the coil using tape if it doesn't adhere anymore.
Then, using the template you made in the first step, place the metal disc so that they're positioned around that coil.
This will keep your phone attached to the Touchstone.
Once everything is positioned, tape it down with some Scotch tape.
The final step is to bridge these parts
in your back plate with your phone's battery.
That's where the copper tape comes in.
You'll need 4 strips for this last step.
On this circuit board, you'll see 2 power terminals.
Take one piece of tape and fold over one end, then take that end and place it directly over one of the power terminals.
Hold it in place and stick the tape down so that it reaches the end of the back plate.
Go ahead and rip off any excess tape if you need to.
Then repeat the same process for the second terminal.
Now, on your phone, take another piece of tape fold over one end and place it over the batter terminal using a pen to shove it in to make sure there is good contact with the terminal.
Then go ahead and stick it down onto the back of your phone.
Go ahead and repeat the same process for the second terminal.
All right, we've done all of the heavy lifting and now some moment to see if this thing actually works.
So, to do that, I'm going to place the back plate on the Touchstone, and I'll grab this digital multi meter and place it on the power terminals here, and what I should get is at least 5.5 reading and we know it works because I'm getting 5.6.
So, now we verified that this set up is sound let's put this together and see that whole contraption works.
If you want to at this point, you can put this black lining back on your back plate or use some sort of other cover to clean this look up, but I'm gonna leave it away it is.
So, I'll assemble this too, and actually the wireless charging parts are to thin that your back plate should be able to close as usual.
All right, now, is the moment of truth.
Let's see if this works and it does because I'm getting an actual notification letting me know that wireless charging is enabled because that software is actually built into the phone even though Samsung never released the solution of its own, but now your DIY wireless charging hack is working and even though it won't charge as fast as if you plug in to the wall, what you're losing speed, you do the inconvenience and awesomeness.
If you have any questions along the way, hit me up on Twitter, and check out my blog with the step by step instructions and photos on how to complete this project and thank you to the XDA Developers Forums for this hack.
For CNET.com, I'm Sharon Vaknin.