How to replace a broken screen on your iPhone
Cracking your iPhone's front glass or the display might not stop it from working, but it can make it difficult and unsafe to use. Here's a step-by-step guide to fixing a broken front panel on your iPhone 4 or iPhone 4S.
Crack the front panel on your iPhone and you have three choices: live with it, buy a new one, or get it fixed.
If you have AppleCare+ or another warranty that covers accidental damage, the choice is easy. Get your phone fixed or replaced under the warranty. If your iPhone isn't under warranty, you don't want to buy a new one, and you're ready to tackle a challenging, but satisfying, do-it-yourself fix, here's a guide for replacing the entire display assembly.
Should you try this fix?
Before you jump into this DIY project, I suggest you watch my video on what to know before trying to fix a smartphone or tablet. It will help you decide if you should repair the phone yourself or take it to a shop.
Lastly, understand that if you follow the instructions in this video, you do so at your own risk. Neither CNET nor any of its representatives can be held responsible for injury, damage, or loss of data.
Getting replacement parts and tools
If you decide to tackle this fix, you'll need to get the necessary replacement parts and tools. As the iPhone's front panel and LCD are fused together, I suggest buying both as a single unit. You'll find them for between $70 and $120 online. Just be sure that you buy the right one for your phone.

As for tools, you'll need a few thin metal blades, a plastic spudger or case-opening tool, tweezers, a Phillips #000 screwdriver, a tiny flat-head screwdriver, and a special pentalobe screwdriver, which you'll use to remove the phone's tamper-resistant outer-case screws. Again, you can pick these up online if you don't have them.
Also, I'll be replacing the panel on an AT&T iPhone 4, but you can use same basic steps on an iPhone 4 from another carrier, and on an iPhone 4S. You may encounter differences, however, such as the location and type of vibration motor and the position of the motherboard screws.
1. Back up your data
The first step is to back up all the iPhone's data using iCloud or iTunes, just in case something goes wrong. You'll also need to eject the SIM card using the eject tool or a paper clip.
2. Remove the back cover
With those tasks complete, you can open the iPhone by removing the two screws located on the bottom edge. As noted above, you'll need a special pentalobe screwdriver for this task.

Then, slide the back cover upward and lift it off.

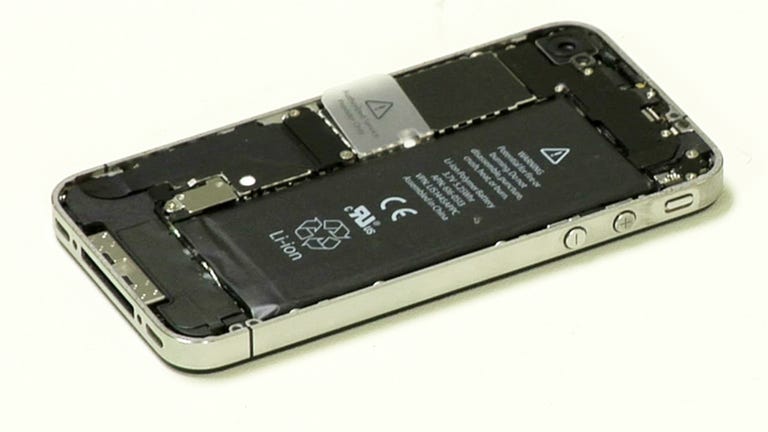
3. Remove the internal hardware
Before installing the new display assembly, you'll need to remove most of the iPhone's internal hardware, starting with the battery.

Remove the battery connector screw and disconnect the connector from the motherboard. Carefully remove the tiny pressure contact located under the connector, noting its location and position for reassembly.
Pull up on the battery's plastic pull tab, and it should come loose from the frame.
Next, remove the metal shields that cover the upper portion of the motherboard and the docking connector cable. As you remove each screw, note its location. The screws are different lengths and will need to go back into their original positions.
Now, disconnect and remove the rear camera and then detach all the cables along the top and side of the motherboard. You'll need to gently pry the docking connector cable away from the metal shield underneath.

Remove the hidden motherboard screw located under the round white sticker near the battery pull tab, the screw under the docking connector cable at the bottom, and the metal standoff from the top near the headphone jack. Then remove the motherboard, lifting up from the bottom.

Lastly, remove the speaker enclosure and vibration motor. (Note: The location of the vibration motor will vary depending on the phone's model and carrier.)
4. Remove the broken display assembly
Finally, we can turn our attention to the broken display assembly. It's held to the metal frame with 10 screws: 3 each along the two sides and 1 in each corner. You'll need to remove them all, keeping track of the washers under the 6 side screws.

Once the screws are removed, carefully insert a thin metal or plastic tool between the metal frame and front glass panel along either the top or bottom edge and gently pry the panel loose. (Note: Do not insert the tool too far or you may damage the phone's other internal components. And if the glass panel is cracked, take care not to injure yourself during the removal process.)

As you pull the panel away from the phone, you'll need to thread the two attached cables through the metal frame.

5. Install the new display assembly
First, remove the plastic film from the back of the display, if it has one. Then carefully thread the display cables back through the frame, making sure not to crimp them in the process.
Gently press the panel onto the frame and secure it with the appropriate screws and washers.

6. Reassemble the iPhone
To reassemble the phone, work your way back through the previous steps. Start with the vibration motor, then install the speaker assembly, motherboard, rear camera, motherboard shields, battery, and finally the back cover.
As you work through the process, be careful not to damage any of the small metal contacts on the cable connectors, speaker assembly, or battery connector pressure contact.
As do-it-yourself fixes go, this one isn't too tough. It does, however, take patience and attention to detail.
For more teardown photos of the iPhone, iPad, and other tech, check out my Cracking Open blog on TechRepublic.