Five handy tips for working with photos in Lightroom 4
Get more out of Lightroom with some tweaks to help speed up your workflow, and do more with photos.


Customise your workspace
Get more out of Lightroom with some tweaks to help speed up your workflow, and do more with photos.
These tips come courtesy of Julieanne Kost and Russell Brown, both evangelists for Adobe imaging software and part of the Photoshop Masters Eclipse tour.
For more tips and tricks from the masters, take a look through the extensive tutorials available at Kost's and Brown's blogs.
Lightroom 4 has an intuitive workspace, but, depending on your screen size, it can become a bit cramped, with lots of panels open — especially when you are in the Develop module and are trying to make adjustments using the panels on the right-hand side.
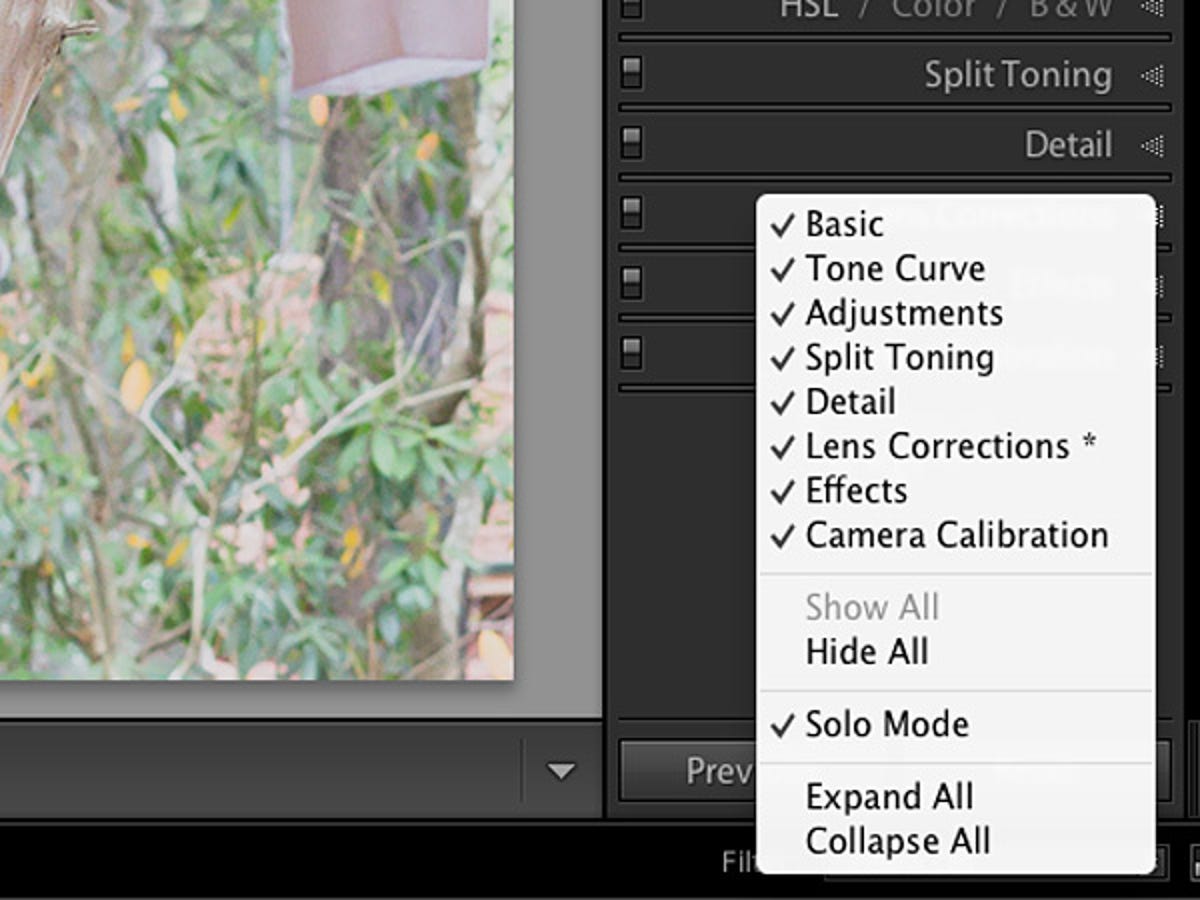
To make it easier to find each panel and just look at one at a time when changing settings, right-click anywhere on the eight panels (Basic, Tone Curve, HSL/Colour/Black-and-white and so on) and click "Solo mode". This will make Lightroom only display one panel at a time when you are making adjustments, so you don't need to continuously scroll down the column to find a particular value. It's very useful for smaller screens, like on a laptop.
Want to open more than one panel at a time, but still keep Solo mode active so that everything else stays closed? Hold down the Shift key while clicking on the drop-down box.
Kost also suggests that you change Lightroom 4's default background colour to a lighter grey, as it is better for making adjustments to the image. She said that there is less tendency to overexpose your image with adjustments when there is a lighter background, and it will give more accurate results when printing.
You can also automatically show or hide the left-hand side panel that houses the Navigator, History, Presets and more by right-clicking on its border to the left and selecting the appropriate option from the menu.
Reset everything!
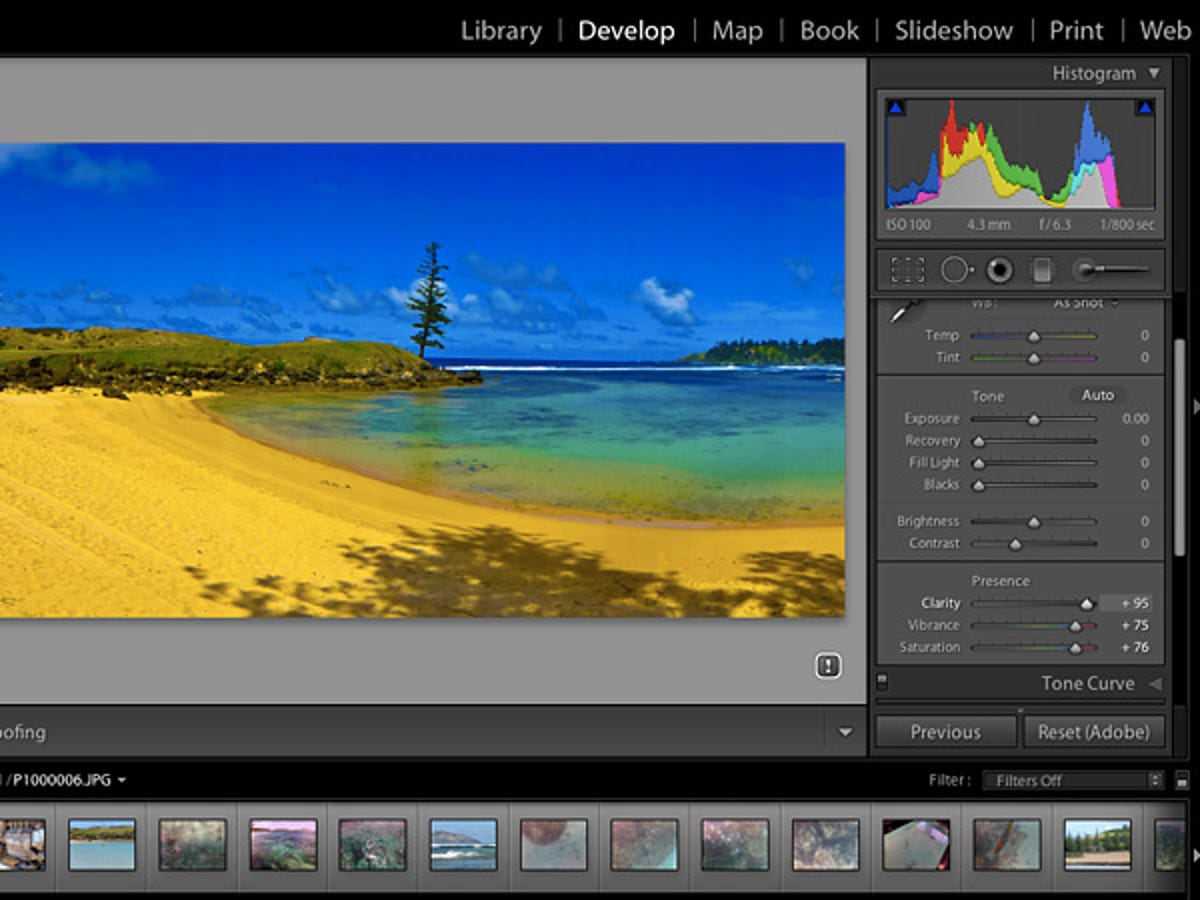
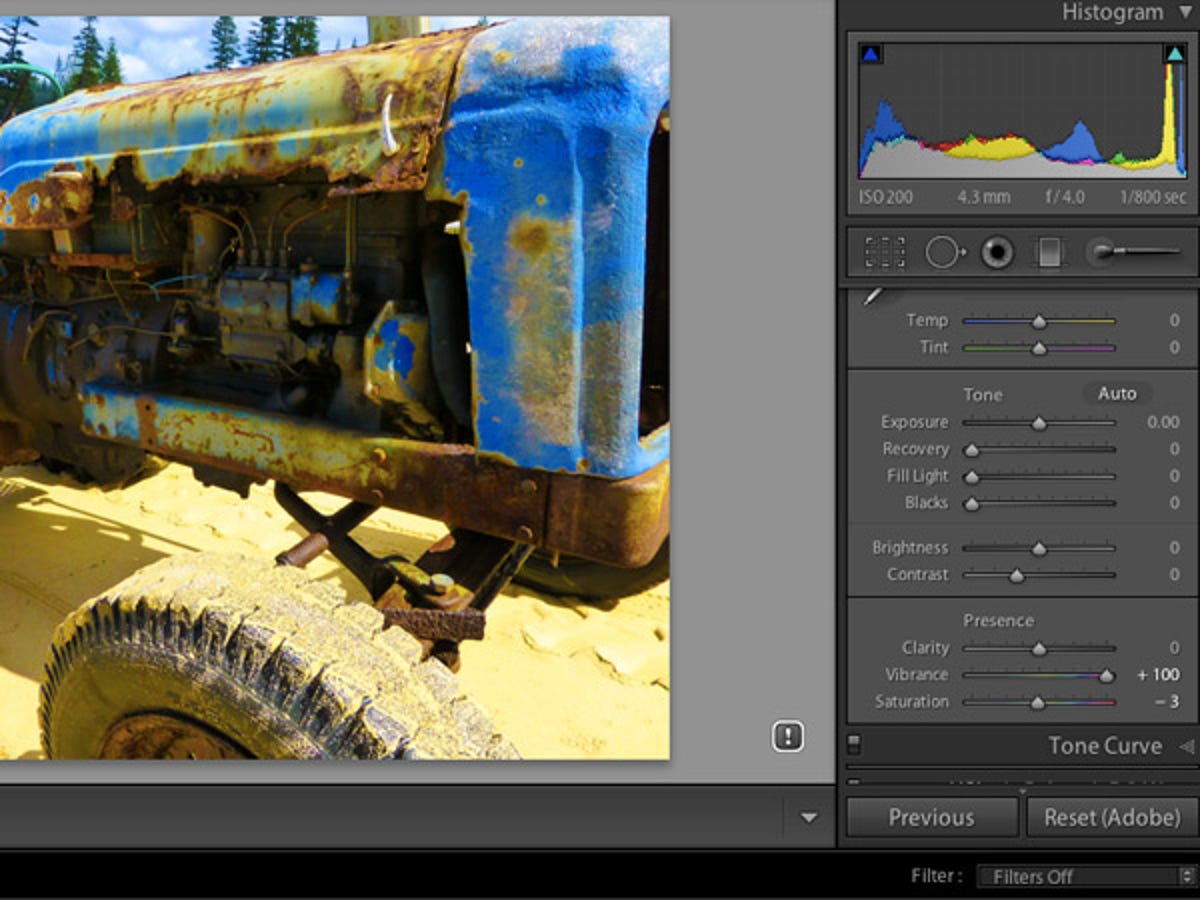
Gone a bit too far with your Clarity slider? Perhaps you've made a particularly bad combination of the Saturation and Sharpening tools. To reset each individually, you could drag the slider all the way to the centre, or you can just double-click the name of each value to reset them. Alternatively, if you want to reset all the changes in a particular group of sliders, double-click the name of the grouping. For example, in the Split Toning panel, double-clicking Highlights will reset Hue and Saturation simultaneously.
In the example above, which is a little too extreme on the saturation, reset all the sliders by double-clicking on the Presence title.
Lens corrections
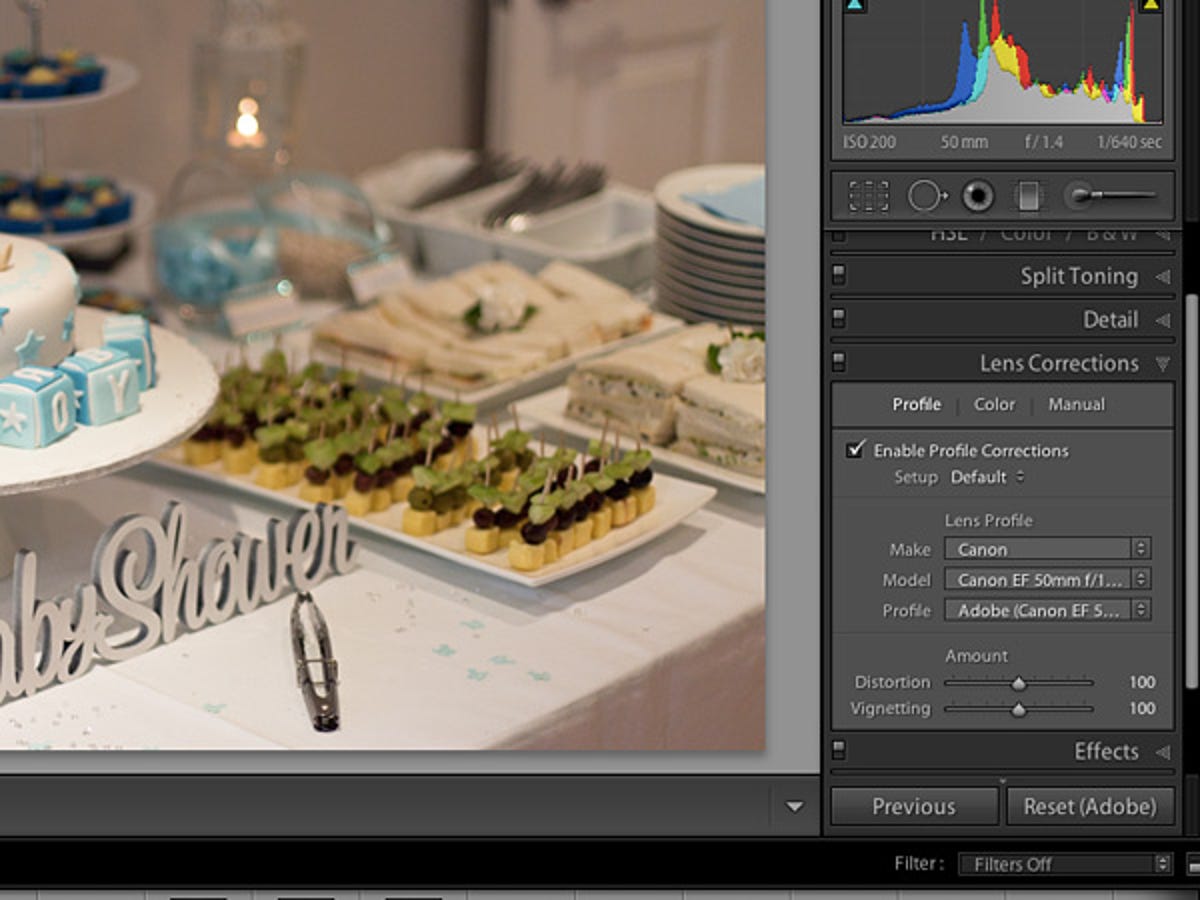
There's no need to go into Photoshop to correct distortions and problems caused by certain lenses — Lightroom can do it all, too. The Lens Corrections panel has a range of tweaks provided, but Kost suggests resetting everything before making any adjustments. This is so you can enable profile correction any time you import an image. It's a little toggle box in the Lens Corrections panel.
Lightroom will automatically read the metadata from images to determine the make and model of your lens and camera, as well as the correct profile to use. Lightroom may also correct for vignetting when an image is imported, but, depending on your preferences, you can drag the slider to the left to leave the vignetting as captured.
Lens correction will be most noticeable on images taken on wide-angle or fish-eye lenses, as it helps correct distortion. Under the Manual tab in the Lens Correction panel, there are also adjustments for fixing perspective, if necessary. If your perspective adjustments make the image take up less space on the canvas (that is, corrected so there's grey-space areas around the edges), you can click "Constrain Crop", which will automatically crop in to take away these areas. Kost suggests that when you are shooting wide-angle images that you know will require some distortion correction, shoot a little wider again to help compensate for the possibility of lost edges when using this tool.
Is your choice of lens missing from Lightroom's existing presets? The Lens Profile Creator is available for a free download, and it lets you create custom lens and camera profiles in Photoshop CS6 and Lightroom 4. The software prompts you to capture a range of checkerboard images, and then convert and import them to create a profile. These can then be output so that other users can access them, which is particularly useful if you have an uncommon lens-and-camera combination — someone else might have done all the hard work for you.
Learn to love keyboard shortcuts
There are a few shortcuts that will make working with Lightroom in the Develop module so much quicker:
Tab key: hides both the left- and right-hand side panels to show the image
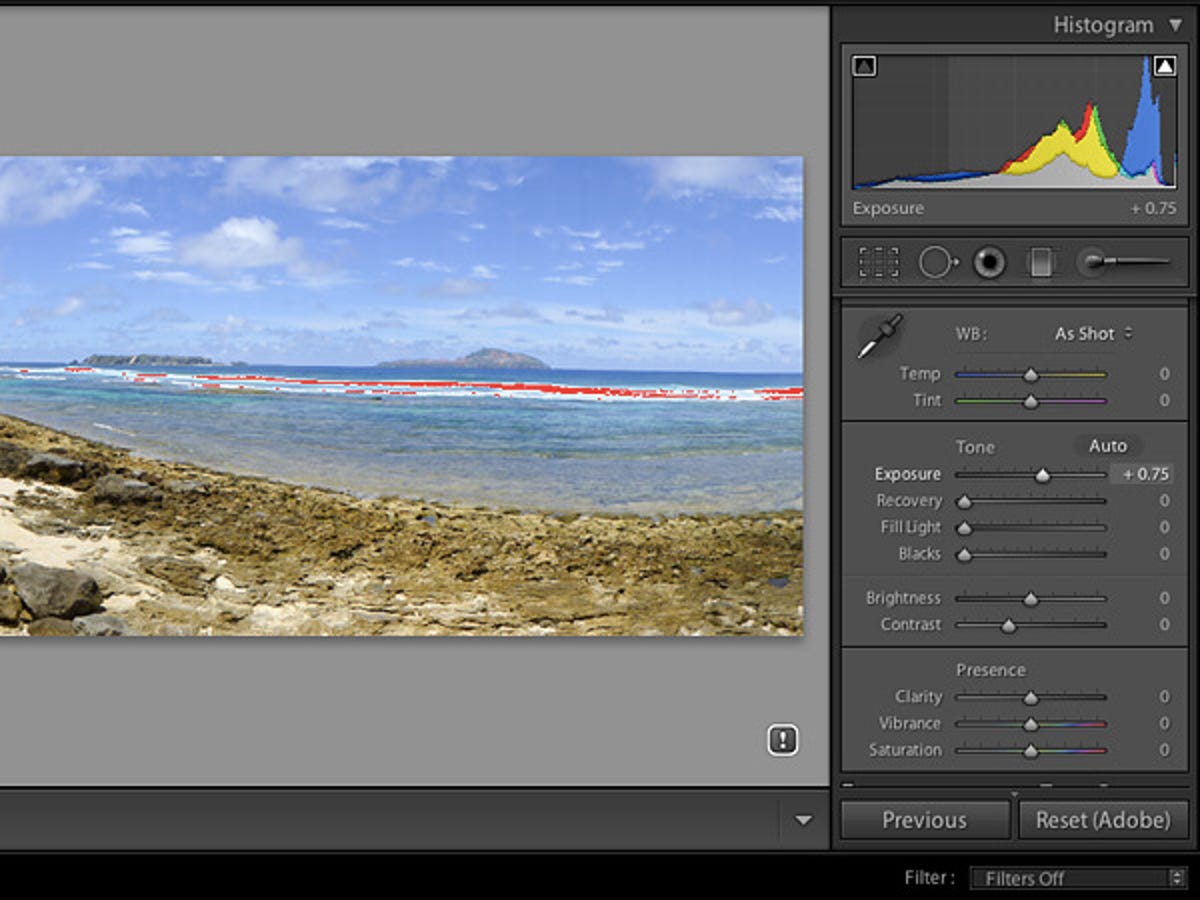
J key: turns on and off the clipping sliders. In conjunction with the histogram, it will show you where there have been any clipped highlights (or pure-white points) in the image by highlighting them all in red. The same goes for any lost highlights (or pure black) that will be displayed in blue. The image above shows clipped highlights displayed in red
X key: when you select the crop tool, tapping X will swap between portrait and landscape orientation for the crop boundary
Ctrl + E or Command + E: send the image for editing in Photoshop
Period (.) or comma (,) keys: cycle forwards and backwards through settings in the Basic panel
(Ctrl or Command + =) or (Ctrl or Command + -): zoom in and out of the image.
A full list of keyboard shortcuts can be found on Adobe's website.
Tweaking the sliders
There are so many sliders in the Develop module that it's easy to get confused. Assuming that you are comfortable with what the Exposure and Contrast sliders can do, move on to the Vibrance slider. This helps increase or decrease the intensity of certain colours in your image, though it is a relative slider, so it doesn't boost levels to the same extent as the Saturation slider. Kost suggests using the Vibrance slider for portraiture, as it adds colour to sky or grass, and avoids adding vibrancy to skin tones.
The Clarity slider looks at edges in the image and brightens and darkens aspects of the photo to sharpen contrast in the mid-tones. This is good at giving the impression of sharpness to an image.
Also, don't forget the History panel on the left-hand side of Lightroom. It gives you a complete list of all the (non-destructive) changes that you have made to an image, and lets you inspect the state of each if you need to revert to previous stages.
More Galleries

My Favorite Shots From the Galaxy S24 Ultra's Camera
20 Photos
Honor's Magic V2 Foldable Is Lighter Than Samsung's Galaxy S24 Ultra
10 Photos
The Samsung Galaxy S24 and S24 Plus Looks Sweet in Aluminum
23 Photos
Samsung's Galaxy S24 Ultra Now Has a Titanium Design
23 Photos
I Took 600+ Photos With the iPhone 15 Pro and Pro Max. Look at My Favorites
34 Photos
