How to clean and speed up Mac OS X Mavericks
Boost your Mac’s performance and reclaim hard drive space with a handful of spring clean tips.


Mississippi bluesman Junior Kimbrough once sang, "Well, I done got old. I can't do the things I used to do; I'm a old man." It's unlikely Junior's song "Done Got Old" is a metaphor for Mac OS X performance, but let's imagine it's just that for the purposes of this post.
Whether you make a fastidious effort to maintain the health your Mac or you take less care of it day in and day out, there will come a time when it will begin to show signs of age, where some days it just can't get up and go like it used to. If your Mac has lost a step, there are a few easy ways to speed it back up.
Two years ago, I shared five tips on how to clean and speed up your Mac. I was running Mac OS X 10.7 Lion back then, and today -- if you have have dutiful with your updates -- you are running Mac OS X 10.9 Mavericks. Mavericks has added a few tweaks and features, all the while inching closer to iOS in a number of areas.
Still, the tips I shared two years ago about cleaning and speeding up your Mac are relevant today. For starters, you should first back up your system before engaging in any performance tweaks, and adding more RAM to your system is an effective and relatively cheap and easy way to boost performance. Of course, if you have a MacBook, it doesn't necessarily invite you inside your case. Even without adding more memory, there are some things you can do to rid your Mac of its sluggish ways. And with Mavericks moving closer to iOS, it should come as no surprise that there are some apps that can help you in this endeavor.
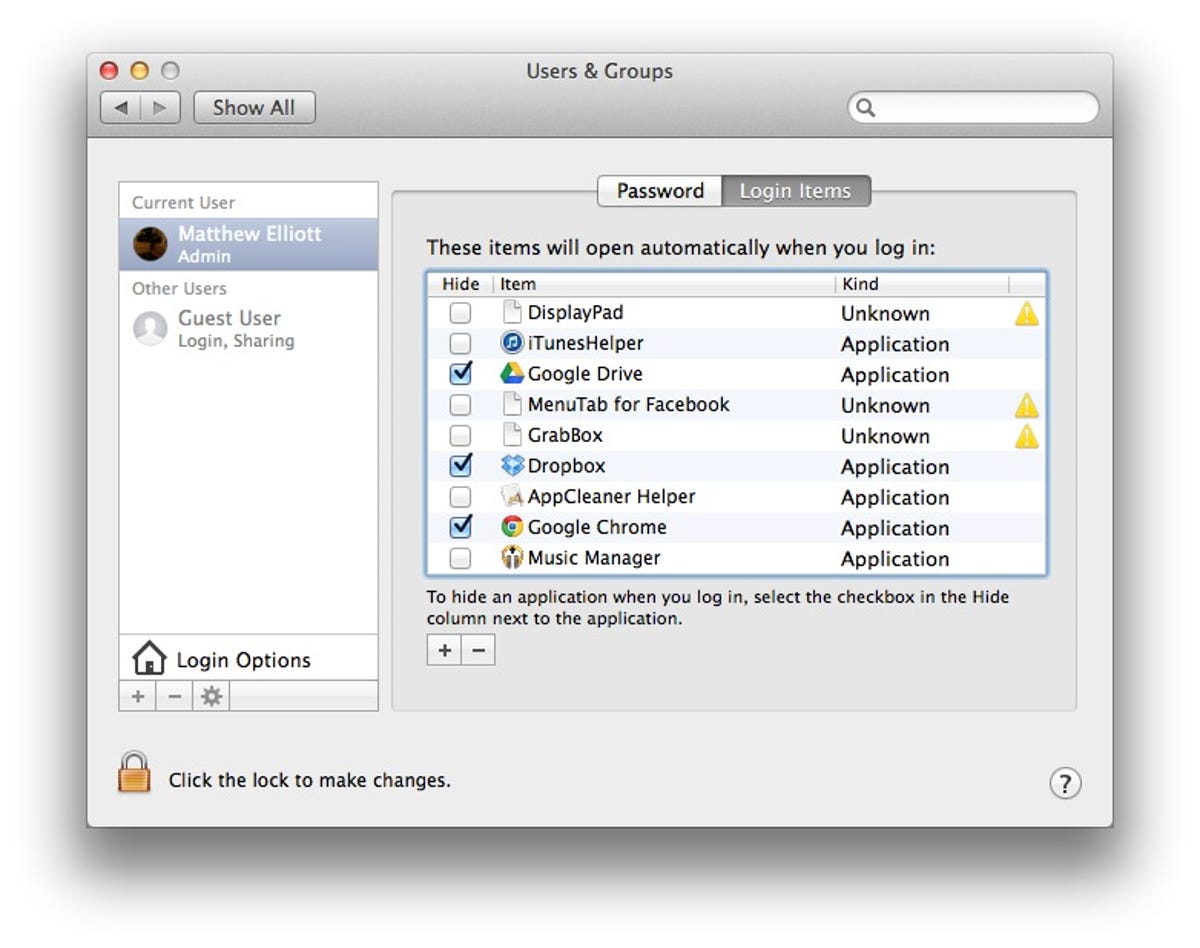
Reduce log-in items
If your system is slow to start up, then you might have too many apps set to launch when you log in. Go to System Preferences > Users & Groups and then click on the Login Items tab to see a list of the apps that open when you boot your Mac. Uncheck the apps you don't need at startup.
After investigating your log-in items, two areas remain in need of a virtual scouring: system memory and hard drive.
Clean your memory
When you system is dragging, the first place to look for an answer is the Activity Monitor. The Activity Monitor is a built-in application that shows which of your open applications are using the most system resources. Click on the Memory tab at the top and then sort the list by Memory to see which apps are occupying the most memory. Close any apps that are using a considerable amount of memory and you should see performance improve.
There are a number of memory-optimization apps that can help you keep an eye on your memory usage and free up memory resources. Memory Diag installs an icon in the menu bar and lets you click a button to empty caches and lower compressed memory in an effort to improve performance. It's particularly useful after you close a memory-intensive app because it will clean up the caches the app left scattered in system memory. Also helpful are the apps which Memory Diag lists that are using a significant amount of memory.
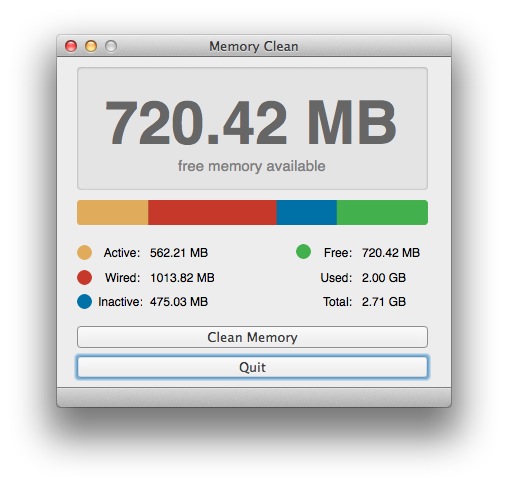
Memory Clean is similar to Memory Diag. It lets you purge caches and other needless items to free up more memory, but it lists in the menu bar the amount (or percentage, if you so choose) of free memory you have at any given moment. The figure it displays is dynamic, giving you something akin to real-time monitoring of your memory usage, and the figure will turn red should it dip below a threshold that you set.
Clean your hard drive
You don't have to be a photographer or filmmaker or musician to find that your Mac's hard drive is nearing capacity. (Of course, if you have large libraries or photos, videos, and songs, then you'll arrive there sooner.) As with memory, you can turn to a built-in application or inexpensive third-party apps to clean up your hard drive.
The built-in application is Disk Utility, which you can use to repair disk permissions. When you install an app on your Mac, the piece of software arrives as part of a package of files, including permissions that tell OS X which users can do what things with specific files. Over time, these permissions can get changed, resulting in your Mac lagging, freezing, or crashing. Repairing disk permissions, in the most basic terms, amounts to reshuffling and re-dealing these permissions so that they return to their rightful place. Read my previous post on how to repair disk permissions for a step-by-step guide.
Repairing disk permissions may or may not have a large effect on the overall performance of your Mac. A more likely culprit of sluggish behavior is your hard drive is simply too full. And it's a near certainty that you have files stashed on your hard drive that are just taking up space. Thankfully, there are a number of apps that can help you find and remove useless files on your hard drive, including HD Cleaner and CleanMyMac2.

HD Cleaner is available in the Mac App Store for $2.99. Launch the app and it will show you a chart of the amount of free and used space on your hard drive. Click the Scan button and a few seconds later, HD Cleaner shows you the amount of space it can reclaim on your hard drive with a list of the items it can delete, including download files, caches, and your trash. Check off the items you want to delete and click the Delete Files button to reclaim your space.
CleanMyMac2 is available from MacPaw and costs $39.95 for a single license. You can try it for free, but it'll clean only 500MB worth of hard drive space. It performs a similar scan as HD Cleaner, though it includes more bells and whistles. For example, it can search for large files an iPhoto duplicates, and it can operate as an application uninstaller and extensions manager.
Take out the trash
Of course, you can manually search through your Downloads folder via Finder and delete the files you no longer need. And Finder lets you search for large files. To do so, open Finder and select the volume you'd like to search. Next, choose File > Find (or hit Command-F). Click on the Kind pull-down menu and select Other. When the "Select a search attribute" window opens, check the box for File Size, uncheck any other boxes, and click OK. Change the "equals" pull-down menu option to "is greater than" and then change KB to MB. Enter a minimum files file size such as, say, 100MB. You can then delete any files that show up on the list that you no longer need -- or move them to an external drive at the very least.

You'll likely see large video files at the top, which brings me to my closing statement. The quickest way to reclaim hard drive space is to keep your iMovie and iPhoto libraries from spanning years and years. I don't have that many videos, but I move my older videos to an external hard drive once a year or so. I take a lot of photos, however, and my iPhoto library can quickly spiral out of control, occupying a large chunk of my MacBook Pro's hard drive. Thus, once a year, I take the previous year's photos and move them to an external drive, leaving me less than a year's worth of photos on my MacBook. (With my regular Time Machine backups to another external drive, I have two backups of my photos and videos.)
Lastly, remember to take out the trash -- twice. iPhoto has its own trash, which you will need to empty separately from the trash can in your Dock.