Microsoft Word's five most useful hidden features
Keep paragraphs together, print on both sides, change the date automatically, fit more text on a page, and insert an object on its own page.


Tuesday, I described how to convert the outline of a Word document into a Powerpoint presentation automatically. I stated that this feature was missing in Word 2007, but Tim Anderson explained in his ITWriting blog that the function was still there, though you had to dig a little to find it: Click the Office icon in the top-left corner, choose Word Options at the bottom of the dialog, click Customize in the left pane, select All Commands in the Choose Commands From drop-down menu, scroll to and select Send to Microsoft Office Powerpoint, and click Add to place this option in Word's Quick Access toolbar, which appears just to the right of the Office icon.
That got me thinking about the other useful features that Word makes difficult to find. Here are five neat tricks in Word 2003 and 2007 that you may not know about.
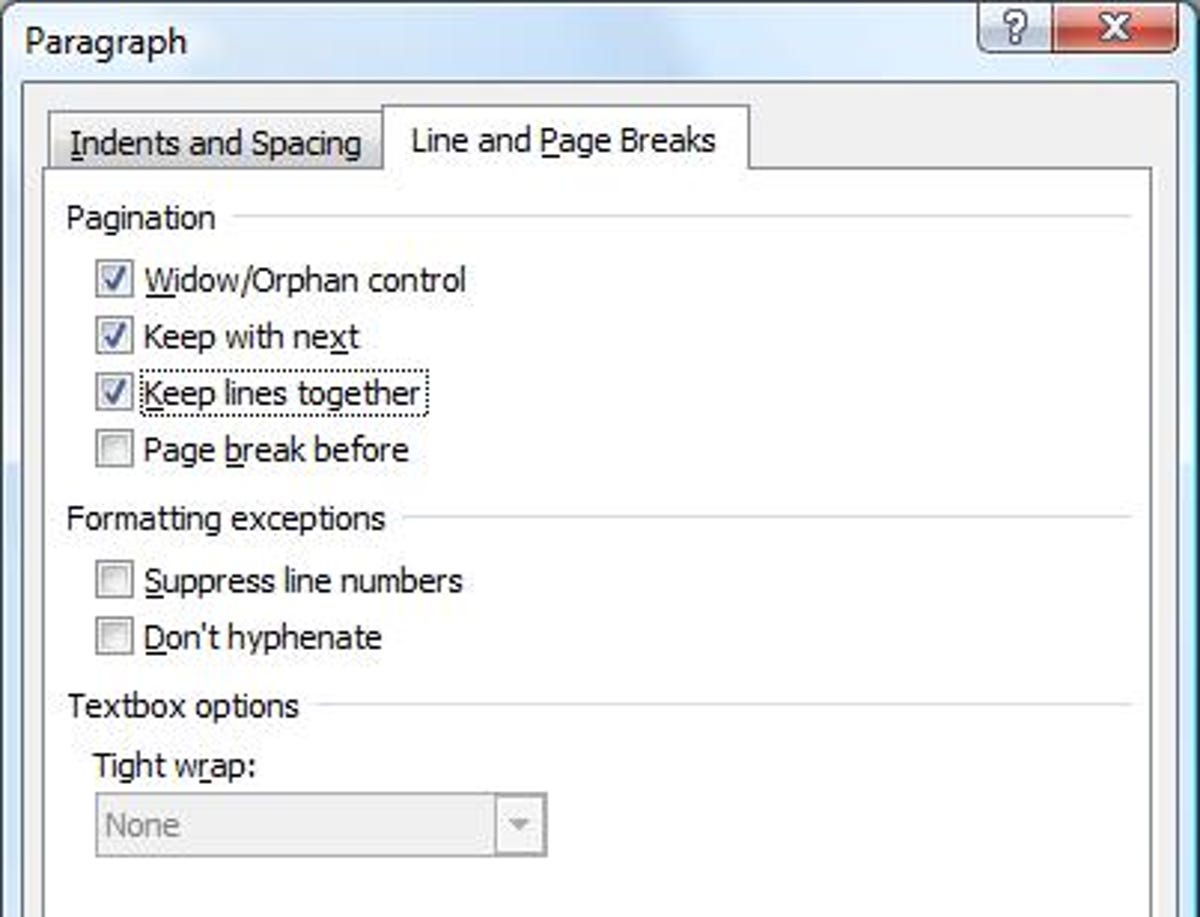
1: Keep your paragraphs together
Too often Word breaks pages in exactly the wrong place, making printouts of your documents difficult to read. The Paragraph dialog box gives you more control over the appearance of your printouts. To open it in Word 2003, click anywhere in the paragraph and choose Format>Paragraph; in Word 2007, click the small arrow in the bottom-right corner of the Paragraph section under the ribbon's Home tab. In both versions, check Keep with next (which is selected by default in Word 2003), and Keep lines together, which prevents a paragraph from being split between two pages. If you'd like a paragraph to begin a page, check Page break before.
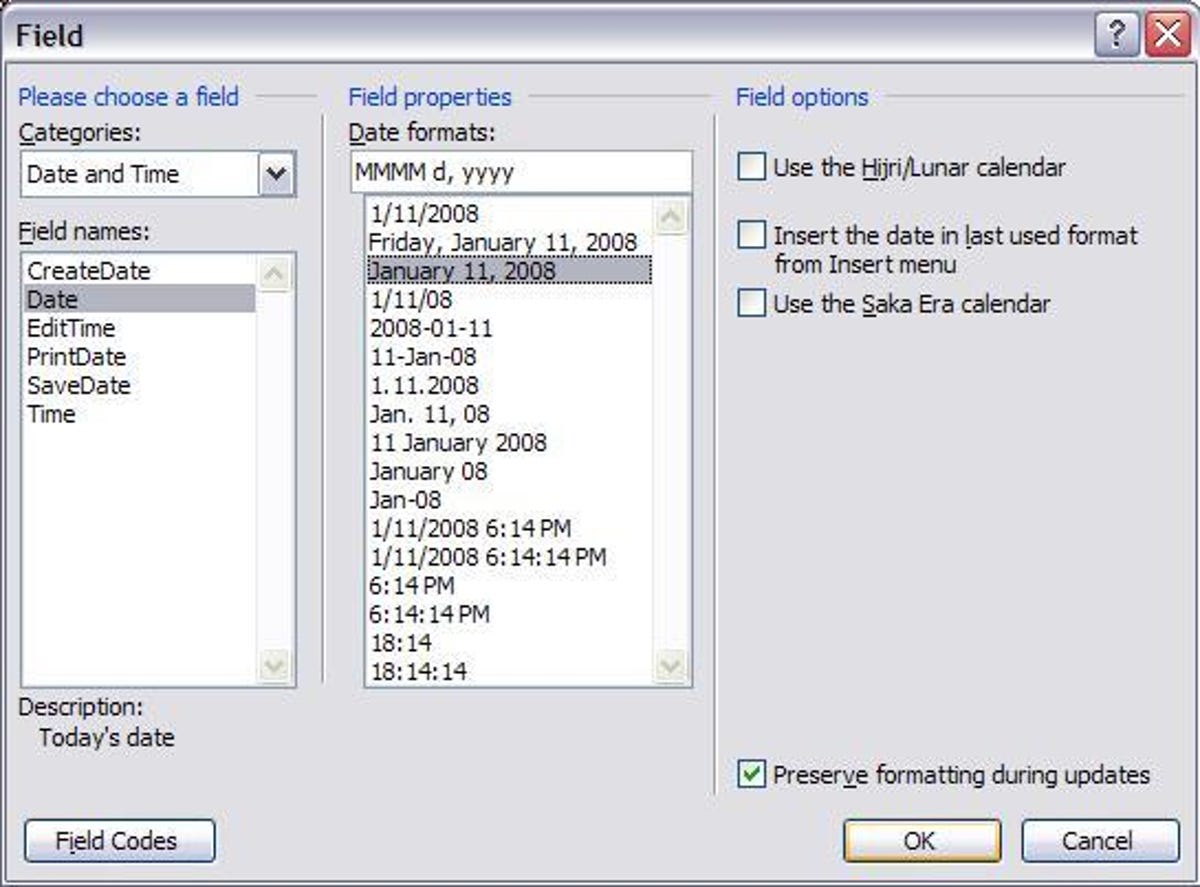
2: Change a document's date automatically
I frequently reuse the same Word file, changing only the date and one or two other items. It's simple enough to select the old date and start typing the new one until Word's auto-fill feature kicks in to display the current date, which it adds when I press Enter. Now I save myself even those few keystrokes by using a Date and Time field set to the current date: Place the cursor where you want the date to appear, and in Word 2003, click Insert>Field. In Word 2007, choose the Insert tab and click Date & Time. In Word 2003, click Date in the Field names window. In both versions, choose your preferred date format. In Word 2007, check Update automatically. Finally, click OK.
3: Fit more text on a single page
In addition to the file backups you create yourself, Word keeps backups of the files you've opened recently by default. Still, there may be times when you want to print an archival copy of a lengthy Word document. Save paper by reformatting the document to fit more text per page.
Start by pressing Ctrl-A to select the entire file, and then in Word 2003, click Format>Font. In Word 2007, click the small arrow in the bottom-right corner of the Font section under the Home tab. Choose a smaller font size, though keep in mind that anything smaller than 6 points will be difficult to read without a magnifying glass.
Next, make the margins smaller by clicking File>Page Setup in Word 2003, or Page Layout>Margins>Custom Margins in Word 2007. Change the Top, Bottom, Left, and Right settings in Word 2007 to .16", and in Word 2003, set Outside to 0.07", Inside to 0.5", Left to 0.25", and Right to 0.25". These are the smallest you can have while fitting all text on the printout.
4: Print on two sides of the paper
You can print on both sides of the paper even if your printer doesn't support duplex printing by default, though you may have to flip and collate the paper yourself. In Word 2003, click File>Print; in Word 2007, click the Office icon and choose Print. If you see a "Manual duplex" option, select it and click OK. After the first side prints, you'll be prompted to place the paper back into the input bin, blank side up. Do so and click OK again to print the second side.
If you don't have a Manual duplex option in your printer settings, you can achieve the same effect by choosing Odd pages in the Print drop-down menu, then flip and collate the pages, return them to the paper tray, and click Even pages. Your printer may also have an option to print more than one page per sheet, though this option may render the text unreadable, so test it on a sample page before using it to print a long file.
5: Place an object on its own page
Suppose you have an Excel worksheet you want to place on its own page in the middle of a Word document, and you want the page to print in landscape orientation while the rest of the document is in portrait mode. Piece of cake!
Place the cursor where you want the new page to begin, and click Insert>Break>Next page>OK in Word 2003, or Insert>Page Break in Word 2007. Copy and paste the worksheet into the Word file, and repeat the steps to create another page break at the end of it. Now select the page, and in Word 2003, click File>Page Setup>Margins>Landscape; in Word 2007, choose Page Layout>Orientation>Landscape.
Tomorrow: The safe and easy way to create and share a Web-based calendar.