 Why You Can Trust CNET
 How to build your own kegerator and install it in your countertop
From CNET Magazine: You can have craft beer on tap at home without paying a fortune.


If you love beer, the benefit of a home kegerator is obvious. Unfortunately, the drawbacks of buying a commercial kegerator, a modified refrigerator-and-beer-tap system, are daunting. Quality kegerators are expensive, you might not have room for a big, industrial-looking block in your home, and you might not be able to get your favorite beer in a full keg anyway. Stores that rent full kegs typically fill them only with a couple of mass-produced beers, which won't be exciting for craft beer fans.
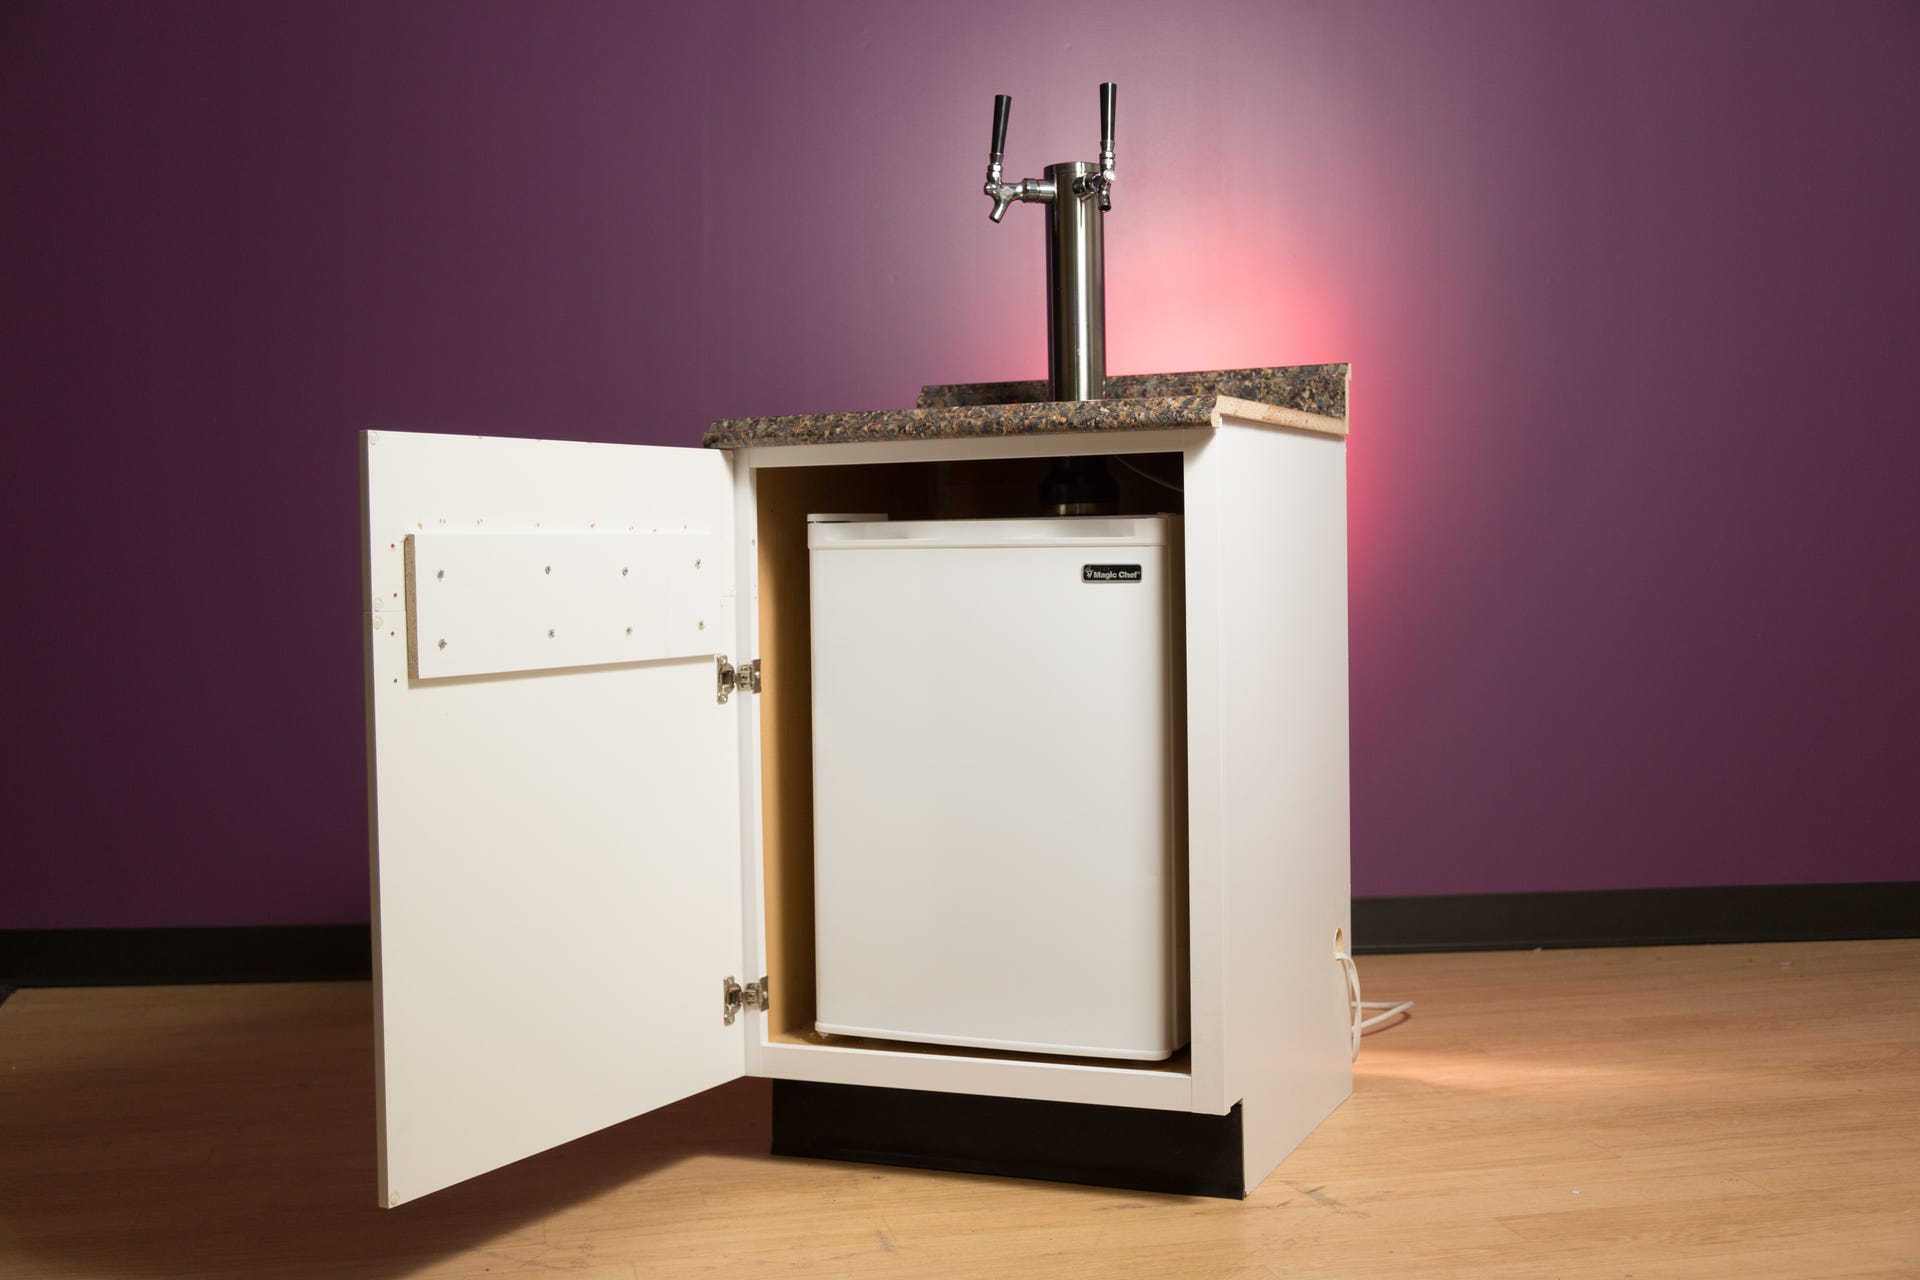
Well, break out your tool box, because we'll show you how to build a kegerator yourself and install it in a countertop. Using a simple dorm-style compact fridge (2.7 cubic feet), CNET's technical editor Steve Conaway and I did this project ourselves for a reasonable $360, and purposely designed our system to dispense beer from two mini kegs. Mini kegs are easier to acquire and fill than their full-size cousins. You might even be able to fill one with craft beer from your local microbrewery, or you can fill them with homebrew to really wow your friends.
Note that this project takes a medium to high level of DIY skill. You'll need the following tools: an oscillating tool, a drill, a soldering iron, two 2-½-inch hole saw bits (one for countertop material and one for metal cutting), assorted screwdriver bits, expanding foam, a tape measure, clear silicone, wire cutters/strippers, metallic duct tape, wood screws and some scissors or a cutting tool. If you have those on hand, and drilling a hole in your countertop for the sake of better beer sounds like fun, let's get started.

See more from CNET Magazine.
Step 1: Gather your supplies
You'll want to do some shopping before you start slicing and dicing. We've listed what we paid for reference, but your costs may vary. You might be able to find better deals than we did, and you'll definitely pay less if you only buy a single-faucet tap -- then you'll only need a single keg and a single conversion kit as well.
- Dorm fridge (We found our model on sale for $88.)
- 2-inch schedule 40 PVC pipe, at least 12 inches long ($5)
- Double faucet tower ($85)
- 3 feet of ½-inch plastic tubing ($8)
- Computer fan ($5. We used this 80mm model)
- Tupperware bowl ($2. We used a 5-cup container. The exact size doesn't matter as long as it's bigger than the fan)
- AC adapter ($8. You need a plug with as many volts as your fan that supports as many amps. An old cell phone charger should work.)
- 2 extension cords, at least six feet long ($9)
- A length of wood ($4. We recommend a piece 3/4 inch thick, 5 1/2 inches wide, and a length cut to fit your cabinet opening.)
- 2 mini kegs ($32, $16 each)
- 2 mini keg conversion kits ($90, $45 each)
- 2 threaded plugs ($18, $9 each. Something like this should work. You'll need it to plug one end of your carbon dioxide regulator. Take the regulator to your local hardware store to find a good fit.)
- 2 ¼-inch stainless-steel double barbed connectors ($4, $2 each).
Step 2: Prep your countertop
After you have your tools and supplies, pick a cabinet to be your victim (preferably one close to an outlet), and let's get to work. You'll want to make the interior of the cabinet a single empty cavity with a single door. If your cabinet, like ours, has a drawer as well, you'll need to take that out, too, along with any rails, drawer hardware or anything else that might block the refrigerator from fitting inside.
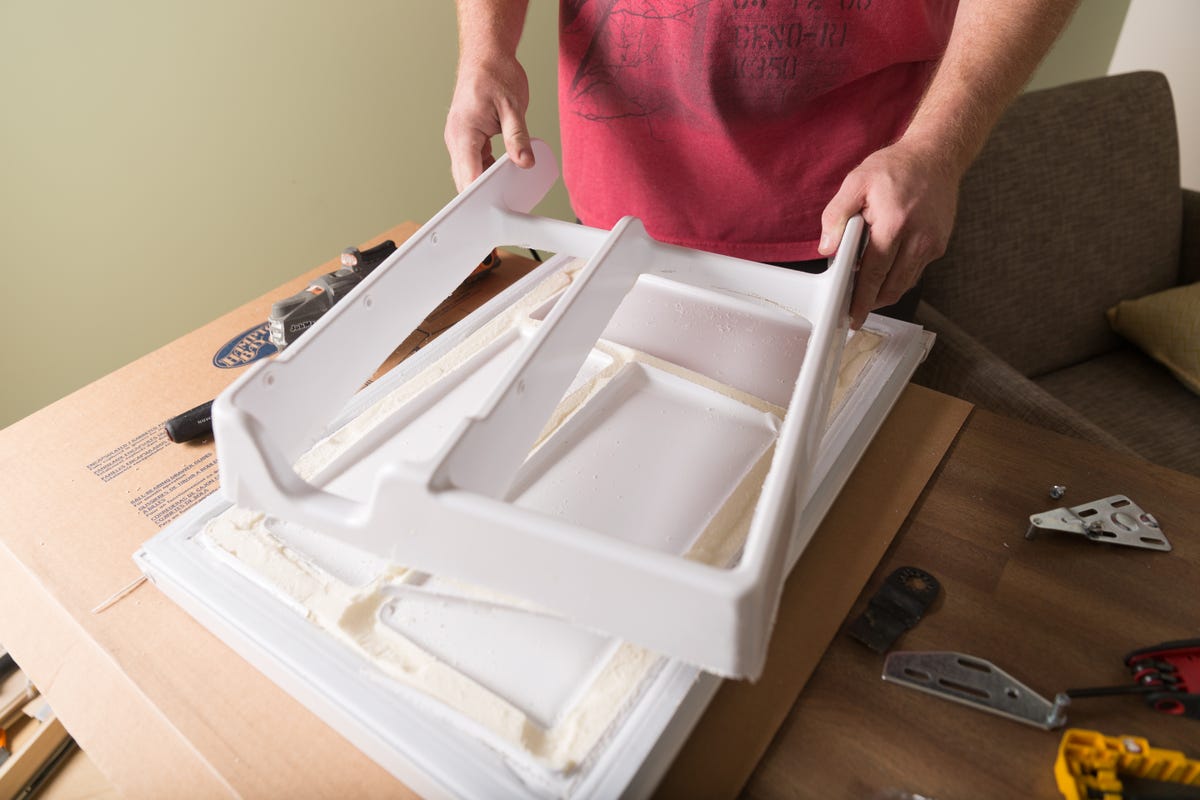
You might also need to combine your drawer face and cabinet door to make a single door that covers the whole interior of the base cabinet. If your door/drawer combo requires a gap between them, use a piece of wood to match the cabinet finish. I suggest something about three-quarters of an inch thick, by about 5.5 inches wide. Cut its length to match the width of the cabinet opening. Using wood screws, attach the wood to both the drawer face and cabinet door. Once you're done, set aside your new door until the end of the project.

Here's how it will look once it's completed. Notice the piece of wood attaching the drawer face to the original cabinet door.
Now, it's time to drill a big hole in your counter. Decide where you want your draught tower. You'll want to leave at least 7 inches of space from the center of the tower to both the back and front of the counter.
Next, open the fridge and closely examine its ceiling for coolant lines. It's critical to avoid drilling into them, or you'll ruin your fridge. (In most dorm fridges, they run up from a compressor shelf in the back and into a metal sheet forming a freezer compartment.)
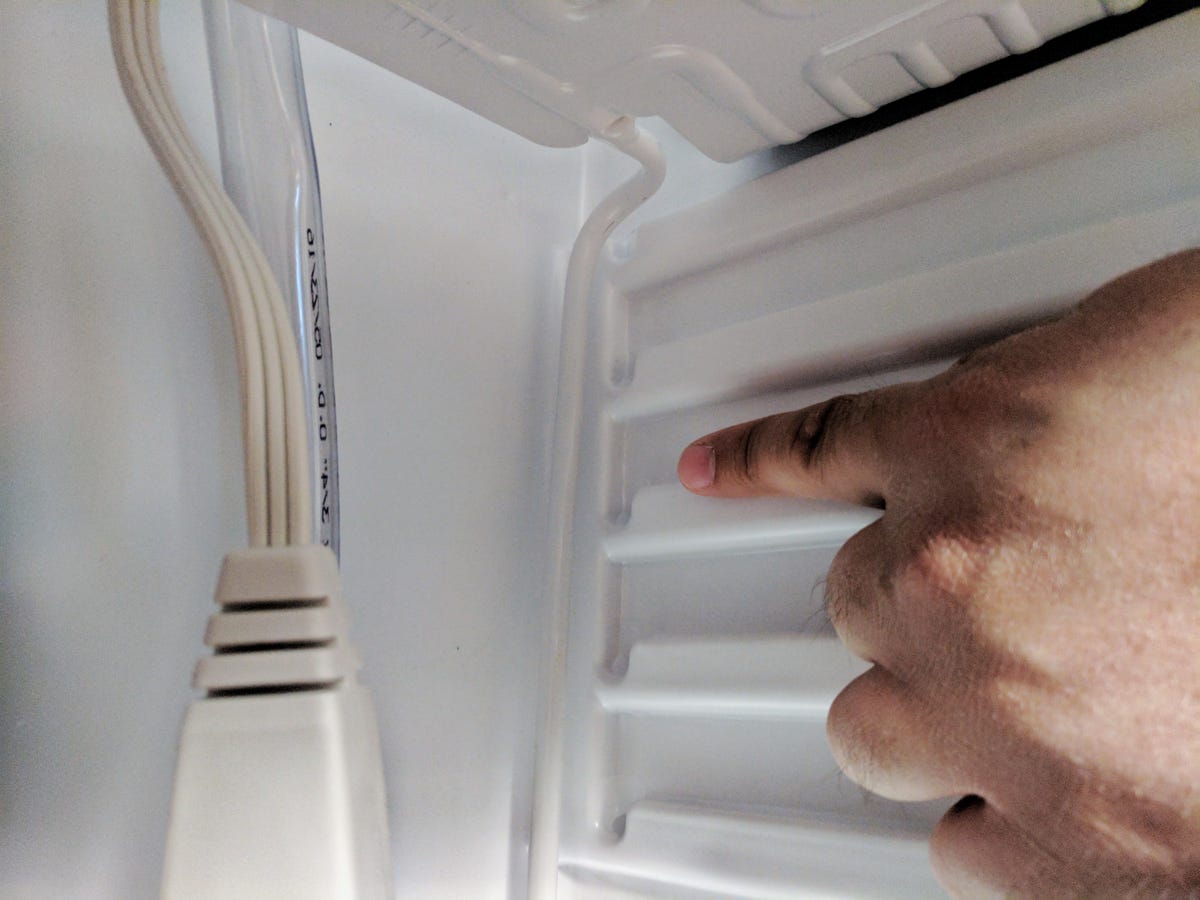
Here's the line running up from the compressor shelf in our fridge. Notice the lines in the freezer shelf above as well.
Put the fridge into the cabinet. Check the manual of the fridge to see how much room it needs for airflow and adjust your placement accordingly.
Make sure you don't have any obstructions in the fridge beneath the spot where you'd like your tap handle -- the hole in your fridge will need to line up exactly with the hole in your counter. We picked a spot far enough back in the fridge to avoid the thermostat. You can do the same, or move the thermostat if it's in the way by unscrewing it and finding a different spot for it.


The thermostat in our fridge. Make sure you don't punch a hole in this either when you drill into your fridge.
We did have to move the left wall of our freezer compartment. This problem was easy to fix -- Steve detached that side of the freezer and gently bent it flat with his hands.
Once you find a spot that works aesthetically on your countertop and logistically on your fridge, it's time to drill. For our laminate countertop, we used painters' tape to cover the area and prevent splintering, and then drilled with a basic wood saw bit. If your counter is granite or some other harder material, you'll want to consult a professional for this part, as stone surfaces can easily crack, and repairs would be costly.
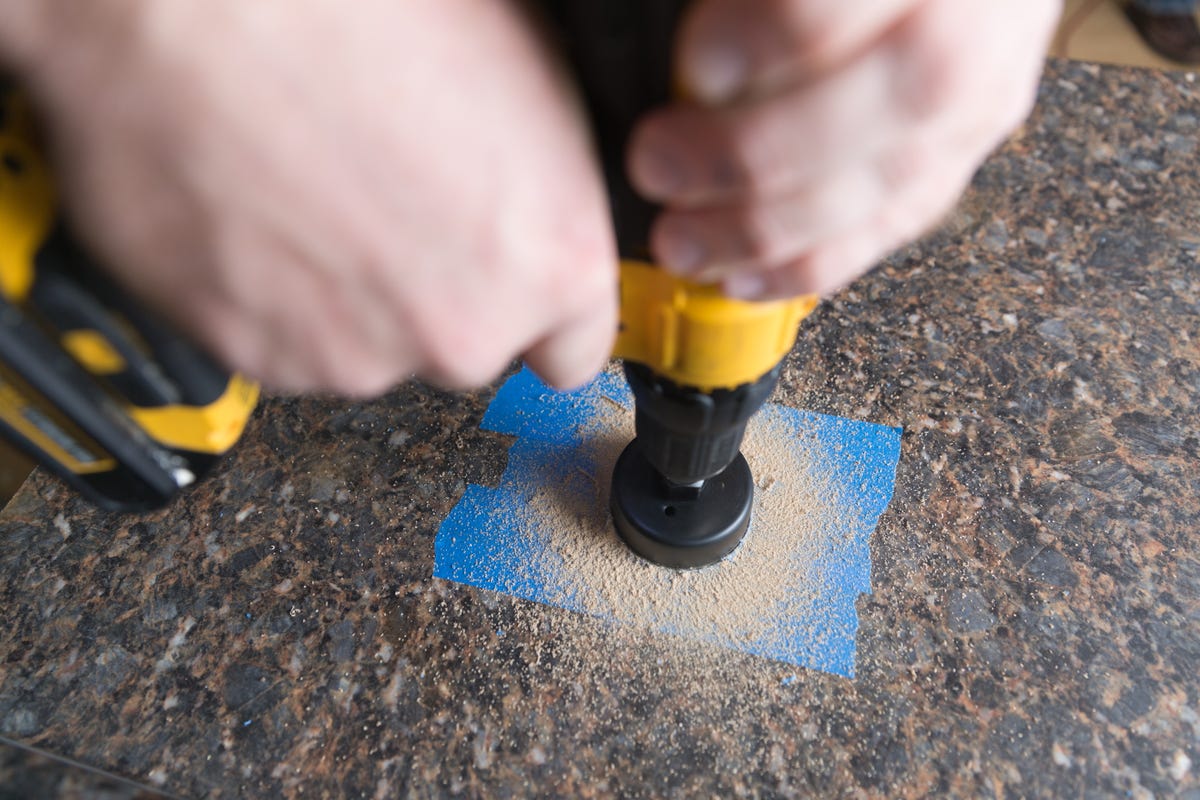

Use your saw bit to punch a 2-1/2 inch hole in your counter.
Step 3: Prep your fridge
Make sure your mini kegs fit in your fridge and the door closes securely. If you're only using one keg, you'll have an easier time. Our pair of kegs didn't fit, so we had to do a little customizing to the fridge interior.
I removed the fridge door (we were going to do this anyway to switch the hinges to the other side so both the cabinet door and fridge door would open on the same side). Then Steve took an oscillating tool and went to town, carving out all of the interior hardware and shelving on the fridge door. There are no internal moving parts to the door, only foam, so you don't have to be too careful. Just make sure you don't cut the rubber seal that runs around the outer edge of the door.

If you need the room, use an oscillating tool to cut the shelving off of the fridge door.
Put the fridge back in the cabinet, then run your PVC pipe through the hole in the counter and rest it on the top of the fridge. Use a marker to trace its outline on the fridge, then pull the fridge out and make sure that hole is more or less centered, and at least two inches away from any edge.
Now take your metal saw bit and cut through the top of the fridge. Go slowly with this step to avoid any wires hidden in the fridge insulation. You can double-check for wires by removing insulation with a screwdriver when you've cut through the outer shell of the fridge's top. Once you're all clear, keep drilling all the way through.
Finally, find the nearest outlet, and drill small holes through the back corners of your cabinet to make a path for the extension cord.
Step 4: Install the fan
By now I imagine that you're ready to kick back with a beer. After all of that work I was thirsty, but while we could have just installed the tap handle, we went a step beyond by building a tap-handle cooling mechanism from a laptop fan and a 5-cup Tupperware container. Who wants beer sitting in warm pipes between servings? Not me.
Install the fan in a Tupperware container by cutting a hole in the lid large enough for the fan blades. Attach the fan to the inside of the lid using the screws that come with it so that the fan pulls air into the container.

The fan pulls cold fridge air into the container and blows it out through a tube wedged into the pipe with the beer lines.
Drill a small hole into the Tupperware large enough for the fan's power wires, and another large enough for half-inch tubing. Pull the wire through the first hole and the tubing through the second, close the container, then use clear silicone to seal both holes and around the edges of the fan.
Check the sticker on your power adapter -- you can probably use an old cell phone charger -- and make sure it matches the voltage of the fan and has at least as much amperage. For an old cell phone charger, cut off the end that attached to your phone, and strip the two remaining wires. Attach them to the power wires of the fan. Plug the charger in to make sure the fan works, then solder the wires.
We used Velcro with an adhesive backing to attach the Tupperware container to our compressor shelf and our fan was ready to go.
Step 5: Install the tap handle
With most of the drilling and wiring done, it's time to start putting everything in place and securing it there. Reattach your fridge door -- make sure it'll swing the same way as your cabinet door -- then put the fridge in place.
Lower the male end of your extension cord through the cabinet hole, but make sure it doesn't go into the fridge -- you'll want it resting on the outside of the fridge as you install the PVC pipe. Leave the female end of the extension cord on top of the counter for now.
Insert the PVC pipe into the counter and the fridge. Make sure it's at least an inch into the fridge, then measure the pipe six inches above your countertop. Cut off any excess above six inches, then insert the pipe one last time and seal it an inch into your fridge with moisture resistant, metallic duct tape.
Loop the female end of the plug into the top of the pipe and adjust it so that the end rests on the compression shelf with your fan. Plug in your fan.
Permanently seal the PVC pipe to the fridge using expanding foam. Be sure to take all safety precautions listed on your expanding foam. You'll have to reach in between the top of the fridge and the bottom of the countertop to apply the expanding foam around the PVC pipe. You will need very little foam to finish the job.


Attach the pipe in the fridge with duct tape. Seal it in place with expanding foam.
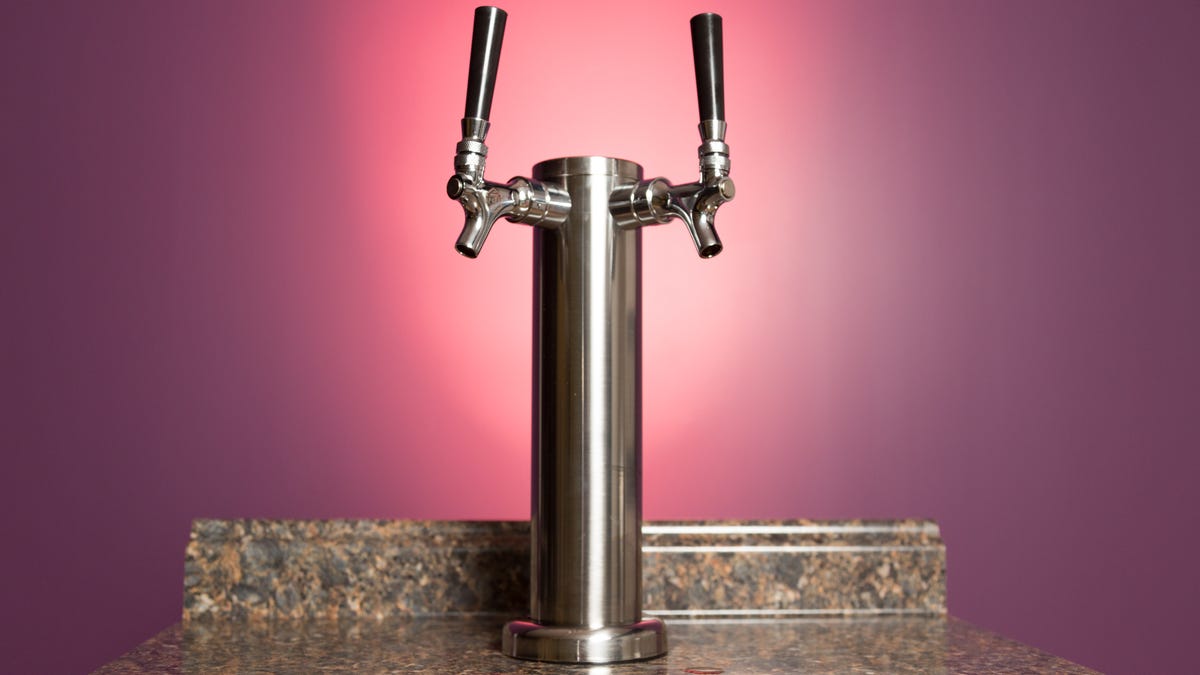
Finish by assembling your faucet tower. You shouldn't have to do much, depending on the model you purchase, but check the instructions. All we had to do was attach the two faucets and handles to the tower.
Your tower will have supply lines that'll deliver your beer to the faucets. Drop those into your fridge through the PVC pipe and lower the tower onto the counter. Center it, then screw the base down onto the countertop.
Now, push the tubing from the fan into the pipe (the spacing will be tight enough that it'll stay). Then, reattach your cabinet door, plug your fridge and your fan into another extension cord next to the fridge, and run that cord to an outlet.
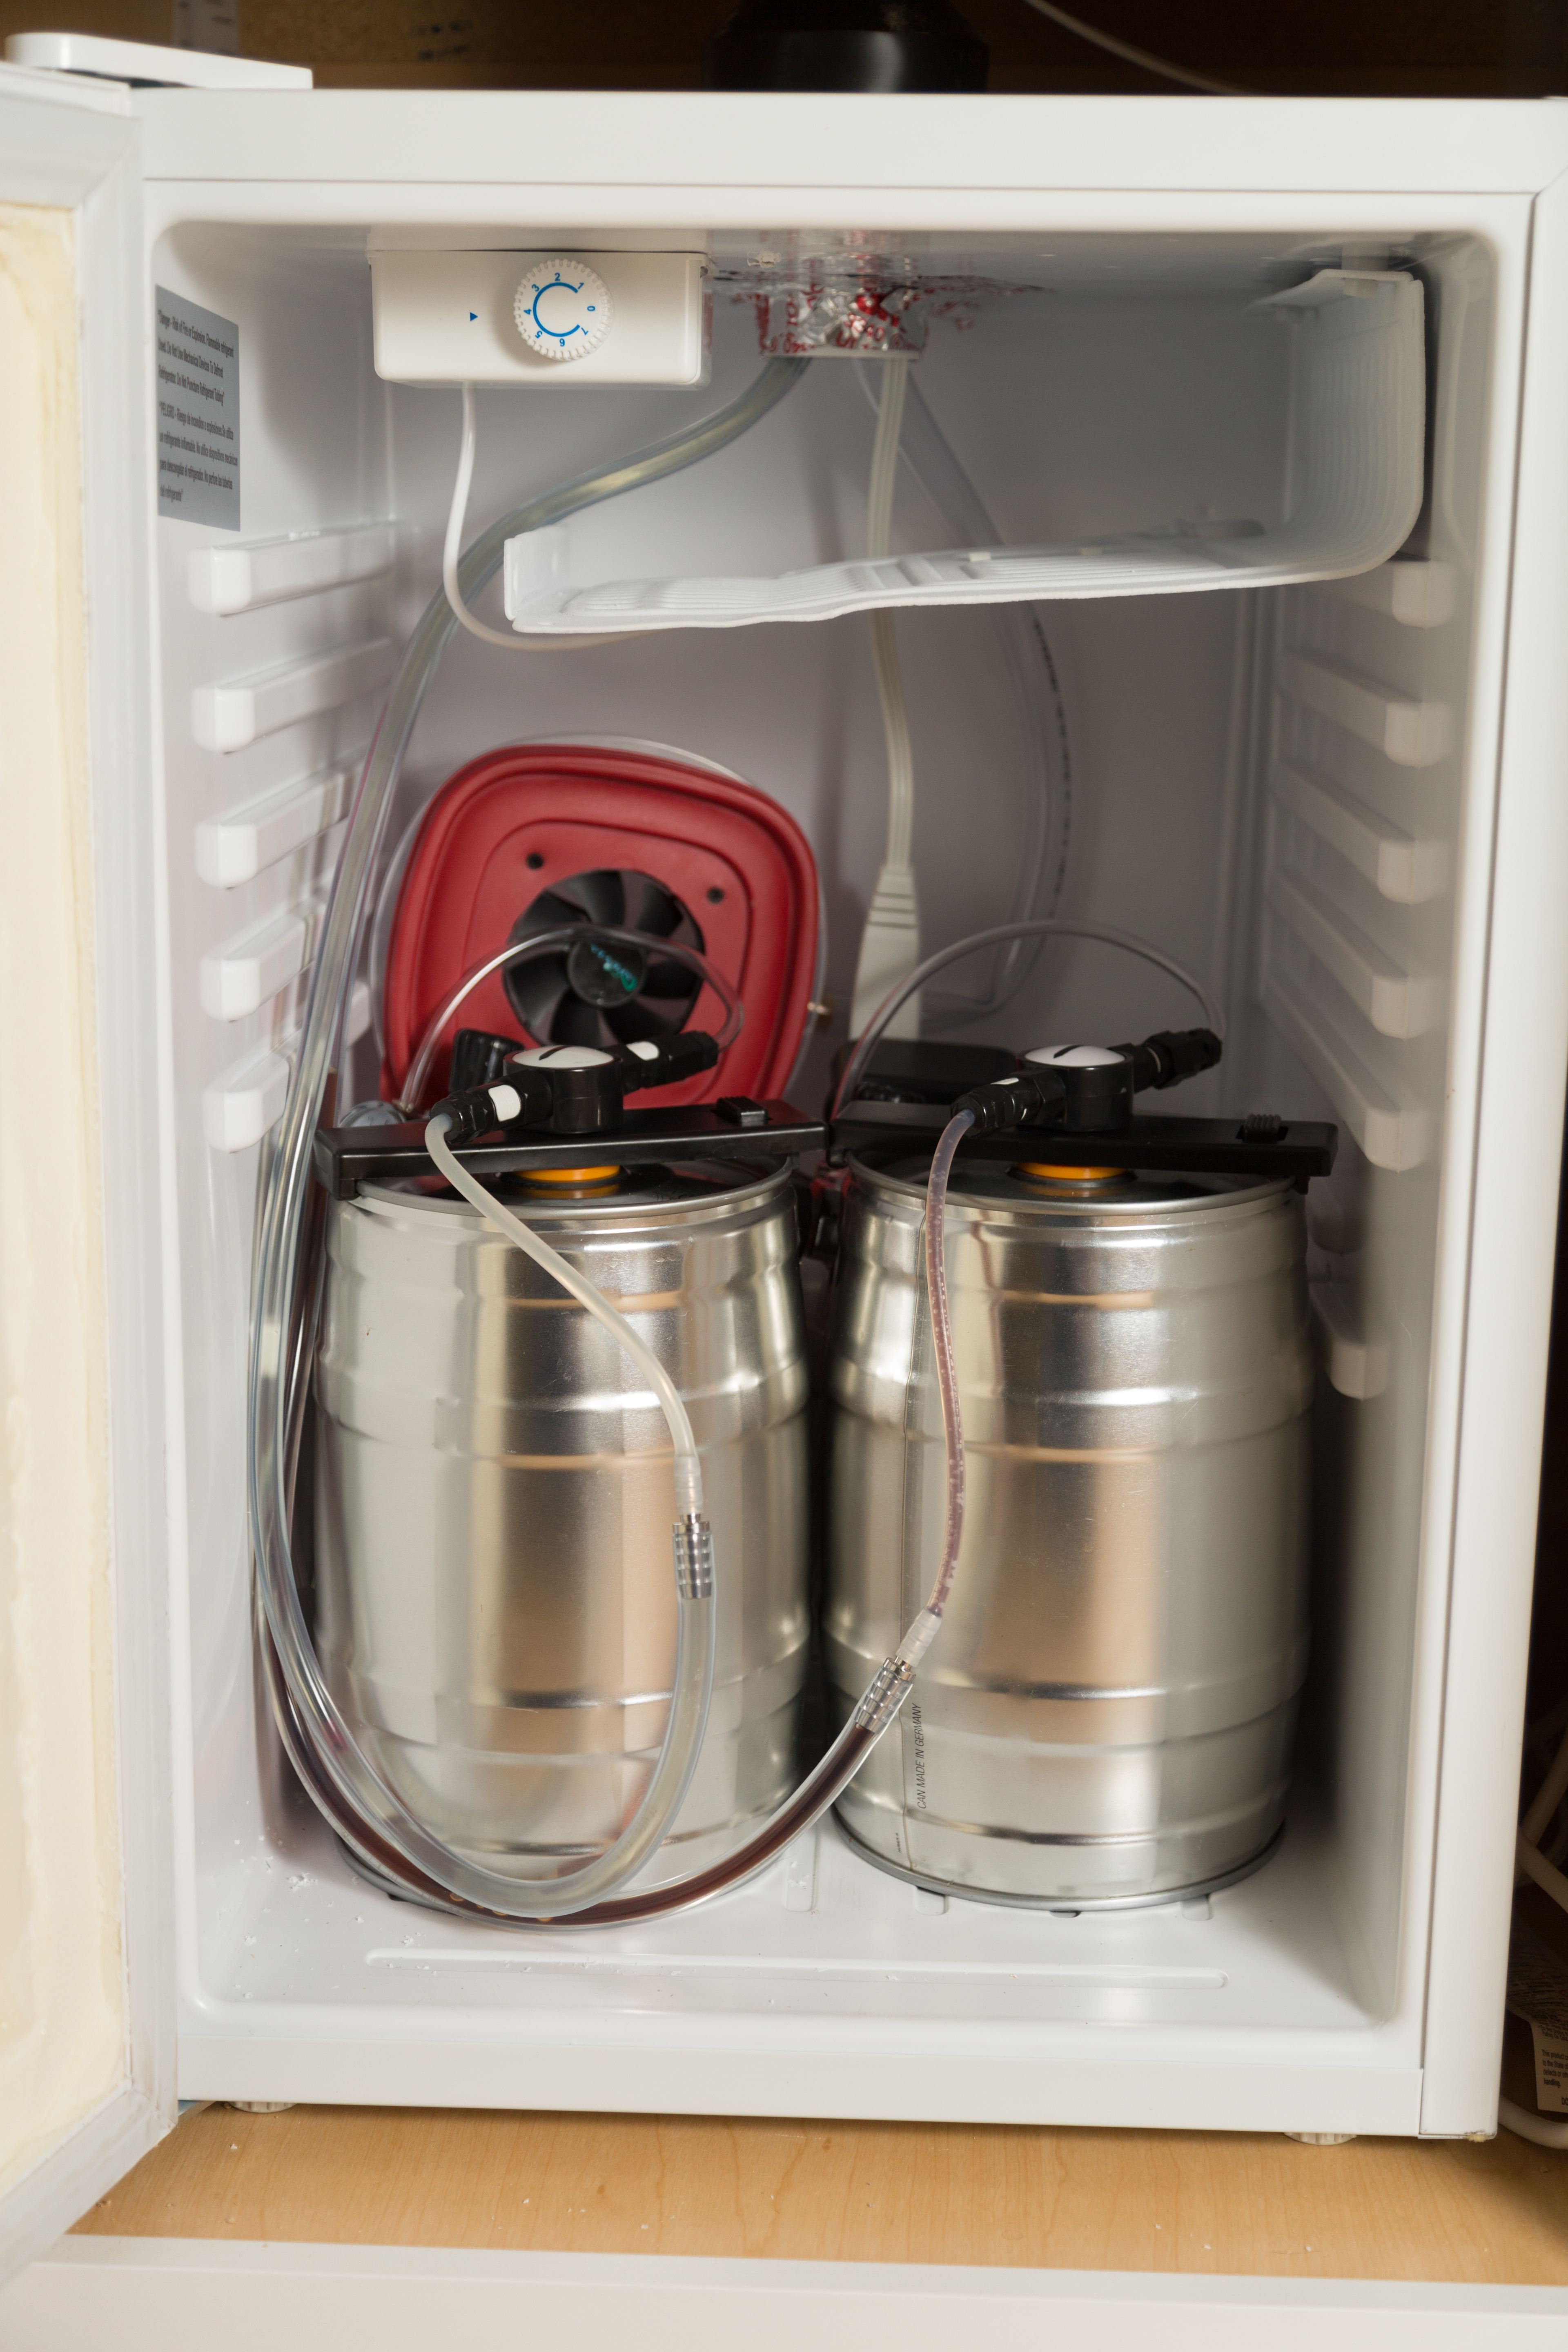
Step 6: Attach your kegs
Now, all you need to do is hook up your kegs and sip on the fruits -- or hops -- of your labor. Filling your mini keg at a microbrewery won't be any harder on a bartender than filling a standard growler (a beer jug that usually holds 64 ounces) as they can use the same hose they normally would. Be sure to call ahead before you make the trip. Some states have regulations against filling containers over a certain size. If you run into trouble, you can always fill your keg with your own batch of homebrewed beer.
Filled kegs in hand, you just need to tap each keg with a conversion kit (the parts that actually suck up the beer from the keg and deliver it to the tap) that you can buy online. Note that you can buy mini kegs of beer in some liquor stores, but since those come pressurized, you'll need a different kit to attach those kegs to your setup than you'd use if you've filled an empty keg.

Put the doors back in place and attach your conversion kits.
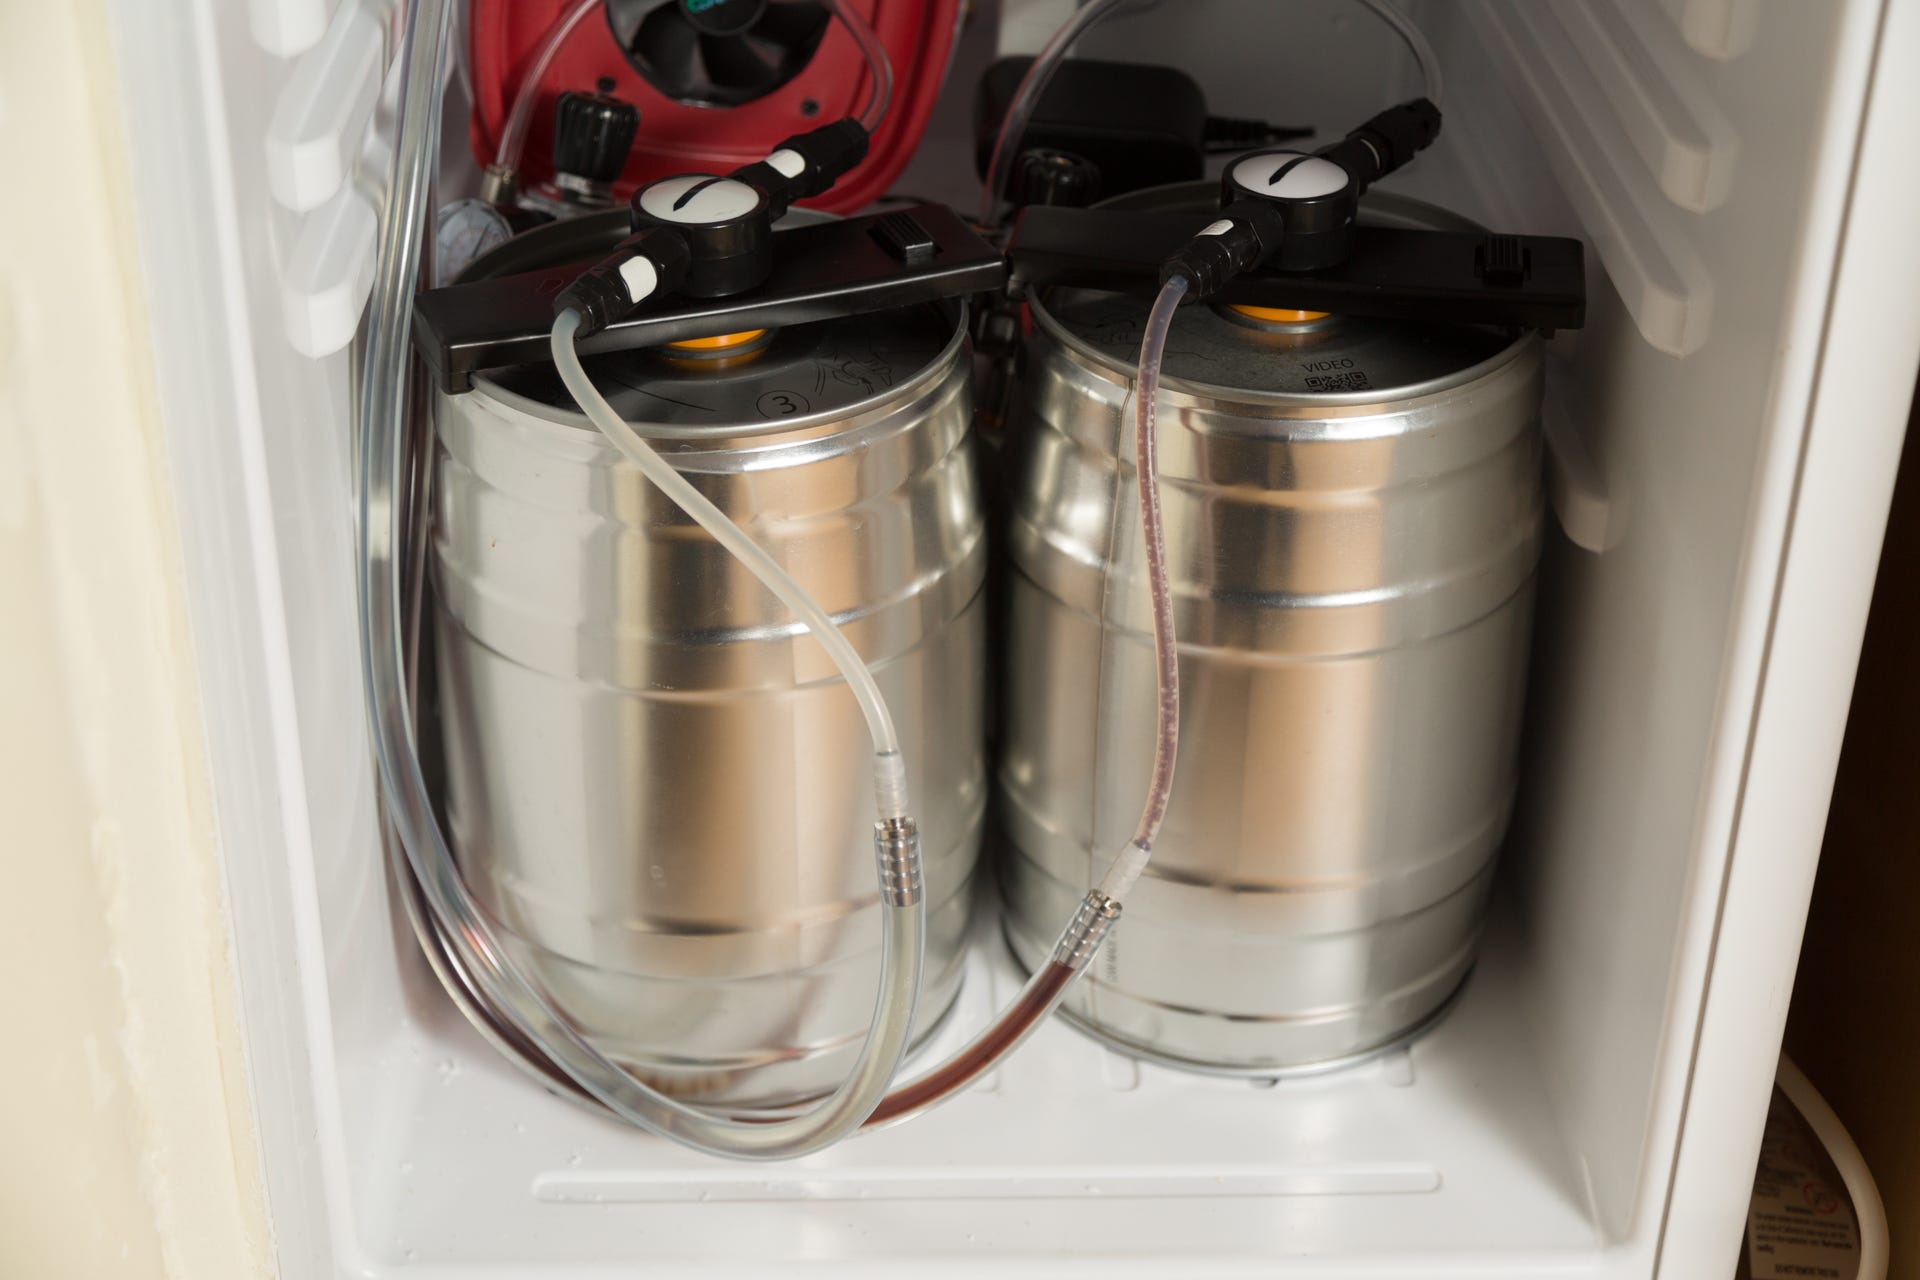
The fridge and cabinet setup we have could actually work with several types of kegs and carbon dioxide tanks. Customize as you see fit; just make sure your kegs are short enough to fit in your fridge. The mini kegs we describe are the cheapest option to get started.
Sanitize the part of the conversion kit that goes into your beer and slide it into place. Then, plug in your carbon dioxide regulator using the provided hose and attach the kit's hose to your faucet's supply line. I had to plug an extra valve into our regulator, which I did by removing the black thumbscrew opposite the pressure gauge and tightening down a capped metal fitting.
You'll need to cut off any existing connector already on the faucet supply line, and insert a stainless-steel double-barbed fitting. Make sure you don't use brass fittings anywhere that will come into contact with beer -- you'll end up with contaminated beer that will erode the metal. Attach the other side of the barbed fitting to the supply line from the tap assembly. Repeat the process if you are using two kegs.
Step 7: Enjoy


Attach the gas cartridges, pull the handle, and enjoy.
Once you've slid both mini kegs into the fridge and you're ready to start pouring, attach the CO2 cartridge to the regulator from the kit and turn the knob to start gas flowing. Grab your favorite glass, pull the handle and pour yourself a tall, cold one. You deserve it.
This story appears in the spring 2017 edition of CNET Magazine. For other magazine stories, click here.