Top ten DIY photography tips
We're going to tell you how to stand out from the Jessops jockeys with ten DIY tips for distinctive looking -- and almost free -- photography hardware

On the day the digital camera was invented, the photographer died. Go on to the street these days and the only thing a digital camera tells you about a person is the size of their bank balance. As an alternative-lifestyle statement, SLR ownership is now right up there with owning a Coldplay CD. In these troubled times, when SLRs are no longer a badge of actual photography skills, you need something to distinguish yourself from the crowd.
We're going to tell you how to stand out from the Jessops jockeys with ten DIY tips for distinctive looking -- and almost free -- photography hardware. Sellotape at the ready: let's go!

1. String Tripod
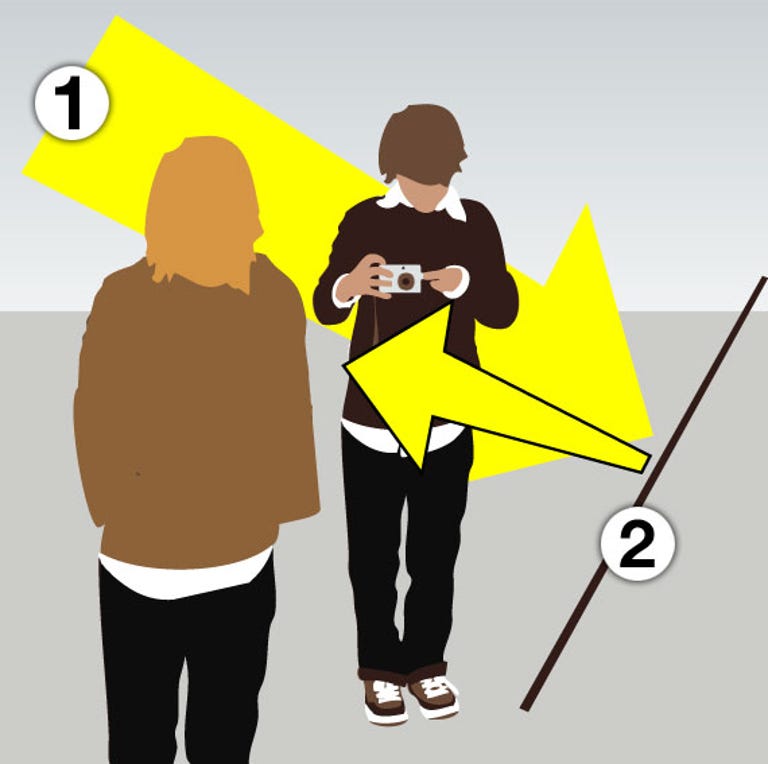
Some 'professional' photographers will tell you that you need to buy a tripod to steady your shots. But you can make a decent tripod replacement out of a piece of string. Watch the faces of yuppie photographers in the press box when you put their ten-grand Manfrotto to shame with your grotty thread.
The principle is simple. Go to your local DIY shop and find a hook that fits your camera's tripod binding. This binding is a little threaded hole on the base of your camera. Although you're only supposed to attach authentic, expensive tripods to this, we're going to stick it to the man, and screw a hook in there. If you can't find a hook, get a bolt the right size and tie the string to that.
You can see the likely insertion point in the diagram above (1). Once you've attached something to bind the string to the camera, thread the string around the binding and loop it around your feet as shown above (2).
If you've got the length right, you should be able to pull up lightly on the camera to produce tension in the strings. Widen your stance to steady the camera even more. It's even possible to toddle about in this position, snapping passers-by and making penguin noises.
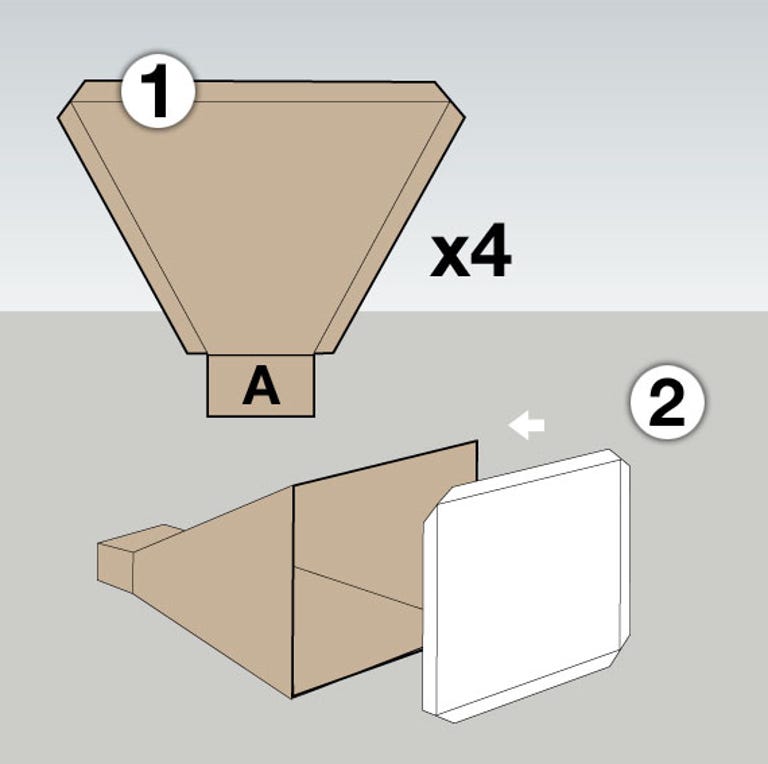
2. Cereal Softbox
Many photographers gallop about with enormous boxes attached to the front of their camera's flash. These diffuse the light -- soften it -- so that models look hot, and really old people look okay.
You can fashion your own softbox out of any cardboard you have to hand. A cereal box will do, but heavier cardboard will last longer. You can really only make a decent softbox, however, if you have a dedicated external flash unit that plugs into the top of your camera.
Construction is simple. Cut out four bits of cardboard that look like the template above (1). Obviously, this template is not to scale, so unless you're a Sylvanian Families doll, you'll need to scale up the sections to fit your flash head.
The distance labelled A in point 1 is the width of your flash head. Scale the rest of the template accordingly. Once you've cut out the sections, tape them together along their edges, line the inside of the softbox with silver foil, and cover the front with something that will soften the flash light (2). A white plastic bag will work, but you could also try some light fabrics. Experiment for the best results.

3. Tin Can Ringlight
A ringlight sounds like the kind of thing that only a rich prince could afford, but you can build your own using just a tin can and a bowl.
First get a tin can, eat the contents, clean it, and cut both ends off. Now you should have a shiny silver tube (1). Although at this stage the contraption is useless, if you tried to buy a similar silver tube in Jessops it would cost you upwards of £1,000.
Now find a bowl. Preferably a metal bowl, but some plastic ones will work fine. Now you need to cut a hole in the middle of the bowl that allows it to fit snugly around the tin can, shown above (2).
You also need to cut a hole in the bowl for your flash head to poke through (3). This will provide the light part of the ringlight.
Now you need to push 80 per cent or so of the tin can's length into the bowl. Then tape or glue it there so it's fixed. If you used a plastic bowl, you'll need to line it with silver foil. If you used a metal bowl, give it a polish (4).
The mechanism by which you attach the tin can to your lens will vary depending on what your camera looks like and how the lens works. We'll leave it to your imagination, but the important thing is to make sure the tin can fits tightly on to the camera's lens and is secure enough to safely support the flash unit. Gaffer tape is a quick solution if you don't mind the dreaded 'sticky lens'.
Now when the flash is fired, light will bounce around inside the bowl, off the outside of the tin can, around in a ring and out at your subject's face. Before anyone complains that this is only 95 per cent as good as a professional ring-light, remember: it's a tin can. Okay?
4. Paper Lens Hood
Glare and lens flare. Argghh. It screams: I think I'm James Cameron.
Actually, there's nothing wrong with lens flare (1), but if you do want to avoid it you can make a simple funnel to cut it out. This is very much like one of those collars you put on a diseased dog to stop it dirtying the carpet when its head collapses. So if you have one of those lying around, you could adapt it.
Otherwise, get some black card from a newsagent and shape it into a cone that fits around your lens (2). Tape it in place and you're done (3). Now light can only hit the lens from the front, and you'll get higher-contrast snaps.
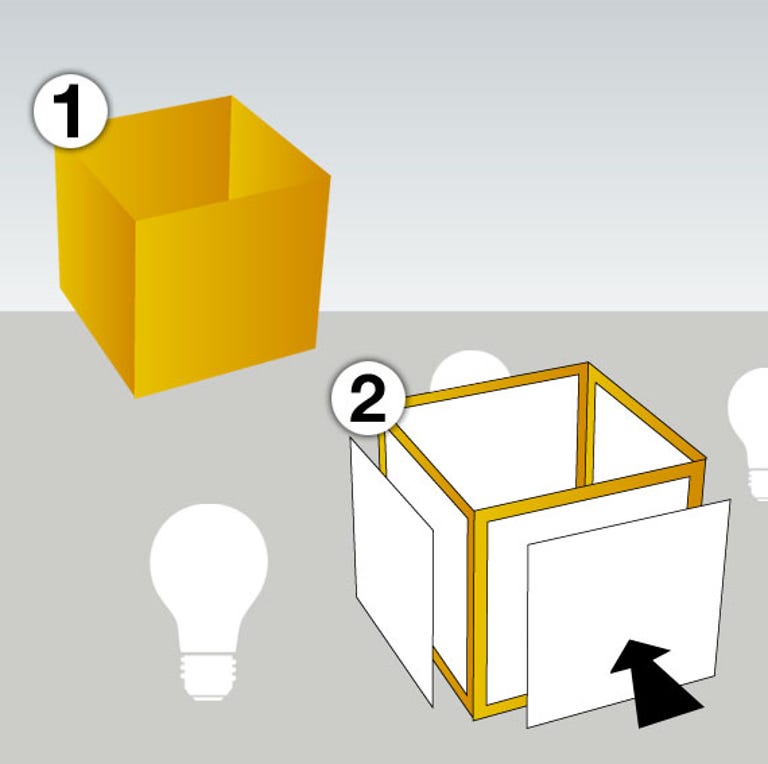
5. Easy Light Tent
Ever look at those photos in the Argos catalogue and wonder how they got the products looking so prettily lit? The key to that look is a light tent. It's like a softbox, except it's not attached to the camera, and light enters it from all directions.
The result is an even, brightly lit photo that's great for showing off stuff you're going to eBay. You can build a light tent as big as you want, but obviously you'll need more lights as you grow the contraption.
To make a light tent, cut square sections out of the sides of a sturdy box (1), as shown above. Then locate some diffuse paper -- thin tracing paper works fine, but you can also try white fabrics.
Now you'll need to tape the diffusing paper around the box, leaving an opening on one side so that you can stick your camera in to take photos of whatever's inside (2).
The key to getting this all to produce an even light is to position your lights properly. You can use multiple flash heads, but if you're building your own light tent, you're probably not stashing multiple flash heads. A good alternative is three or four household desk lamps pointed in on each face of the box.
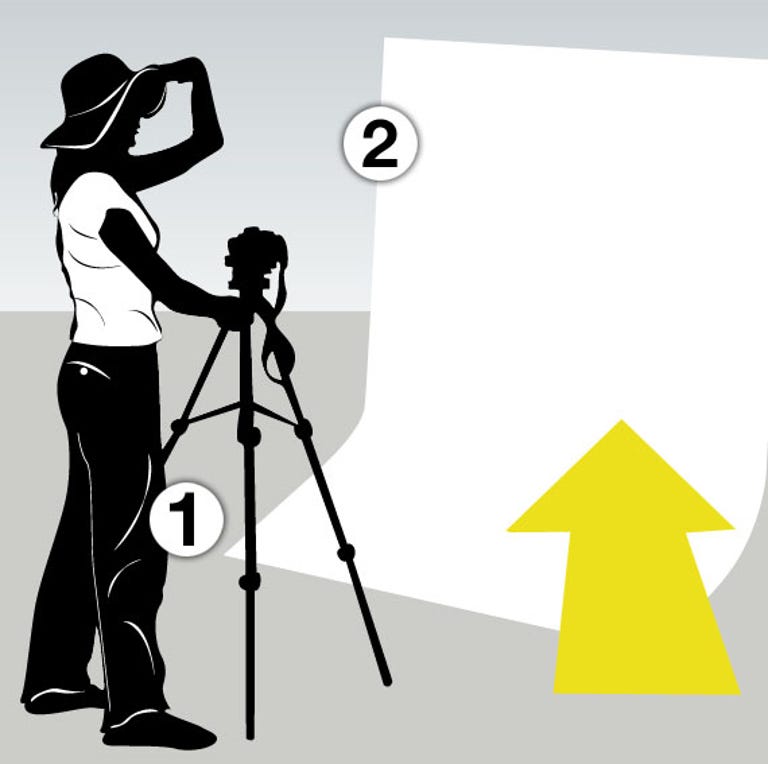
6. Infinite White Backdrop
Probably the easiest DIY project of them all, the infinite backdrop just requires that you find a white wall and expose your subject correctly, while throwing enough light at the wall behind them to 'blow out' the background -- that is, overexpose the white wall so much that it appears infinite.
To throw light at the wall you can use household lamps pointed at the surface. Remember, you want to light the wall so that it overexposes in relation to your subject. If you just keep throwing more light at both the subject and the wall you won't be overexposing only the wall.
Using household lamps will probably do odd things to the colour balance of your photos, but you can fix most of this in Photoshop.
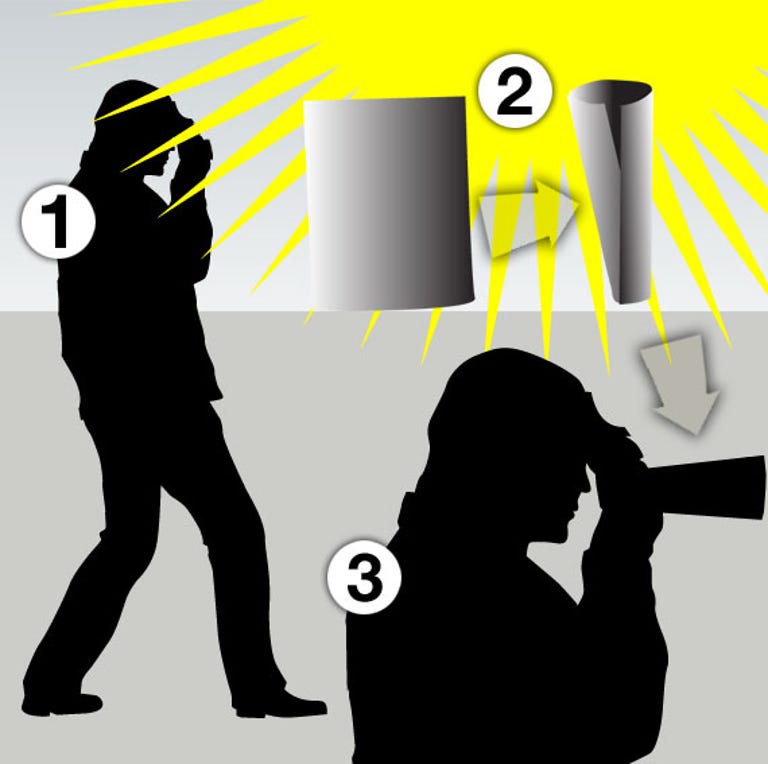
7. Homemade Reflector
Luckily, Mother Nature is a socialist. Because of her kind heart, every photographer -- no matter how poor -- has access to the best lighting equipment in the world: the Sun.
The sun is a multi-billion-watt flash bulb sitting in the sky. It's completely free to use, but there's one problem with it: it tends to head in from one direction.
Most of the world's most beautiful photos are taken in natural sunlight, so there's no need to use a reflector to improve your photos. But if you do notice your subject's face is in so much shadow that you're uncomfortable, there are loads of everyday objects you can use to bounce that sunlight right back into the shadows.
Take a large sheet of wood and paint it matte white (1). Now angle the sheet into the sun. You can prop it against a wall, a tree, or get someone to hold it for you. The idea is to bounce the sun's rays back on to your subject, as in the diagram above (2).

8. Flash Diffuser
Camera shops will happily charge you for the little bits of plastic that attach to the front of your flash and soften the light a little. Others will tell you that you can't attach a diffuser to a built-in flash. In fact you can.
Admittedly you'll look slightly odd with your camera covered in sellotape and bits of plastic, but who cares what's going on behind the camera, as long as the shot is great?
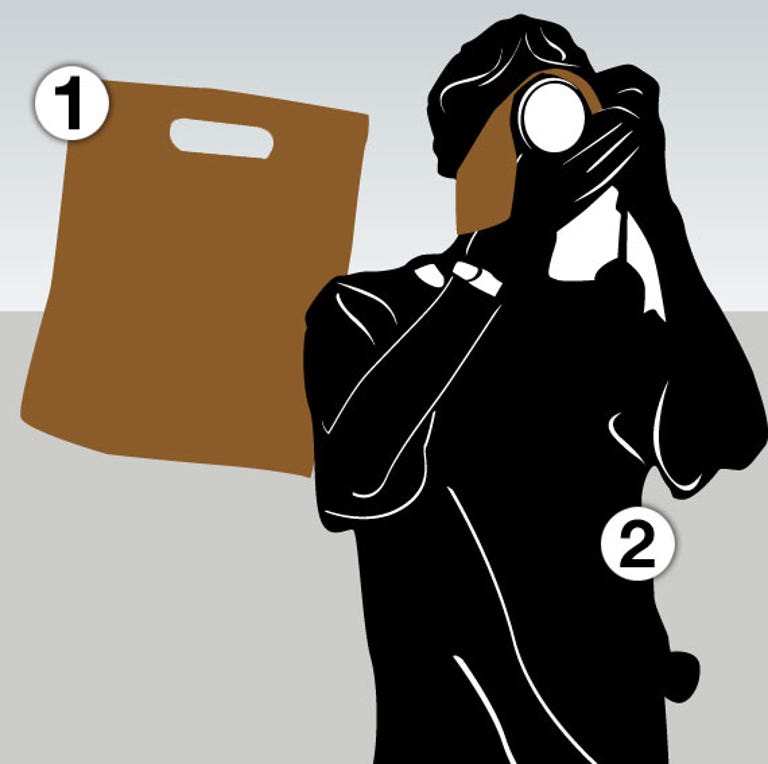
To make your DIY flash diffuser, you'll need a translucent bottle or milk carton (1). Cut the base off the carton, as shown in figure 2 above. Now attach the base to the camera flash, shown in figure 3. You can add and remove extra layers of carton to make the flash even more diffuse.
9. Splashproofing
Some companies will try to sell you expensive waterproof housing for your camera, but did you know you can defend your camera against the elements using nothing more advanced than a bin liner (1)?
Simply wrap the liner around your hands and the camera, make a hole for the lens to poke out, and sellotape everything into a decent shape (2).
Before anyone posts that this is ridiculous, you might want to consider that the UK's top press photographers can often be seen walking around the rain-drenched Glastonbury festival with ten-grand cameras wrapped in nothing more than bin liners.

10. Paparazzi Helmet
You know the drill. You see a celebrity, you whip out your camera, the celeb starts throwing kicks your way (1), then punches. Before you know it you've smashed your Canon EOS 5D Mark II all over Oxford Street and your face has been ripped clean off.
To avoid this common tragedy, you can build a mounting bracket to attach your dSLR to a builder's helmet. Even if you're not out to harass celebs, you can still use your camera hat on most days.
The hassle with dSLRs is that they don't easily fit in coat pockets. But with a homemade camera hat, the dSLR is stored neatly out of the way, but ready for use when you need it. Simple, and with the added bonus of improving any paparazzo's dignity.