How we test: Digital cameras
Learn about CNET's testing procedures for digital cameras.


Under tungsten lighting, we shoot sample images of our carefully created scene, which contains a diversity of colors, contrast, textures, and patterns. Under daylight-balanced HMI lighting, we shoot a series of test targets to determine how well a camera deals with important image-quality challenges such as noise, accurate color reproduction, and sharpness. To evaluate a camera's performance, we time how long it takes to perform typical functions, such as powering up and shooting the first picture, and how fast it can snap two pictures in a row. Our image-quality analyses and performance test results combine to form the basis of our overall assessment of camera's abilities, and how it stacks up against the competition.
Image-quality tests
Noise test
To evaluate the amount of noise generated by a camera, we start by capturing images of an X-Rite Munsell ColorChecker Chart target (formerly known as the GretagMacbeth ColorChecker Chart) usingdaylight-balanced HMI lighting at each ISO setting the camera supports. The camera's white-balance setting is set to either daylight or manual, depending on which one is more color-accurate. We then analyze the images using Imatest image-analysis software to measurably evaluate the generated quantity of color and luminancenoise. The images are captured at the lowest-available JPEG compression setting, and at the camera's highest native resolution. Settings such as sharpness, contrast, and saturation are set to the camera's defaults.
Color reproduction ability test
While color can be corrected via software after an image is captured by a camera and copied over to a computer, it's usually best to start with a captured image that is as color accurate as possible--especially for those instances when an image will not be edited or might be sent directly to a printer.
To evaluate how well a camera can reproduce accurate colors, we capture images of the X-Rite Munsell ColorChecker Chart target using daylight-balanced HMI lighting. The camera's ISO setting is set to 100 or as close as to 100 that the camera supports. Images are captured at the camera's daylight white-balance setting. We then analyze the captured images using the Imatest image-analysis software to measurably evaluate a camera's ability to reproduce colors correctly, based on the industry standard sRGB color space. The images are captured at the lowest-available JPEG compression setting and at the camera's highest native resolution. Settings such as sharpness, contrast, and saturation are set to the camera's defaults.
Sharpness test
To evaluate how well a camera can create sharp images, we capture images of an ISO 12233 test target using daylight-balanced HMI lighting, set to the camera's lowest ISO and on automatic white balance We then analyze the images using the Imatest image-analysis software to measurably evaluate a camera's capability when capturing sharp details. The images are captured at the lowest-available JPEG compression setting, and at the camera's highest native resolution. Settings such as sharpness, contrast, and saturation are set to the camera's defaults.
Additional testing

If a camera saves uncompressed files, we capture uncompressed test images using three different white-balance settings:
- Automatic white balance
- Manual white balance
- White balance preset for tungsten or incandescent lighting
We also shoot images using a camera's lowest compression-mode setting (the best available quality setting that uses compression) using the same three white-balance settings.
CNET Labs also tests a camera's ability to balance its built-in flash with ambient light by capturing an image using the camera's flash white-balance setting (or the automatic white-balance setting if a specific flash white-balance setting is unavailable). Other than the built-in flash, the only additional light source for this test is a shaded lampwith a 150-watt incandescent bulb.
We evaluate the quality of the test images for dynamic range, tonal range, proper exposure, accurate color reproduction and saturation,highlight and shadow detail, white-balance accuracy, proper flashillumination, image sharpness, and lens distortion. We also look for typical problems that arise in digital cameras images, including noise,chromatic aberration (fringing), blooming, and aliasing, as well as artifacts caused by compression, or demosaicking.
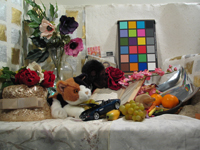
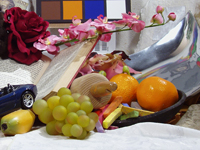
In addition to the test images captured in our camera lab, we shoot additional photos in both indoor and outdoor settings. Scenes are photographed in a variety of lighting situations, capturing images that contain a diversity of colors, contrast, patterns, and light levels. We also capture images of people with a variety of skin tones, both with and without the flash.
Performance testing
For all digital-camera performance testing, we run each set of tests a minimum of four times, discarding any anomalous results. We report the average of the remaining times, using a minimum of three iterations to calculate the average.
Time-to-first-shot test
This test measures how soon a camera can capture its first picture after being powered up. We first determine the fastest way to take a photo after starting up; for instance, with some cameras, you can hold the shutter down while turning on the power, and it will automatically shoot as soon as it's ready. Some cameras won't register the shutter press until after they've reached a certain point in their power-on process.
Shot-to-shot time test
This set of tests measures how fast a camera captures a second photo immediately after capturing the first. We focus the camera on a digital timer, set the zoom lens to the middle of its focal range, turn on the camera's LCD display, and use the highest native resolution.
-
We perform four different versions of this test:
- A typical scenario using the highest-quality compressed-image setting
- The slowest possible scenario using the highest-quality, compressed-image setting and the flash
- Using TIF file settings, if available
- Using RAW file settings, if available
For each scenario, we press the shutter, then press it again rapidly and repeatedly, until a second shot is captured.
Continuous-shooting (burst) mode tests
This set of tests measures how fast a camera captures multiple consecutive photos using the camera's continuous-shooting mode. Variables that can impact how fast a camera can capture consecutive images are the camera's integrated buffer and the data transfer throughput of the memory card. With the camera set to continuous-shooting mode, we capture as many frames as possible with a camera focused on a digital timer. We count how many frames a camera captures at a consistent rate until the rate starts to slow. To obtain the frame rate, we divide the number of frames captured by the total time from the first frame to the last frame shot. We do two versions of the test in order to obtain a camera's slowest and fastest burst-mode frame rates, using the following settings:
-
Slowest settings:
- We choose the low-speed option, if available.
- The optical lens is zoomed in as tight as it can go.
- The flash is turned off.
- We use the highest-available resolution.
- We use the lowest-available compression setting.
- We leave the camera's LCD on and enable automatic review.
- We choose a shutter speed of 1/60 second or the next-closest (higher) setting, if available.
-
Fastest settings:
- We choose the high-speed option, if available.
- The optical lens is zoomed out to its widest angle.
- The flash is turned off.
- We use the lowest-available resolution.
- We use the highest-available compression setting.
- We turn off the camera's LCD and disable automatic review. .
- We choose a shutter speed of 1/60 second or the next-closest (higher) setting, if available.
Shutter-lag tests
This set of tests measures how quickly a camera captures an image after the shutter-release button is pressed. Anyone who has ever tried to take a picture of an active child, pet, or similar subject in motion knows the importance of this information. To run these tests, we use the shutter-lag test created by Ed Schwartz at Shooting Digital. We follow the procedure for the Without pre-focus test, but instead of focusing the camera on the rotating image on the CRT display, we first focus the camera away from the image, on an object off in the distance to set the focus to infinity so that the AF system is starting from its furthest focus point. We do two versions of the test, one for the fastest focusing speed by setting the CRT display's contrast to maximum, and one for the slowest focusing speed by setting the CRT's display contrast to its minimum setting. We use the following settings for both versions of the test:
-
Common settings:
- The flash is turned off.
- We enable the autofocus illuminator option, if available.
- We choose the lowest-available resolution.
- We use the highest-available compression setting.
- We turn off the camera's LCD and disable automatic review.
- We choose a shutter speed of 1/60 second or the next-closest (higher) setting, if available.
Testing equipment
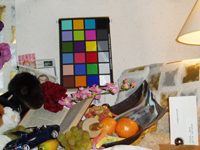
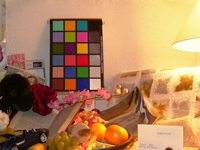
All our target-based testing is conducted using two 5-inch Altman 575SE-M HMI Fresnel lights with electronic ballasts. The bulbs are rated at 575 watts and are daylight balanced. The test targets we use are an X-Rite Munsell ColorChecker Chart and an ISO 12233resolution target. Our Labs-based, simulated, real-world scene is photographed using two Mole-Richardson Tweenie II Solarspot lights with 500-watt tungsten bulbs, and a Lowel Omni-light with a 300-watt tungsten bulb. Our fixed scene includes an X-Rite Munsell ColorChecker Chart target and an IRE 100 white card. We use a second IRE 100 white card to set a camera's white balance for our tests that require manually setting the white balance. We use a Konica Minolta Chroma Meter CL-200 to regularly check the color temperature of our lights. When the color temperature starts to deviate by more than +/-200 degrees Kelvin from the norm, we swap out the bulbs for new ones.
-
Depending on the camera, we use one of the following storage media during testing:
- SanDisk Extreme Pro 90MB/s CompactFlash card
- SanDisk Extreme Pro 95MB/s SDHC 8GB card
- Sony QXD 125MB/s 16GB card
The image quality of images captured during testing are evaluated using Imatest image-analysis software, along with Adobe Photoshop CS6. Captured images are viewed using a color-balanced, HP DreamColor LP2480zx Professional Display 24-inch LCD monitors. We maintain the proper color balance of the display using an X-Rite Eye-One Photo colorimeter. We also view captured images on printouts using the nine-color, 5,760x1,400dpi Epson Stylus Photo R3000 photo printer.
Image artifact examples
Here are some examples of the image-quality characteristics we consider when evaluating a camera, as well as some indications of where we draw the line between acceptable and unacceptable artifacts.
White balance
 |  |
 | The sample at the top left has correct white balance; the whites and grays look neutral, and there's no discernible color cast. We consider the sample on the bottom left acceptable. Even though the image appears a bit too cool (bluish) and measurements indicate that the blue channel is a bit too strong, it still lacks an obvious color cast. The incorrect sample on the top right has an obvious, distracting color cast. |
Exposure
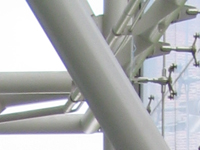
 |  |
 | The top left and right samples are overexposed and underexposed, respectively. Using the correct exposure on the bottom left as a reference, you can see that in the overexposed sample, the sky looks blown out, and you can't tell that there's a glass wall on the right side because it loses the reflection. The underexposed version loses detail and definition in the white pipes. |
Color saturation
 |  |
 | The sample to the immediate left most accurately represents our test scene. The sample on the top left has undersaturated colors; it looks as if there is a smoky filter in front of the scene. The sample on the top right is oversaturated, with colors that look too vivid to be real. |
Dynamic range
 |  |
We use various techniques to evaluate dynamic range, but these are two quick indicators: to judge quality of shadows, you should be able to clearly see the gorilla's face and the various shades of brown that comprise it. For good highlights, you should see well-defined reflections off the CD and the detail of the hat's weave.
Noise
 |  |
 | The top left and right examples respectively show low and high noise, and the sample to the immediate left displays moderate noise. The noise in these samples appears as white spots. We consider the quality of the first sample to be good, the second unusable, and the third acceptable. |
Flash exposure
 |  |
In the good flash-exposure example on the left, the camera appropriately meters for the lamp on the side, and there's relatively even illumination across the scene. In the bad flash-exposure example, the lit area under the table lamp is blown out, yet the elements of the scene on the left don't receive enough illumination.
Compression and demosaicking artifacts
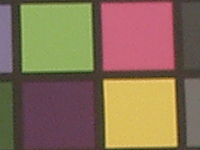 | 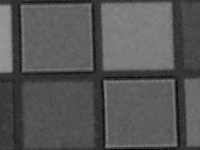 |
Compression and demosaicking artifacts are difficult to discern since they tend to be accompanied by noise and poor focus; cameras with poor compression algorithms tend to also suffer from other limitations that degrade overall image quality. In the image on the left, the bright outline within the green and yellow squares is an indication of these types of artifacts. The image on the right shows only the lightness values for the blue channel, which tends to show the artifacts most clearly. If you look closely, you can also make out some blotchiness, which can be the result of poor demosaicking, the process by which a camera estimates full-color image data from the partial data delivered by the sensor's color-filter array.
Chromatic aberration (fringing)
 |  |
Chromatic aberration (or fringing) usually appears as a purple glow around the edges where two high-contrast objects overlap, although sometimes it appears in green and red. Though most digital cameras suffer from this problem to a certain degree, some models do so more egregiously than others. The image on the right is an example of an unacceptable amount of chromatic aberration. The image on the left displays some color shift along high-contrast edges, but this is more typical of what you should expect and is at a relatively acceptable level.