How to keep Snow Leopard when upgrading to Lion
While Lion may seem like an enticing installation, some programs are not yet compatible with it. You may wish to maintain Snow Leopard in a dual-boot setup to maintain compatibility. Here is how to do this.


The features and advancements in OS X Lion may make it an enticing installation; however, as has been mentioned previously, Apple is doing away with a few key features that have maintained compatibility with some popular applications. Some of these features, such as the lack of Java, can be remedied by installing support for them, but there is no workaround for others like Rosetta and support for 32-bit system extensions in the default 64-bit boot environment. And a number of (perhaps mostly relatively obscure) applications may have trouble running, as can be seen on the RoaringApps Lion compatibility database. As a result, for some people it may still be useful to maintain their current Snow Leopard installations, even if they would like to install Lion to take advantage of its features.
There are a couple of routes to take to run both Lion and Snow Leopard: virtualization and dual-booting.
With Lion, Apple changed its EULA to allow for virtualizing of the operating system. Therefore, if you are interested in maintaining your current Snow Leopard OS you can do so and also install Lion; however, setting this up for now is a bit limited. Common virtualizing programs still prevent you from installing OS X (even Lion), so it will take an update to these software packages to enable this.
Additionally, even though virtualization may seem like a neat idea, after using it for a while you may find it to be redundant and cumbersome, especially when virtualizing the new OS on top of an older version of the same OS. If Apple's EULA would allow for Snow Leopard to be virtualized on top of Lion, then people could more feasibly get their incompatible applications running in Lion in a minimal virtual machine setup of Snow Leopard. But unfortunately this is not the case. The only option for this would be to virtualize the OS X Server version of Snow Leopard, but that would require the purchase of the server software.
Because of these OS limitations and licensing quirks, the better alternative to virtualization is to set up a dual-boot environment, in which you can upgrade your Snow Leopard installation to Lion and then set up an smaller secondary Snow Leopard install to contain your incompatible programs. Like Boot Camp, this would require you to restart your system to run the Snow Leopard applications, but it would be an option that would work.
You have two routes to take to set up a dual-boot environment. The first is to create a dual-boot environment on your main boot drive, and the second is to install Snow Leopard to a secondary drive (such as an external FireWire drive) and use that to boot when necessary.
Here is how to set this up:
Install Lion
Download Lion from the Mac App Store and install it (optionally create a boot DVD from the installer using these instructions before installing)Partition or otherwise set up your drive
If you are creating a dual-boot setup on your boot drive, then open Disk Utility and select your boot drive device (not the boot volume). Click the Partition tab that appears, and under the Partition Layout diagram click the plus button to add another partition. By default, Disk Utility will split the partitions in two, but if more than half the drive is used, then it will use the remaining empty space for the second partition.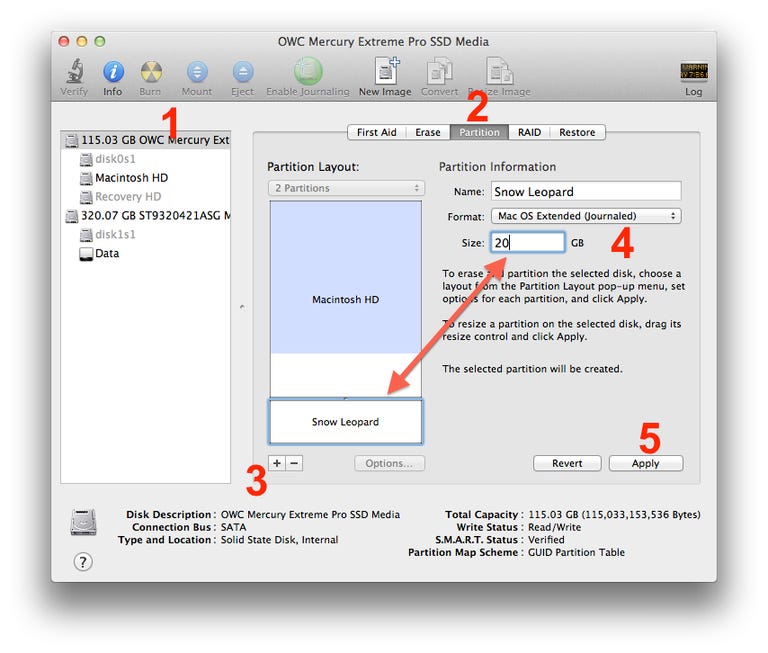
To partition your drive, first select the drive device (not the volumes underneath it), then select Partition tab, add a partition, and size it according to your desires. Then click Apply to save the changes (click for larger view). Select the new partition and resize it so it will accommodate your Snow Leopard applications and any support data (approximately 15-20GB should be plenty, but it does depend on your use). Keep in mind that Snow Leopard itself uses around 6GB of space, and will require about double that to at least run in a basic bootup.
With the partition sized properly, name and select a format for it, and then click the Apply button to create the partition.
If you are not going to partition your drive and instead are going to use an external drive, then attach it and format it using Disk Utility. You can optionally partition it as described above if you have other data on the drive, but this is not necessary to do.
Install Snow Leopard
At this point you have an empty volume on which you can install Snow Leopard. Insert your Snow Leopard disc and restart your computer with the C key down to boot off the disc, and then proceed with the installation, ensuring you select the blank volume you previously set up as the location to install Snow Leopard.When the installation is complete the system will boot to Snow Leopard by default, but you can use the system preferences in either Snow Leopard or Lion to change the default boot drive. In order to boot to a different OS installation than the default one, while you can continue to use the Startup Disk preferences, you can instead hold the Option key at bootup to bring up the boot menu.

This procedure allows you to install a fresh copy of Snow Leopard on which you can install the few programs you have that still require it to run; however, if you wish, you can approach the dual-boot setup from another direction, which is to first partition and set up your drives (Step 2 above) and then use a tool like Carbon Copy Cloner or SuperDuper to clone your current Snow Leopard installation before upgrading it to Lion. This in essence will create the same setup with a couple of differences. The first is that it will have all of your current applications available in Snow Leopard so you will not have to set anything up. The second difference is the drawback to this, which is that the installation will require more space, even if you exclude your personal data in the cloning process.
Regardless of your approach to creating the dual-boot environment, you can use this procedure to get Snow Leopard running on your system, and when you are done using it and have fully moved to Lion you can use Disk Utility to erase the Snow Leopard partition and resize the Lion partition accordingly.
Questions? Comments? Have a fix? Post them below or e-mail us!
Be sure to check us out on Twitter and the CNET Mac forums.