 Why You Can Trust CNET
 Home networking explained, part 3: Taking control of your wires
CNET editor Dong Ngo explains how to get down and dirty with network cabling.


Editors' note: This post is part of a regularly updated series. For the other parts, check out the related stories below.
All home networks start with a network cable. Even if you plan on using all wireless clients, in most cases you will still need at least one cable to connect the wireless router and the broadband modem. A typical home network needs more than that because chances are you also want to connect a few Ethernet-ready devices to the router.
Knowing how to make your own networking cable is an important, handy skill for a few reasons. First, network cables that you buy at the store are generally grossly overpriced: a 7-foot-long cable can run you $20, almost $3 per foot. Secondly, it's hard to find a ready-made cable that's just the perfect length; most of the time it's either too long or too short. When you make your own, the cable will be exactly the length you want, and if it's not, well, you can make another one or adjust it.
You can also make other hardware parts for the network, including network wall ports and patch panels. As you will see after reading this post, this is a skill that's not only easy to learn, but it doesn't cost much, either. All the tools you need cost less than $40. Parts, such as patch cable and connectors, are also very affordable.
The biggest return on this investment, however, is that you may find making and wiring your own network hardware actually fun, and it gives you complete control of your home network. A well-designed wired home network is also the best in terms of performance, since -- for right now, anyway -- cabling is much faster and more reliable than a Wi-Fi signal. If you want to do serious streaming and data sharing within the local network, running network cables is the way to go.
Now, let's start with the cable itself.

This is more than you need to make or adjust the length of a network cable. Note that I cut off one of the connectors from the ready-made cable; there's a bag full of connector heads that are eagerly waiting to be the replacement.
1. Making your own network cable
A network cable basically consists of a patch cable and two network connectors (formally known as RJ45 modular plugs) attached to each of its ends. The job of making your own cable is attaching these connectors to a patch cable.
Note: By network cable, I mean the CAT5e cable, which is the most popular type of networking cable that can handle gigabit connections. The newer network standard, CAT6, however, has exactly the same wiring (with the same tools), but requires CAT6-compatible parts.
What you need:
A crimping/cutting/stripping tool: This the most important tool; it helps cut, strip, and crimp patch cable. It costs just about $15. I personally use the Trendnet TC-CT68.
Patch cable: You can buy this in bulk; it costs anywhere between $40 and $100 for 1,000 feet. Shorter length costs less, accordingly. You can also turn an existing network cable into a patch cable by cutting off one or both of its network connector heads. This is typical when you want to make a cable shorter or want to replace a broken network connector.
RJ45 modular plugs: These network connector heads are very cheap; you can get 100 pieces for just a few dollars online.

Here are the steps to make your own network cable. Remember, the wiring scheme is the hardest part (click to enlarge).
The steps:
Use the tool to strip the patch cable's jacket about 1.5 inch from one end; you'll find eight color-coded wires (twisted into four pairs) that you'll need to arrange in a particular scheme. (In my experience, it's easier to spread these wires out and put them in the right scheme when you strip more than 1.5 inches of jacket. Later on you can cut the wires shorter if need be.)
This scheme, from left, is: white/orange > solid orange > white/green > solid blue > white/blue > solid green > white/brown > solid brown. Remembering this order is the hardest part of making the cable.
Note that the wiring scheme above reflects the popular 568B wiring standard, which is recommended. You can also use the less popular 568A wiring standard (white/green > solid green > white/orange > solid blue > white/blue > solid orange > white/brown > solid brown). There's no difference in terms of performance between these two wiring standards, and you can also use both of these wiring standards on one cable (one for each end) to make it a crossover cable used to connect two Ethernet-ready devices directly to each other.
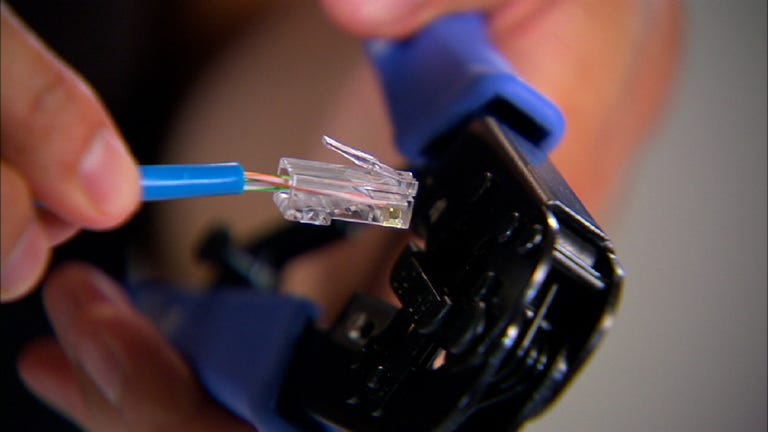
- With these wires pulled out straight and close together in the order above, make sure they are all the same length (you can trim them a bit if needed). Now insert them into a modular plug with the plug's bottom facing you. This step is actually very easy. Despite the small sizes of the parts involved, the plug has pin grooves on the inside to accommodate the wires, and the tiny size means that the wires can't easily go to wrong pins as long as they are properly aligned coming in. Check to make sure the wires go into the plug in the right order.
- Insert the plug (with the wires now inside) into the crimp slot of the tool and crimp it.
Repeat the same step with another plug on the other end of the patch cable, and you have made yourself a network CAT5e cable. A quick calculation shows that a homemade network cable costs just a few cents per foot.
2. Wiring a wall network port
Now that you know how to make your own network cable, let's talk about how to hide it. As you might imagine, it's not a good idea to run a long cable from the router (in the living room) all the way to a home office, with, say, the kitchen in between. Instead, it's better to make two wall network ports, one at the router and the other in the office. The cable connecting these two network ports can be hidden under the floor, on the roof, or behind the wall.
Depending on your home, the actual job of running patch cables behind the wall or under the house, and making both of its ends come out of the wall, can be tricky. You might want to hire a handyman for that job, especially the part where you need to cut holes in the wall. In this post, though, I'm just talking about how you can make an Ethernet jack, with the ends of the patch cable already sticking out of the wall. Again, this is a CAT5e jack, also known as a RJ-54 Ethernet jack. A CAT6 jack has the same wiring, however.

A good punch-down tool is essential to making your own network port.
What you need:
A punch-down tool: This tool costs about $20. I use a Trendnet TC-PDT, which incorporates a blade to cut off extra wires.
Ethernet jack and wall plate: As many as needed. Generally a set of one jack and one wall plate costs around $5. You can buy these separately and you can find a wall pate that can house more than one jack.
The steps:
- Use the stripping tool (or a pair of scissors) to strip the patch cable about 2 inches from its end. You can strip more than 2 inches if needed, since the extra length will be cut off, but note that there's a limited amount of patch cable coming out of the wall so you don't want to cut it too short. Spread the eight wires from one another. There's no need to put them in a particular order since the pins on the Ethernet jack are color coded.
- Place the cable in the middle of the jack and push its wires on the pins of the matching color for the 568B standard. This means that the orange wire goes into the orange pin, the blue wire goes into the blue pin, and so on. Technically, you can use the 568A wiring standard, but in this case you'd need to do the same with the other end. Generally, you want to avoid using 568A for network ports because it could cause problems in the future if somebody else repairs the port and uses the more common 568B standard.
- Use the punch-down tool to punch these wires down on their pin in one quick motion. If you do it right, the wire will be punched down, and the excessive wires will be cut off.

Wiring an Ethernet jack is actually much easier than making a network connector, since you don't have to remember the wiring scheme; instead just match the colors of the wiring and the pins (click to enlarge).
Now you just need to install the wall plate and you are done with one network port. You can make another port at a different end of the house that connects to the port you have just made if you want to have just a single wired connection. For a home with multiple wired connections with devices being far apart, though, you should consider using a patch panel for the other ends of the (hidden) patch cables.
3. Wiring a patch panel.
If you want to have a wired network with many wall network ports coming out in different rooms of the house, it's best to use a patch panel at the central location where the router/switch and/or the home server is. A network patch panel is basically a collection of many wall ports on one panel, with each of the ports connected via a patch cable to another port elsewhere in the house. This allows for easy management of the wired network and better organization.

Wiring a patch panel is very similar to wiring a network wall port.
In a way, the patch panel is just a bunch of network jacks bundled into one. You can find a patch panel with anywhere from 8 ports to 24 ports or even more, and you can also use multiple patch panels together to make a bigger one. Generally, you want to have a patch panel that offers the same number of ports as the total number used in the entire home or office.
Wiring a patch panel is exactly the same as wiring an Ethernet jack; you just need to do that multiple times for multiple ports. For most homes, an eight-port patch panel, such as the $16 Steren FastHome Data Hub, fits the bill.
Note that a patch panel is more of a convenience than a necessity. You can always just turn patch cables coming to the central place into network connectors (mentioned in the first part of this post) and connect them directly into a switch or router.
To learn the difference between Wi-Fi and (wireless) internet, and answers to frequently asked questions on connectivity matters , check out Part 4 of this series.