 Why You Can Trust CNET
 Monoprice Dual Extrusion 3D Printer review: A time-consuming, yet fun machine for 3D-printing hobbyists
Looking to make your own iPhone case - or any other plastic object for that matter? You can! As long as you have the courage and the time to master the Monoprice Dual Extrusion 3D printer.


The Monoprice Dual Extrusion 3D Printer is a challenging gadget. And at $1,200, it's an expensive one, too, even though it's among the most affordable of dual-extruder 3D printers. (Pricing for the UK and Australia is not available at this time, but the US price converts to £725 or AU$1,290.) But like all challenges, it can also be tons of fun, and deliver a great sense of accomplishment -- as long as you're up to the difficult task of mastering the relatively nascent state of 3D printing.
Monoprice Dual Extrusion 3D Printer
The Good
The Bad
The Bottom Line
For first-time users, there's a major learning curve with the Monoprice at every step, from putting it together and calibrating the build platform, to installing and using the software. If you're familiar with 3D printing, however, it's similar to other printers on the market, such as the MakerBot Replicator .
Keep in mind that, like all other 3D printers, the Monoprice requires a good deal of tweaking before you can create its first successful simple 3D object. And it will remain a learning process for a long time, since even more tweaking might be needed when you want to print more complex 3D models.
As a result, the Monoprice Dual Extrusion 3D Printer is not for everyone, especially those expecting to use it the way they do a regular inkjet or laser printer. But if you're into making your own 3D objects and are prepared for the amount of work involved, this is a very good machine to start with.

Assembly required
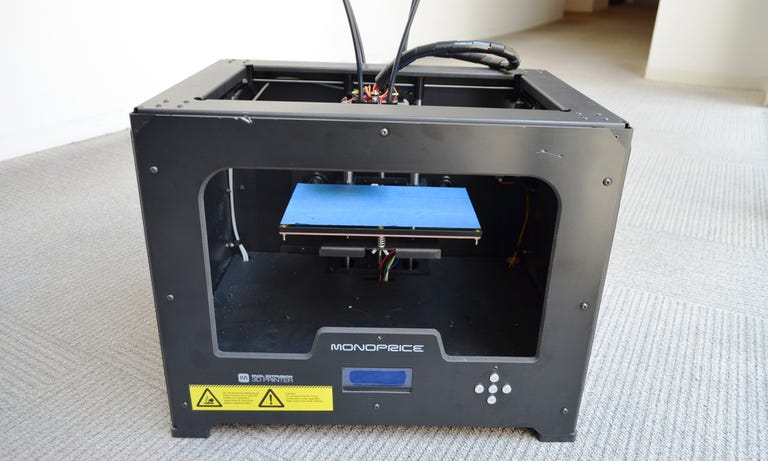
The 3D printer is a prepackaged machine, yet it looks like a do-it-yourself project that needs finishing. On the outside, it is a rectangular, cube-shaped box that measures 18.7 by 12.7 by 15.1 inches (476 by 322 by 383 mm) and weighs about 28 pounds (13kg). It consists of a sturdy metal frame and four covers made of soft material attached to it. The entire box is painted black and has no smooth surface. In fact there are a lot of sharp edges that could scratch your fingers if you're not careful.
Looking closer, a bunch of hex bolts keep all the parts together. Also included is a small bag of tools that contains a few hex wrenches and a large selection of extra bolts. Using these tools, you can disassemble the printer entirely, for troubleshooting or part replacement. Monoprice makes all the parts available for purchase separately for those who want to tinker around with the machine.
Note that the machine is not plug-and-play, and getting it up and running can be intimidating. Make sure you watch this instruction video closely, since the included manual doesn't have all the needed information.
Out of the box, the printer is about 90 percent assembled. You'll need to attach the dual-extruder print-head and assemble some other parts, including the filament-holding brackets, and two filament guide tubes. The machine includes two 2 pound (1kg) spools of PLA filament (one each of black and white) that will need to be installed on the brackets on the back of the printer. The machine also works with other types of filaments, including PVA and ABS.
The filament is the material used for printing -- similar to an inkjet printer's ink cartridges. They are basically easily melting and fast-congealing plastic strings that are fed through the print head's nozzles during a printing job.
The Monoprice uses standard filament spools that you can use with other 3D printers, including those from Makerbot. When you run out of filament, you can buy more from Monoprice, including those of different colors. Each 1kg filament spool costs around $35. In my trial, after a busy week of printing, I used up only about a third of the included filament.
Monoprice Dual Extrusion 3D Printer specs
| Extruder | MK-8 dual head |
|---|---|
| Plate | Heated metal build plate |
| Print technology | Fused Deposition Modeling |
| Build volume | 8.9" x 5.7" x 5.9" (225 x 145 x 150 mm) |
| Printing material | ABS/PLA/PVA/HIPS filament 1.75mm |
| Layer resolution | ±0.10mm |
| Positioning precision | XY: 11 microns (0.0004) / Z: 2.5 microns (0.0001) |
| Layer thickness | 0.1 - 0.5mm |
| Nozzle diameter | 0.40mm |
| Printing speed | 24cc/hour |
| Extruder temp. | 0-250°C |
| Heating plate temp. | 0-120°C |
| Connectivity | USB cable, SD card |
| Opering system supported | Windows XP or later, Linux, Mac 10.4 or later |
| AC input | 100~240 VAC, ~2 amps, 50~60 Hz, 350W |
| Dimensions | 18.7" x 12.7" x 15.1" (476 x 322 x 383 mm) |
| Weight | 28.7 pounds (13kg) |
| Software | ReplicatorG |
| 3D file type | Input: STL/OBJ, Output: X3G |
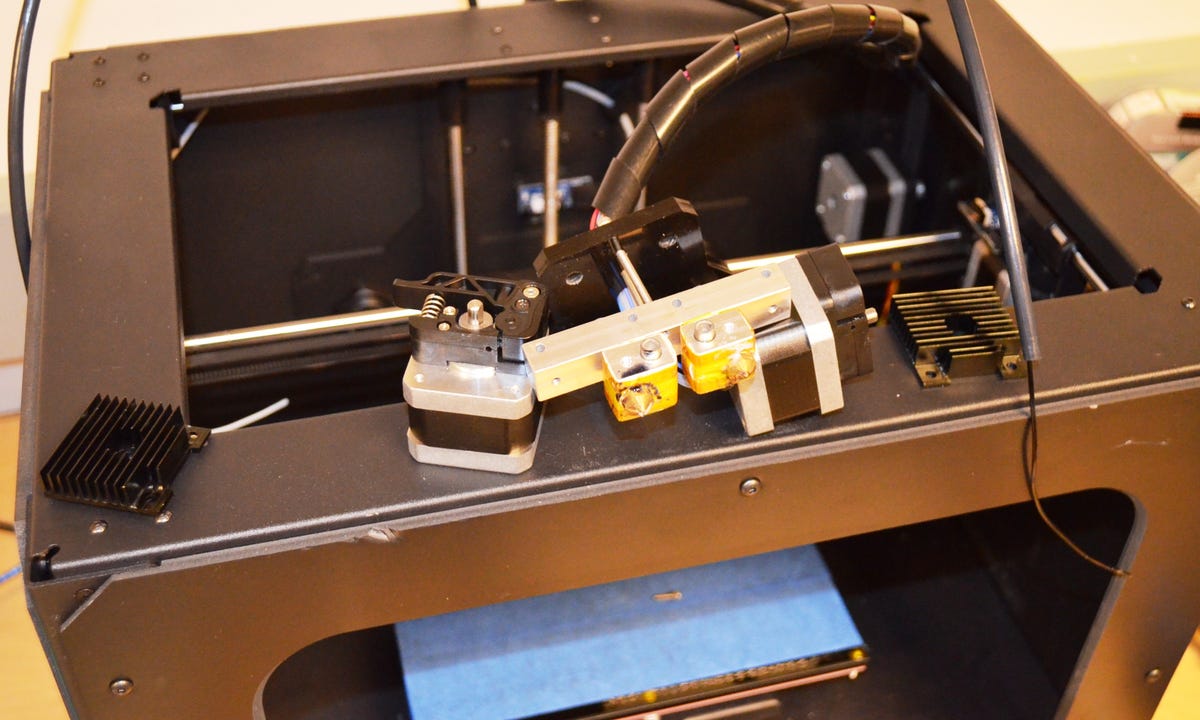
The printer's dual-extruder print head means that at any given time you can use two types of filaments with it, making it very convenient if you want to work with two colors at the same time. (With a single-extruder print-head, you'll need to swap out the filament each time you want to change the color.) When printing a dual-color object, its software is used to assign each of the Monoprice's two extruders a color.
In the end, though, because the printer uses whichever filament is currently loaded to a given extruder, assigning the colors doesn't really matter. Indeed, you can print in two colors, but unlike a standard printer, a 3D printer will print according to the color of the filament loaded, not to the color of the model.
Note that generally, you should use only one type of filament at a time since they require different temperature to melt. However, since HIPS and PVA are for support only, they can be used together with PLA and ABS, respectively. On the other hand, you can't use ABS and PLA filaments together.
The printer connects to a computer using a standard USB cable (included) via its port on the back. But it can also print directly from files stored on an SD card. (A 4GB card is also included; it contains the manual in PDF format.) The SD slot, however, is hidden on the inside of the printer, which makes it a little hard to reach.
On the front, there's a control panel that includes a four-line resolution LCD screen and five navigation buttons. You can use this panel to control many of the printer's functions, including calibrating the build platform, loading materials, preheating the print head, and so on.
Fused-deposition modeling
What a 3D printer does is mold melted material in the shape and size of the desired object. The Dual Extrusion is the first 3D printer from Monoprice, and like virtually all consumer-grade 3D printers, uses fused-deposition modeling (FDM) technology. FDM is an additive process in which a layer of plastic is extruded on top of the previous layer, one at a time. This process is very similar to caulking or icing a cake using a tube, but much more precise.
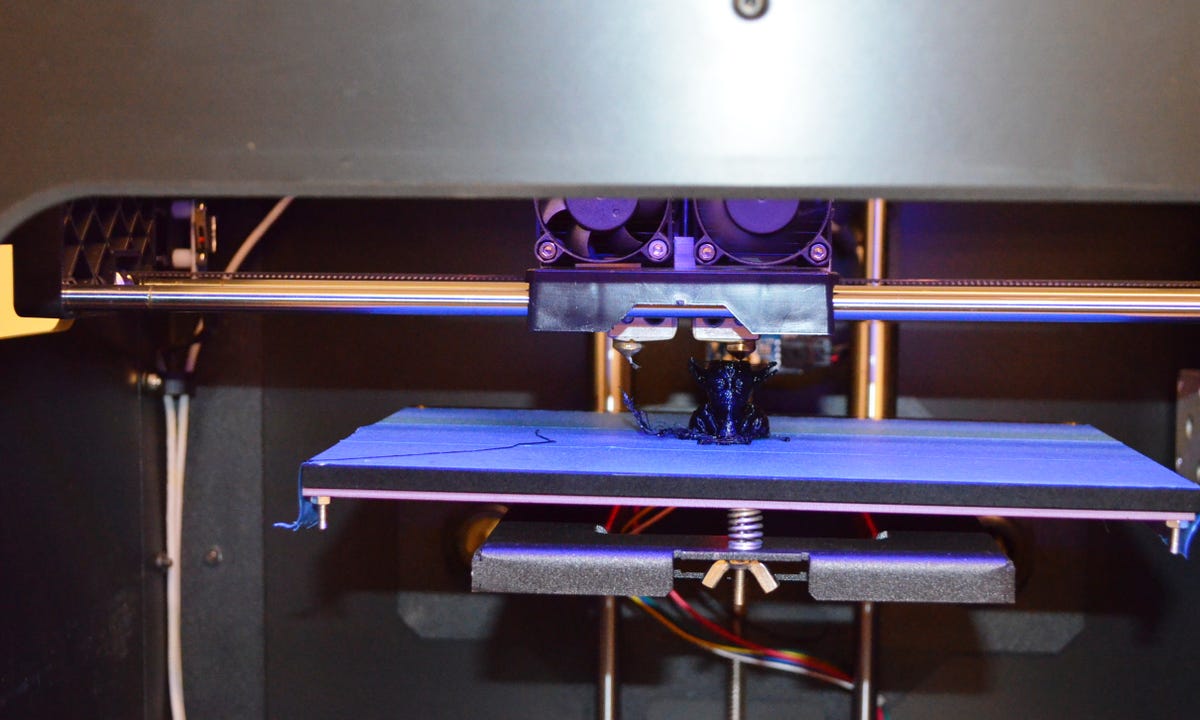
Similar to all 3D printers, the Monoprice has a plate -- called a build platform -- that stays underneath the print-head. During a printing job, the print head pulls the filament string from a spool, melts the plastic, and extrudes it onto the platform. The platform itself raises and lowers depending on the height of the object being built, and the plastic congeals very fast once it's extruded to form the 3D object.
The printer can accommodate 3D objects of up to 8.9 by 5.7 by 5.9 inches (225 by 145 by 150 mm) in volume, which is quite large. In reality, you'll likely print much smaller objects. Generally the larger the print, the longer it takes, and a maximum size object could take days to finish, considering the printer can print just 24 cubic centimeters per hour at most.
As for finding things to print, there is a huge collection of 3D object models at Thingiverse that you can use, or you can create one yourself using one of the various free modeling programs out there, such as Sketchup or Autodesk 123D. You can also invest in a personal 3D scanner, although those are probably best for committed hobbyists, given that prices start at $400.
Calibration required
While 3D printing sounds simple enough, getting the Monoprice ready to print something for the first time is anything but easy.
The hardest part is to make sure the build platform is properly calibrated. The platform is rectangular but there are only three screws underneath it -- two on the back corners and the third right in the middle on the front -- for the height and tilt adjustments, making it very hard to level it perfectly.
The guideline is to make sure the platform stays horizontal and at a distance from the print head that's just large enough for a piece of paper to fit through. In reality, you will need to make a test print after each adjustment to see if it works properly. It took me a few hours of trial and error before I could make a successful 3D print.
Another issue with the print platform is keeping your printed object from moving around while it's printing. Using painter's tape -- a roll of 3M tape is included with the machine -- on top of the platform helps reduce this risk, but it doesn't always work. When you print a large object, it might be a better idea to pause the print process to add more support to the object, or use tape to keep it grounded, before continuing.
The second hardest part is the print software. The Monoprice shares the same ReplicatorG (RepG) software as older 3D printers from Makerbot. RepG is an open-source application that requires the Python software interpreter to work with any of the supported platforms, including Windows, Mac OS, and Linux.
The problem is you need to install these two pieces of software (which are preloaded on the included SD card, or you can also download them) separately. What's more, even after the installation, chances are that you'll need to manually change the preferences of RepG for it to know the existence of Python in the system.
Once everything is installed properly and you have a 3D model file ready, RepG is quite powerful and intuitive, and it allows for customizing the 3D model in many ways. You can easily use the mouse to look around the 3D model, and scale, rotate, or set it to stay flat on the platform. How you see the model within the software dictates how it will be printed on the print platform.
The first 3D print
Getting RepG to print is a two-part process. First, it needs to generate the "gcode," which is a series of instructions that determine how the machine prints, step by step. The gcode decides everything, from the size of the object, to how fast the print speed is, to whether the object will be solid or hollow. Once generated, the gcode isn't customizable, so if you make changes to the 3D model, you'll need to regenerate the gcode from scratch.
(Note that the Monoprice Dual Extrusion also works with the MakerWare software, which is free and designed for newer Makerbot 3D printers, as well as a few other third-party 3D printing software.)
Depending on the complexity of the 3D model and how large your printed object is, it takes anywhere from a few minutes to a few hours for the software to generate the gcode and finish printing. You have two options for completing a job: copy the gcode file onto an SD card, or have the RepG print directly to the printer.
The benefit of the former is that you don't need a computer for the print process, which takes a very long time. In the latter case, you'll need to make sure the computer won't go into sleep mode or become unplugged from the printer, which would cause the print job to fail. Once a print job starts, you can pause it then resume it, but if you choose to stop completely, you'll need to start the job over from the beginning.
Before the printer actually starts, it first needs to heat up its extruders and the build platform, which can take up to 10 minutes. This is a required step, since heat is used to melt the filament. To save time, you can use its front control panel to preheat these parts while the gcode is being created.
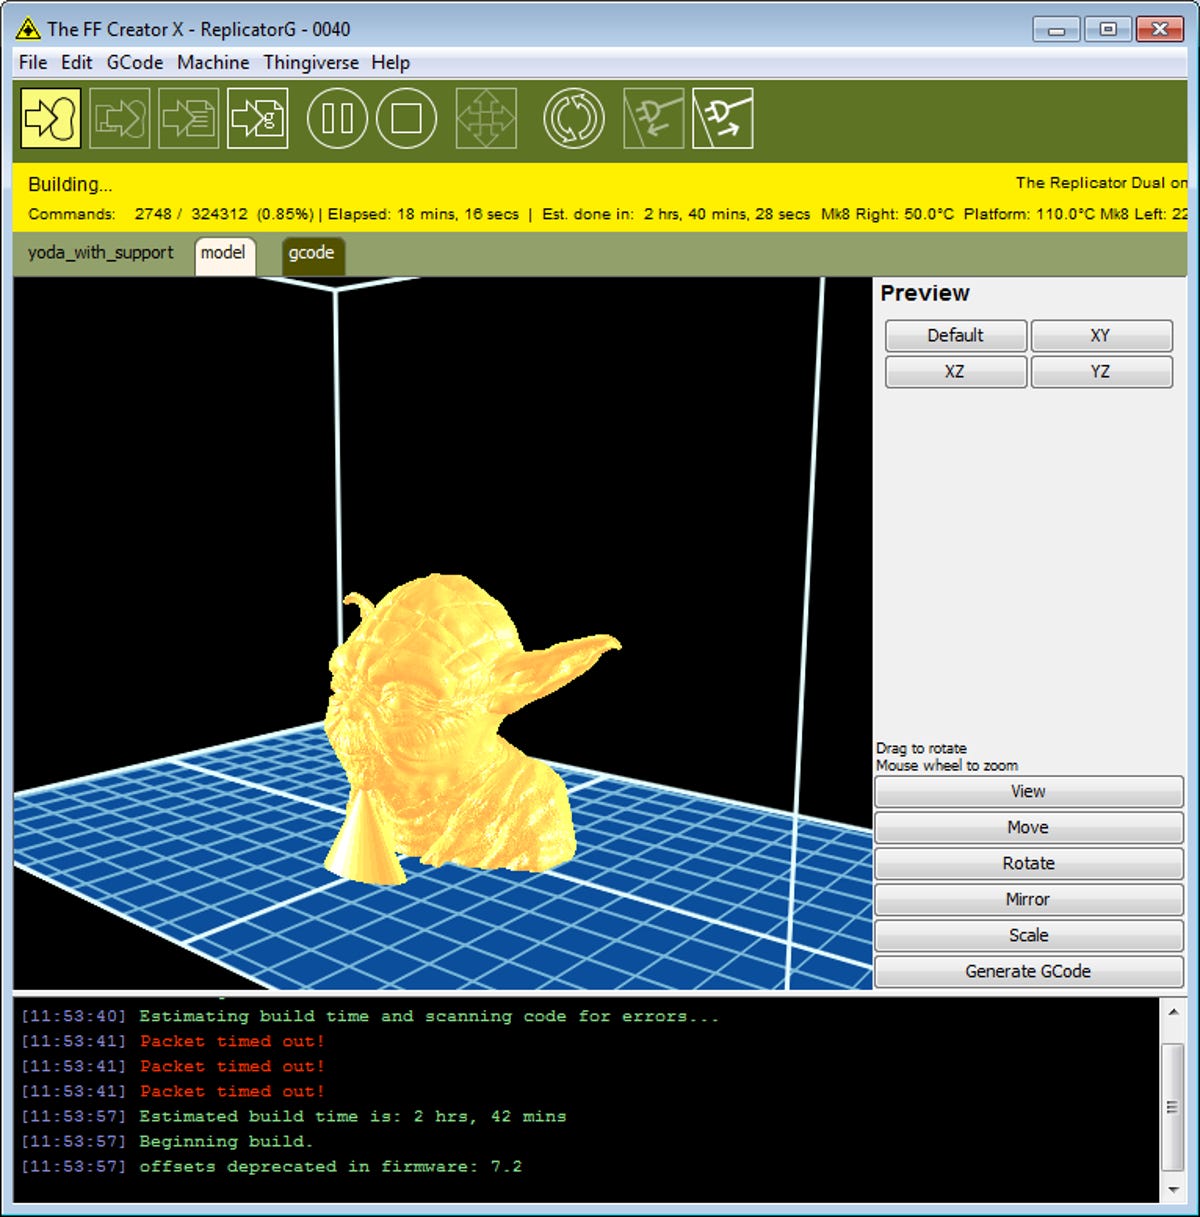
In my trial, it was really fun, and quite mesmerizing to watch the print head extrude a melted plastic string on the build platform and slowly -- very slowly -- and meticulously form the shape of a 3D object. With a resolution of 0.1mm, Monoprice can create object of very fine detail, and when I got my very first object printed successfully -- a little action figure of Yoda from "Star Wars" -- the feeling was nothing short of amazing.
Many times, however, after hours of printing, the half-done object would come loose and fall off the platform, making the rest of the print a failure. There were also times the extruded material was mushed into a ball. When this happened, I just wanted to call it a day.
I noticed that failed prints happened more often with large objects, specifically those that were wider than the distance between the two extruders. When the print-head moved around for one of the extruders to deliver the filament, for example, the other idle extruder might bump another part of the object and push it out of place. Sometimes when this happened, a few times, I could fix it by pausing the printer and righting the object before continuing. But if I had left the machine unattended, the print job failed.
That said, it's a good idea to check on the printer once in a while during a long print. It's really frustrating when a large half-done 3D print becomes a failure right before the end.
Much time, ongoing tweaking required
The good news is that, in my experience, the Monoprice was reliable once it completed a job successfully. When I wanted to print the same object again, even on a different scale, it didn't fail. On the other hand, if I changed to a new 3D model file of a significantly different object, especially one that was more complex, I usually had to recalibrate the printer or tweak the software again.
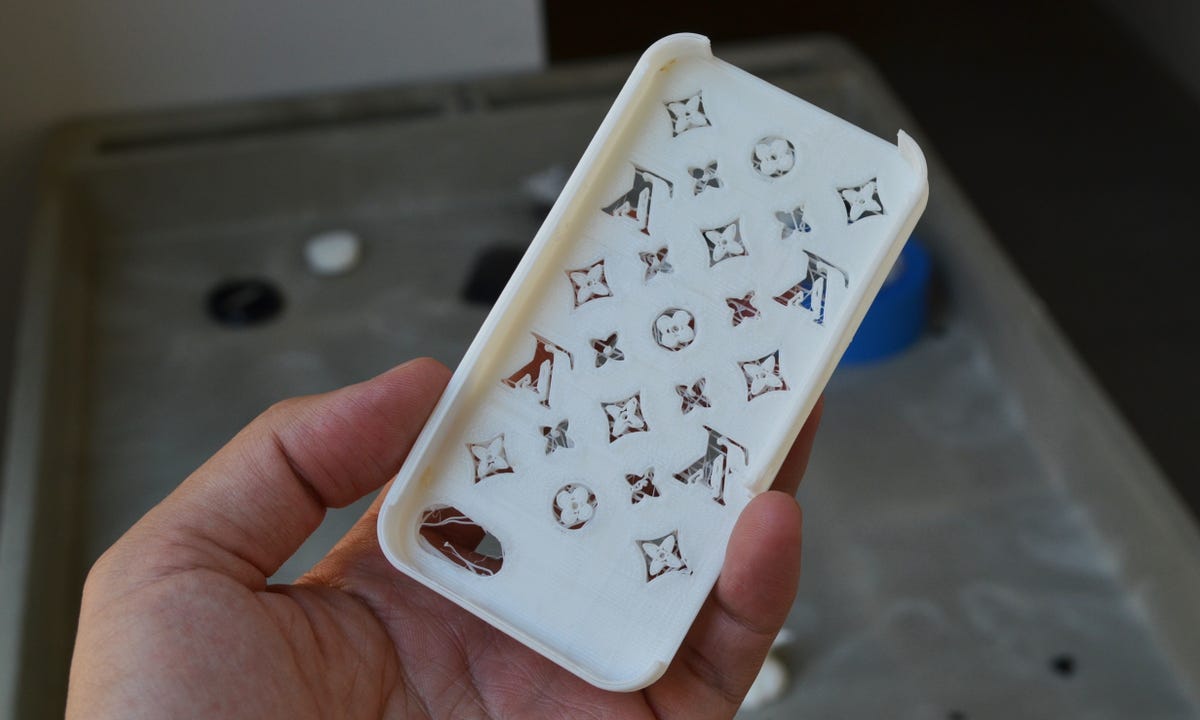
In my testing, it took me five trials before I was able to successfully print an iPhone 4 case, which actually works better than some cases that I bought from the store. As mentioned though, note that it takes a long time for a 3D print to finish. The iPhone 4 case took almost 2 hours, for example, and a life-size thumb drive took about half an hour to print. If you want to make a large object, it's best to print it on a smaller scale first to make sure that you got everything right. Then, set the machine to run overnight for the object's actual size.
In all, however, the machine worked well in my testing. It was relatively quiet for a mechanical device that includes many moving parts. Still, it's loud enough that it requires a separate room if you want to concentrate during the job or if you print something overnight.
Conclusion
Time and patience are key in using the Monoprice Dual Extrusion 3D Printer. You'll need a lot of time to get the printer ready and to understand how its software works, and even more time to print out a 3D model. And you need patience to deal with the high rate of failed prints that you'll run into at the beginning. But this doesn't mean it's a bad printer, it's just the current state of 3D printing as a whole.
Compared to other 3D printers on the market, the Monoprice has a few very strong advantages. First, it's cheaper than other similarly configured 3D printers -- the MakerBot Replicator lineup, for example, can cost close to twice its price. On top of that, the Monoprice also sells filament at comparatively cheaper prices. The printer's parts can be replaced very easily too, and it can produce objects with very fine details.
In the end, the question is whether or not you can afford the printer. At $1,200, it's quite an investment. That said, it is one of the cheapest dual-extruder printers on the market -- other dual extruders can run up to $3,000, and even some single-extruder models can cost around $2,000. And that's not the only thing you need to invest in. It's also the time and the willingness to work with a technology that's not yet ready for the mass market. But for the same reason, owning a Monoprice Dual Extrusion 3D Printer right now will also make for a fun and unique experience.