How to: migrating data to a new user account
While sometimes a complete reinstallation of OS X is the most straightforward approach to fixing problems, migrating to a new account may be preferred if you need to ensure other user accounts and application installations do not get touched.


Periodically people may find that their user accounts have become corrupted, where system processes and applications will not function properly when running in that account. Depending on the severity of the corruption, troubleshooting and fixing the problems may sometimes be more effort than it's worth, with creating a fresh account being a quicker workaround, especially if upon testing a new one the odd behavior does not persist. In these instances, while sometimes a complete reinstallation of OS X is the most straightforward approach, migrating to a new account may be preferred if you need to ensure other user accounts and application installations do not get touched.
Creating a new account is simple, and can be done by anyone with administrative access through the "Accounts" system preferences; however, one problem lies in how you will get your old data to the new account, since permissions are by default set to keep user data private. When you are in your new account, you will not be able to see documents from the old account unless they are put in publicly accessible areas such as the account's "Public" folder.
Starting over with a new account is easy to do, with the only hurdle being preserving the use of your old account name if you desire to, since the system will only allow one instance of the same username to be used.
Migrating to a new account
First you will need to create a new account for yourself, which can be done by any administrator through the "Accounts" system preferences. Once this is done, log into the new account and go back to the "Accounts" system preferences. From here, delete the old account, and select the option to save the home folder in a disk image, which will save the image in a "Deleted Users" folder. Doing this will easily allow you to access all the files and folders from the account in any other account you wish to migrate to, but this might not work if you are limited on disk space.
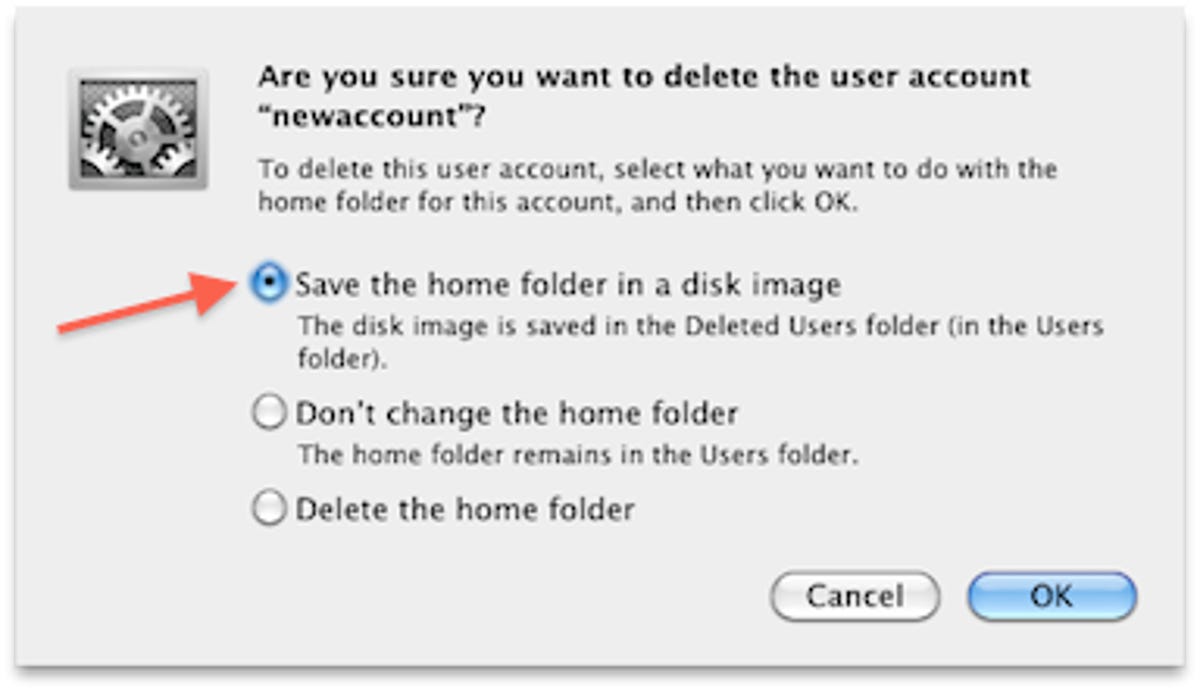
If you do not have enough space for the disk image, be sure to choose the "Don't change the home folder" option in order to save the user data as "files and folders" so it can all still be easily accessible.

When you do this, the files will no longer have an owner but unlike the option with the disk image they will still have permissions restrictions applied, so if you do not have access, run the following command in the terminal to ensure (in this command "oldusername" is the name of your old account's home folder):
sudo chown -R `id -un` /Users/oldusername
If for some reason you still do not have access to some files in the old home directory, run the following command which will give the current owner (your current account) full read and write permissions for all files in the "oldusername" directory:
sudo chmod -R u+rw /Users/oldusername
Once you have access to the files in the old account, either through the disk image or from files and folders with the permissions modifications we mentioned, move the files to their desired locations in the new account. While you may have the option to either move or copy the files (for disk images you will only be able to copy), I recommend you copy them because doing so will reset the files' ownership and permissions whereas just moving them will preserve these attributes. For most cases the difference between copying and moving will be negligible, but it is still something to consider.
Keeping your old account name
Once you've transferred your files to the new account, you may wish to use your old login name; however, the system will not allow for two instances of the same "short" username. To change your new account's username in Leopard and Snow Leopard the process is relatively simple, and just involves creating another account with the desired username and then modifying the account to target the existing home folder you just set up. We outlined it a while ago in a previous article:
Enable the root user and log in as root. This can be done by opening "Directory Utility", clicking the lock and authenticating, and then choosing "Enable Root User" from the "Edit" menu. After supplying a password for this account, users can log out and log back in as "root". WARNING: You have full access to all files as root, so be careful since you can easily delete or modify important system files in this account.
Locate the home folder of the account to be changed, and rename it to the desired account name, ensuring the name is lowercase, letters only, and all one word.
Go to the "Accounts" system preferences and create a new user, giving that user a "short" name that's the same as the new home folder name. The system will ask if the present home folder is to be used, and users should click "ok". Then ensure the new user can administer the computer (if the user is to be an administrator).
Log out of the system and log back in as the new user, and if everything behaves normally, users can then delete the old user in the "System Preferences". At this point, you should be logged back in with your old account name, and all your user data should be in your home folder where you moved or copied it.
Reverse the steps to enable the "root" user in order to deactivate it that account. The root user account should only be enabled temporarily for running certain administrative tasks such as this.
Questions? Comments? Post them below or email us!
Be sure to check us out on Twitter and the CNET Mac forums.