Five tips for cleaning and speeding up your Mac
Boost your Mac's performance and reclaim hard-drive space with this handful of tips.


My wife and I recently cleaned out our attic and basement, throwing out and donating six years' worth of accumulated clutter. We celebrated each run to the dump as we literally lightened our load. Now our attic isn't as overwhelming, and our basement is less creepy.
I wanted to continue our cleaning momentum so I turned to my MacBook Pro. Sure, the amount of garbage I've put on it since purchase can't match the amount of crap I found in my attic and basement, but it is slowing down some. I see the spinning beach ball more than I care to. If your Mac struggles to keep pace from time to time, the following are some ways you can clean and speed it up.
Before you engage in any maintenance, it's always a good idea to back up your data. For Macs, it's easy: grab an external drive and run Time Machine.
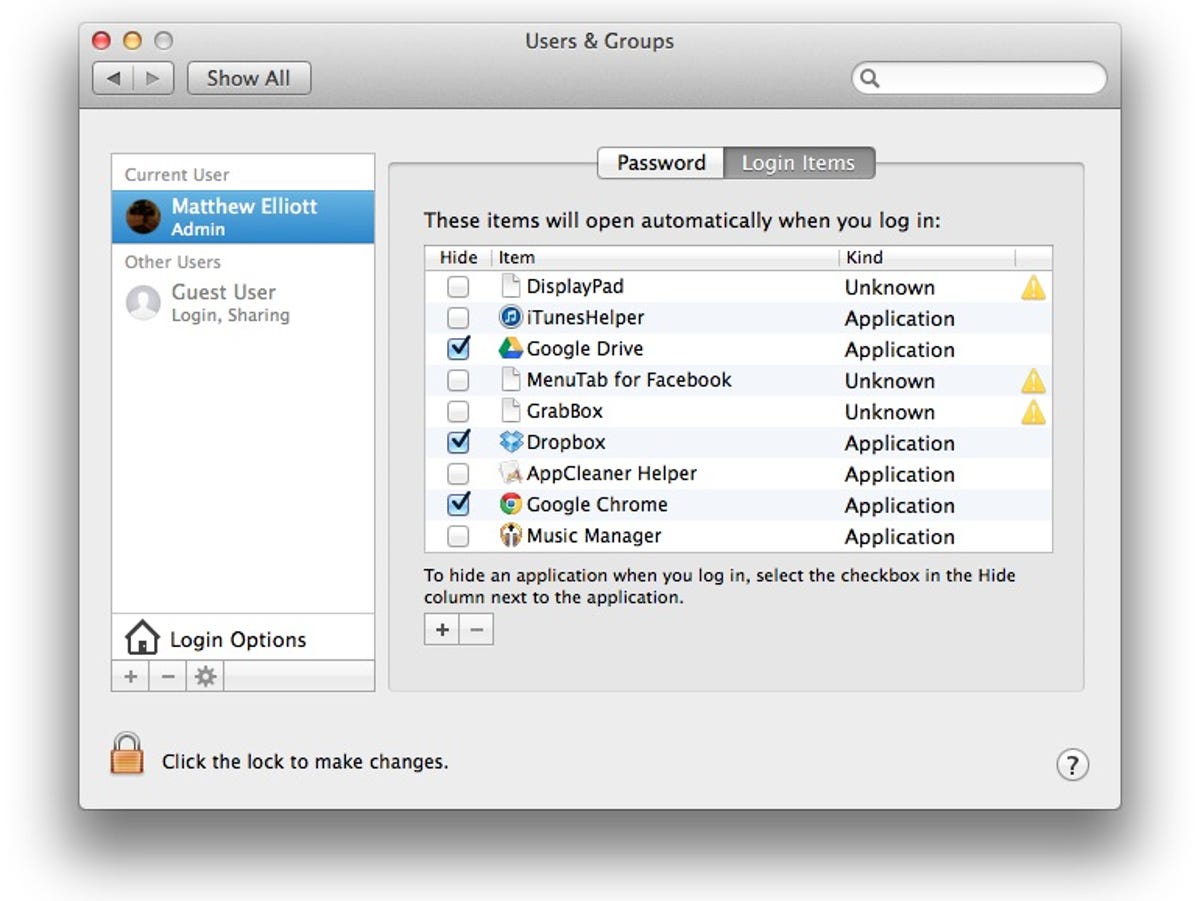
Step 1: Check your Login Items
If your Mac is slow to boot up, the problem may be it simply has too many applications to open that it can't load the OS in a timely fashion. Many applications by default open automatically at startup. Go to System Preferences, then to Users & Groups and then click on the Login Items tab to see a list of the apps that open when you boot your Mac. Uncheck the apps you don't need at startup.
Step 2: Identify and eradicate offending apps
If your Mac acts like it needs a nap every afternoon, when you are at the height of multitasking, there is an easy way to see which of your open applications is using the most system resources. Open the Activity Monitor. The numbers are constantly fluctuating, but they show you the amount of CPU and memory resources each app is using. After watching the Activity Monitor for a while this morning, I see that Firefox generally takes up more CPU resources and more than triple the memory resources. Perhaps it's time for me to abandon Firefox and use Chrome exclusively. Also, I found that the sluggish iTunes isn't nearly the resource hog I thought it was. My apologies, iTunes.

Similarly, to get a picture of what's taking up the most space on your hard drive, install the free Disk Inventory X utility. Run it and it scans your drive for a few minutes before spitting out a graphical representation of the applications on your hard drive. The bigger the block, the more space it's taking up. You can't delete any files with Disk Inventory X, but the app is a good first step in identifying which apps are eating up the most space.
Step 3: Clean up your hard drive
The biggest chore of your Mac housekeeping efforts is reclaiming space on your hard drive. I'm fairly certain there are files and applications on your Mac that you no longer need. Your Mac has a utility to root out evil, and there are a handful of free apps that will also help you clean up your hard drive.
First, to start cleaning your hard drive, open your Mac's built-in Disk Utility program and click on your hard drive in the left panel. Make sure you are viewing the First Aid tab and then click the Repair Disk button in the lower-right corner. This will run a lengthy scan of your desktop, making repairs as necessary.
To clear the cache that your Mac's various applications and processes have stashed on your hard drive, install the free utility, OnyX. It's a fairly extensive program, much of which I will not cover here. For our spring cleaning purposes, I will direct you to the Cleaning tab at the top of the app. Here, you can check off items across six categories, clicking Execute to delete the cache of the checked items, freeing up space on your hard drive.

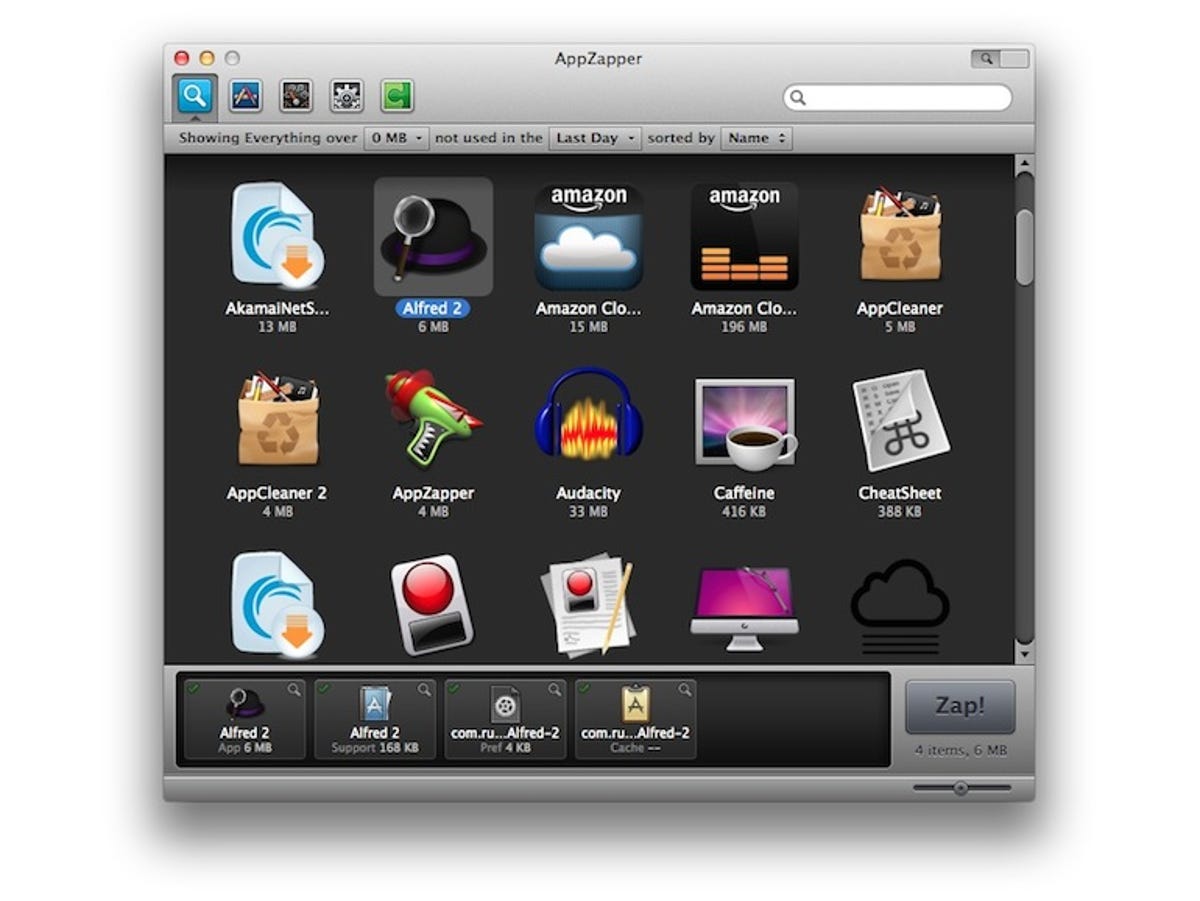
It's never a bad idea to take a gander at your Applications folder on occasion. The same goes for your Downloads folder. If there are apps in there you can't remember installing, odds are you can live without them. Move them to the Trash to reclaim some hard-drive space. There are files associated with every application you install, however, and they are left behind when you simply move an application to the Trash. Mac OS X lacks anything resembling an uninstaller, but AppZapper is one such app. With it, you can uninstall apps and the related files. AppZapper is free for the first five zaps, after which you'll need to pay $12.95.
My two biggest offenders in terms of taking up hard-drive space are iTunes and iPhoto, which does not come as a surprise. Every year or so, I move a year (or two) of photos to an external drive (while also backing up my iPhoto library to another drive via Time Machine) to reclaim some of my hard-drive capacity. I also delete the occasional album from iTunes or move it to an external drive if I haven't listened to it for a while. (I gave Guns N' Roses' "Chinese Democracy" a listen and then immediately removed it from my hard drive; I wanted to reclaim the space, and I wanted to pretend that album never happened.)
Admittedly, keeping your iPhoto and iTunes libraries in order is a Sisyphean task. There are two tasks you can perform, however, which can help. The first is emptying the Trash in iPhoto. The app has its own Trash, so all of those photos you have deleted remain on your hard drive until you empty the Trash in iPhoto itself. Right-click on the trash can in the left panel in iPhoto to remove deleted photos from your hard drive. And in iTunes, you may have accumulated a few duplicate tracks over the years. Hold down the Option key and select File, Display Exact Duplicates to view a list of duplicate songs. Be careful, some duplicates may actually be a live version of a song or from a different album. Choose File, then Display All to view your entire library again.
Apple ships each Mac with a variety of language files, which take up space. Unless you are a polyglot, you'll never use these files. Or miss them when they're gone. Install Monolingual, a free utility that removes unneeded languages. Just click the languages you want to remove and click the Remove button. The scan takes longer than you'd expect; it ran for around 30 minutes on my machine, but ended up saving me 2.4GB of space.

Step 4: Add RAM
Perhaps the cheapest way to boost your Mac's performance is to add more memory. The sealed, brushed-aluminum enclosure of the MacBook Pro doesn't exactly invite you inside, but it's not that difficult an endeavor. (CNET's Scott Stein, a RAM-installing newbie, wrote a blog post detailing how he installed his own RAM.)
For starters, do not buy memory from Apple. It charges $400 for 8GB of memory, and you can find that online for less than $50. The brand doesn't matter; everyone has his or her favorite. Just make sure you are buying the right amount, type, and speed. Apple has a handy support page that shows the memory specifications for a variety of models, along with an illustrated guide to replacing the memory.
In my case, I know my early 2011 MacBook Pro has two DIMM slots, each of which is occupied by a 2MB module. Since I don't have any free slots, I will need to replace those two modules with two 4GB modules. I need DDR3 memory with a speed of 1,333MHz.
After finding the right RAM for your MacBook Pro, you will need to power it off and remove the 10 small screws on its bottom panel. Be sure you note the position of the screws when you remove them; some are short and some are longer. Since I need to replace the existing memory instead of simply adding a new module to an open memory slot, I had to push outward on the two levers holding the sides of the memory module to release it before gently sliding it out. Repeat for the second module. Install your new memory by lining up the bottom notch of each module with the memory slot and push it in until it clicks. Once your new memory is installed, screw the bottom panel back into place.
Step 5: Keep your OS current

There's no reason not to upgrade to Mac OS X 10.9 Mavericks. It's free and can breath new life into your aging Mac. Among the many new features in Mavericks is a trio that will be of particular interest to those with Macs that have lost a step: Compressed Memory, Timer Coalescing, and App Nap.
With Compressed Memory, as your Mac approaches maximum memory capacity, Mavericks compresses data from inactive apps to make more memory available. Perhaps this feature can save you from the expense and effort of adding more memory.
Meanwhile, the other two aforementioned features help improve battery life. Timer Coalescing groups low-level operations together to create tiny periods of idle time where your CPU can rest, entering a low-power state. With App Nap, Mavericks can see when apps are hidden behind other windows and idle, and it will slow them down to reduce the drain on your battery.
For more tips on Apple's latest OS, learn how to clean and speed up Mac OS X Mavericks. For all our latest Yosemite tips, check right here.