Diving into the wild world of custom, ergonomic, mechanical keyboards
If a Jedi builds their own lightsaber, shouldn't someone who wields a keyboard have an equally customized weapon?


Yes, that's a keyboard -- or it will be, once you finish soldering it together.
"That's a keyboard?"
That was the reaction I got the first time I sent a picture of my new, customized, 36-key GergoPlex keyboard to a friend. A friend who, like me, has spent much of his life within an arm's reach of some keyboard or another. But across the spectrum of input devices that have been tethered to personal computers over the years, of all the variations and evolutions of the classic AT layout, few have looked so radical as this.
The GergoPlex is just one of the options out there for keyboard jockeys who want something different, something customizable and, frankly, something more raw than anything you're likely to find inside your average computer hardware outlet -- never mind an Apple Store. It served as my introduction into the fascinating world of DIY ergonomic mechanical keyboards, a wormhole I'm about to open up for you.
Ergo Mech
To begin with, it's important to understand what a mechanical keyboard is. For a long time, all keyboards were mechanical, and there's a good chance you've typed on one at some point in your life. If you've ever pressed a traditional key offering a nice, progressive throw and maybe even a bit of a click, you've probably experienced a mechanical 'board. Each key on a mechanical keyboard is a discrete, electrical switch. The internals vary, but pressing of a key physically compresses a spring and completes an electrical circuit, which the controller sends along as a keypress.
The other, increasingly common option are membrane-based keyboards, which use springy contact patches called pressure pads. Push down on a pad and you complete the circuit. My first experience on one was learning BASIC on the Atari 400, which featured a spill-proof, membrane that is perhaps the worst keyboard of all time. Since then, membrane-based keyboards have gotten much better, offering physical keys and improved feel combined with greater durability and lower cost. However, for traditionalists, mechanical boards will always be king.
Why? It mostly comes down to feel and customization. Cherry MX switches are the traditional mechanical standard, but there are hundreds of options on the market offering different levels of spring resistance, throw heights, key shapes and even different sounds. And, if that's not enough, switches can be disassembled and customized with bespoke springs and even oils.
Now, if the idea of dissecting your keyboard to add a custom weight lubricant and progressive springs sounds crazy, hold tight, because we're just getting started.

Faunchpad is a functional, eight-key keyboard that's a great way to learn soldering.
PCB hero
Custom key-feel is a huge draw for mechanical keyboard aficionados, a group I now very much consider myself a part of. However, we can go deeper.
Since individual keys are just electrical switches, it's relatively simple to create a fully custom keyboard. Know a thing or two about printed circuit board design? Whip up something that accepts standard switches, upload your design to a PCB house and you could be soldering together your next board inside of a week. Add a 3D printer to the mix to create a custom housing and you have yourself the beginnings of a beautiful, nerdy hobby.
But, you needn't go with a fully custom PCB. Hundreds of underground vendors are crafting small-batch custom kits requiring various degrees of soldering proficiency. Whether you're the sort of person who can't splice two wires without burning yourself or you're a surface-mount star, there's a kit for you. Vendors like Boardsource have plenty to choose from.
At the beginning of this journey, my soldering skills lay more toward that former group and, as I was trying to figure out where and how to get started, a friend turned me on to the kits offered by Jane Bernhardt -- or, as she's known in the ErgoMech community, Germ.
Bernhardt is a Saskatchewan-based fan of custom PCBs and stenography, passions that have berthed a suite of custom PCBs swathed in catchy silkscreens. Her company, G Heavy Industries, offers a suite of keyboards of various shapes and sizes, ranging from the 10-key Ginny to the nearly full-sized BuzzSaw which, in living up to its name, can be broken into pieces as your typing skills improve.
Most of the boards can be purchased as kits, where you solder every single chip onto the board. Given some are smaller than a grain of rice, beginners may want to opt for a so-called Partial Kit. Here, Bernhardt has done the hardest soldering for you, leaving you with the relatively simple task of attaching individual switches of your choosing. Or, if you're just not into soldering at all, many of the kits can be ordered fully assembled.
That just leaves the not-so-simple task of compiling a custom firmware for your keyboard.
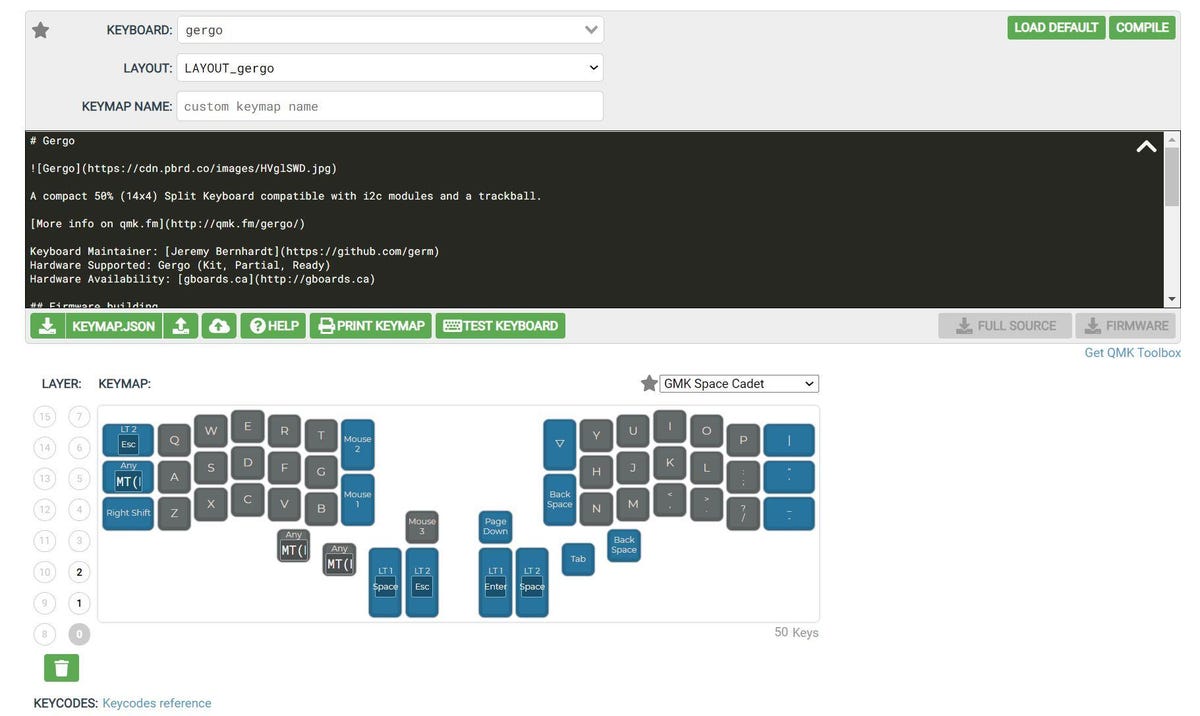
QMK's online configurator makes it easy to do the majority of setup that you'll need.
QMK
Did you think that we were going to stop with custom hardware? No way, we're going deeper still down this wormhole, into the realm of coding.
A custom keyboard is nothing without some sort of embedded processor to pass along those keypresses to your device, and while you could go so far as to write a bespoke firmware or perhaps something that runs on top of Arduino, the Quantum Mechanical Keyboard community already has you covered.
QMK is an open-source framework that greatly simplifies the task of coding up a custom keyboard. With QMK, you need only worry about the details of what you want each key, or combination of keys, to do. QMK handles the ugly details of passing that instruction along down the USB cable.
Still, knowing your way around a text editor and a build environment is definitely helpful. QMK Configurator means you can define custom layouts in a friendly interface, then download compiled firmware and flash it to your device. But, if you really want to delve into the power of QMK, you'll need to learn a bit of code.
What kind of power? Well, how about a key that changes behavior if you hold it down for 50 milliseconds versus 60? Or, a single key that types out your entire email signature, or that moves your mouse cursor diagonally up and to the right? All things are possible if you're willing to break out a text editor.
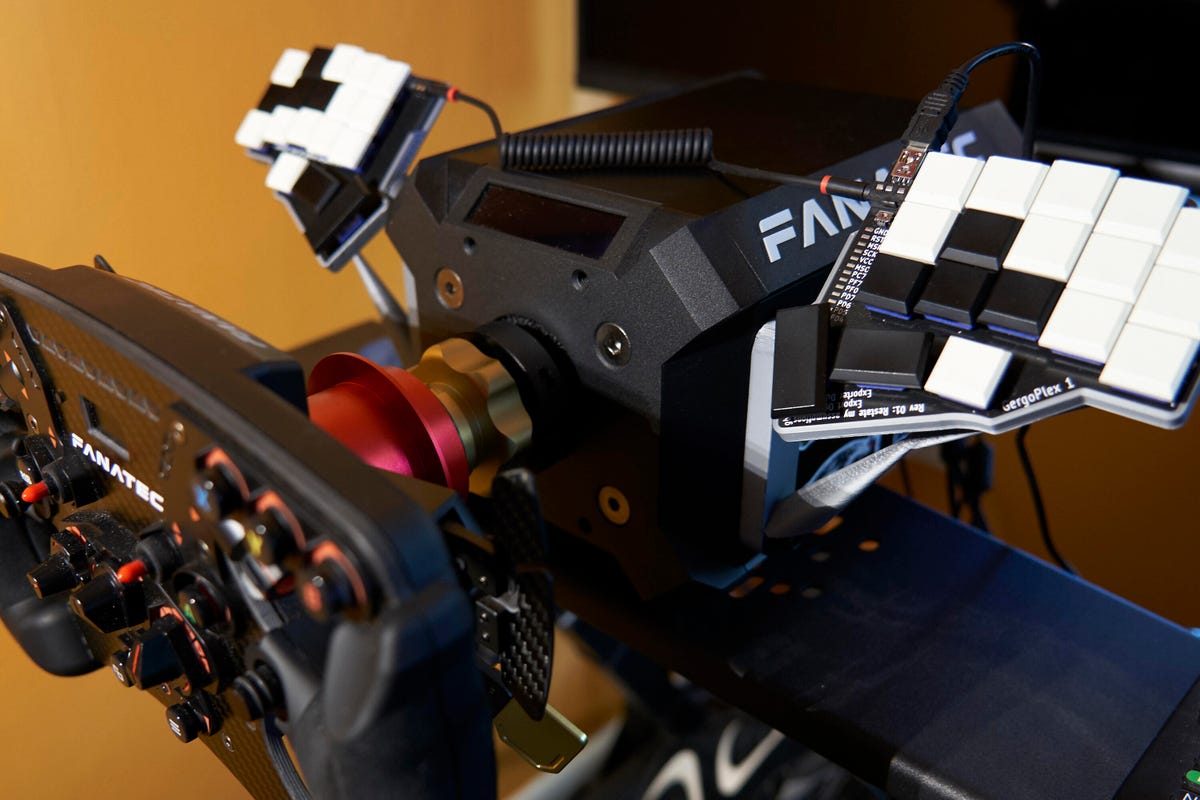
My GergoPlex now lives on my sim racing wheel.
My experience
So, what's it like to actually build and use one of these keyboards? As I mentioned above, my soldering skills are hardly legendary, so I started off with a partially assembled GergoPlex. Bernhardt had kindly added the trickier surface-mount components, leaving me with a bag full of switches and keys to solder myself. Which I did, successfully. For someone who enjoys building kits and figuring out how stuff works, it was legitimately fun.
I wish I could say the same about learning to type on the thing. GergoPlex has just 36 keys split across a pair of small PCBs. That may seem generous considering there are only 26 letters in the traditional English alphabet, but look at all the other keys on a typical keyboard and you can see the challenge.
The idea is that, with so few keys, your wrists and hands never need to move. You're never reaching across to a numberpad, never straining to hit backspace or tab and forcing your hands to leave their home position. All the keys are literally right underneath your fingers and so the ergonomic compromise of using a keyboard is minimized.
To make this work, individual keys must do double duty, or even triple-duty. Or more. This is done partially by defining keys that act differently when tapped vs. held. For example, I configured the lower-right key to be both the period key and the shift key -- tap for the former, hold for the latter.
To get the arrow keys, I defined what's called a second layer. Holding down the horizontal key beneath my left thumb enables that layer, changing the behavior of all the keys. Now, the J, N, M and comma keys now became up, down, left and right. Number keys? For that I created a third layer, this one triggered by holding down the vertical key beneath my left thumb, which turned the keys on the right side into a numberpad.
Wondering why there's nothing printed on these keys? Now you know: each key does many, many things.
Factor in all the special keys that you'll need to access, not to mention things like scroll lock, and it all begins to get complicated. Before disconnecting my old, traditional keyboard, I ran an online typing test and scored 137 words-per-minute. I plugged in the new GergoPlex and tried the same test. My score? Nine wpm. Yes, nine.
As someone who spends all day tethered to a keyboard, whether writing or emailing or communicating in Slack, I cannot tell you how painful it was to be that slow. I made it an hour on my first day before switching back to my old keyboard, twice as long on the second, then started forcing myself to spend at least 4 hours a day figuring out my new keyboard.
When typing on the tiny, split GergoPlex I could almost feel my brain being rewired. All those shortcuts, all those ingrained key combos were being ripped out as I had to start from scratch. It was like learning to walk again. The biggest hangups were backspace and enter, two keys typically operated by my right little finger, now done by my thumbs. Many an erroneous message was dropped in Slack thanks to this.
By the end of the first week I was up to 50 wpm, achieving accuracy of 90%. A far cry from my previous 137 wpm and 98%, but getting there for sure. A week later I scored 80 wpm then after another week, fell back to 70. I managed to get back up to 80 the following week, but I had clearly hit a sort of ceiling. The problem? The lack of dedicated modifier keys.
I had one key operating as both the period key and the shift key -- tap for the former, hold for the latter. When I was typing slowly that worked just fine. As I got quicker, the time I was holding shift necessarily got shorter, and I started getting a lot of dots when I wanted capital letters.
I spent hours fiddling with parameters in the QMK code, modifying timing figures in 10 millisecond increments to try to fix the issue. It's a tedious process, requiring a full recompilation and firmware flash of the keyboard with every change. After many iterations I decided to make the obvious choice: switch to something with a few more keys.
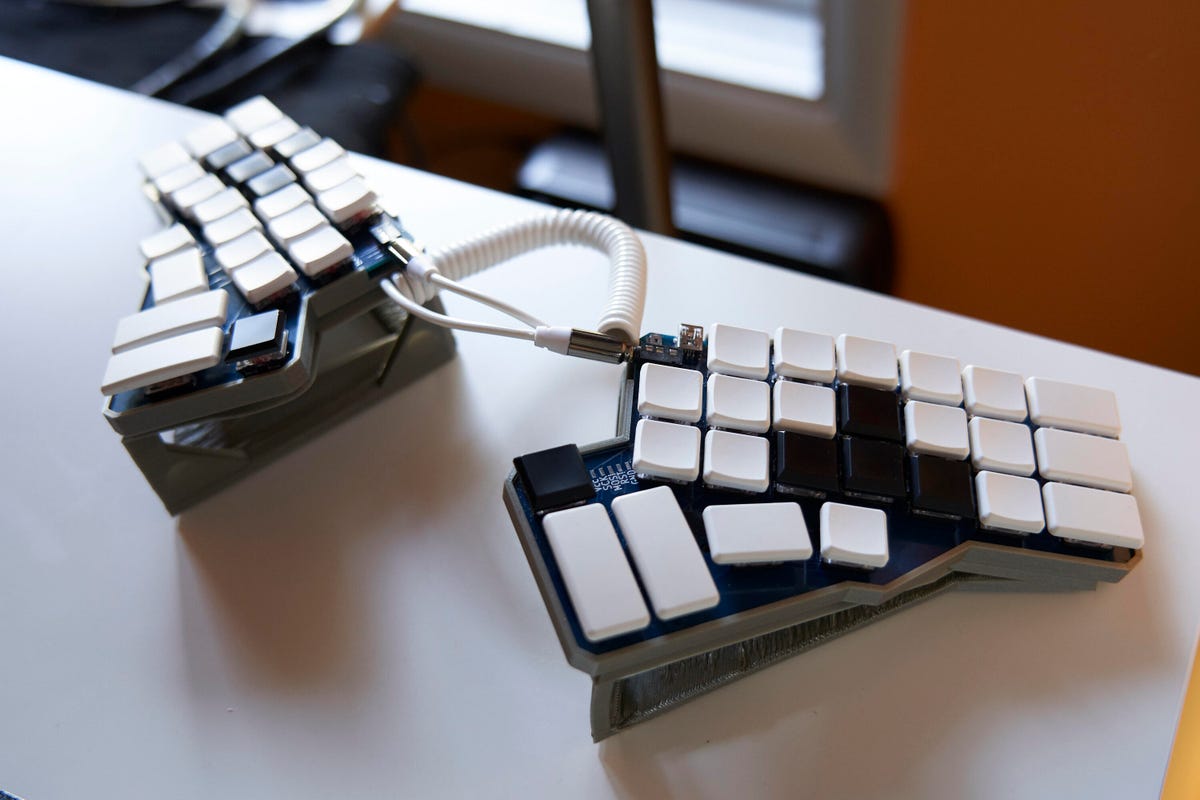
My Gergo keyboard, with a custom, tented case.
Gergo
The Gergo is actually a predecessor to the GergoPlex, featuring an additional two columns of keys, plus an additional two keys for each thumb. Having 48 keys means you're still working with less than half the offerings of a traditional, 104-key unit, but compared to GergoPlex it's downright roomy.
Crucial for me are the extra keys on the sides, enabling dedicated shift, control and backspace. Meanwhile, the extra thumb keys means I have a dedicated space plus plenty of other keys at my disposal for triggering layers. I even had enough left over for a dedicated printscreen key, something I didn't realize I'd miss as much as I did.
I made other changes, too, experimenting with different shaped keys to help me more quickly find home, something sorely missing before. I'm also trying heavier springs and even designed a custom, 3D-printed tented case with magnets to hold it together.
The result? well, I'm still far from 130 wpm on the Gergo, but I'm up over 90 consistently, and my accuracy is over 95%. The GergoPlex? I really enjoy typing on it, but I just don't see that being my daily driver. For that board, I actually made another custom case and mounted it to the steering wheel on my sim racing rig. It's the perfect size for quick chats between stints.
I honestly don't know if I'll ever get back up over 130 wpm on the Gergo, nor can I say how long it'll be before I can stop consulting a printed keyboard mapping to remember how to type a tilde. But as I get older and the threat of arthritis and other repetitive stress-related injury grows stronger, the appeal of something perfectly ergonomically suited to my hands gets stronger, too.
Ultimately, though, the world of the ErgoMech keyboard is as much about crafting. It's the art of creating an input device that is perfectly suited to you, both functionally and aesthetically, and in that regard I feel like I'm just getting started.