Buried in Tabs? Use This Mac Hack to Organize Your Windows
If you have more than 10 tabs open right now, this MacOS hack is for you.


- Adam has been covering streaming services since 2013 and wants to help people navigate the subscription creep in their lives.
Learning how to use split-screen mode on your Mac can help you multitask.
Toggling through each of your open tabs to find the right one can be a frustrating waste of time, especially if you work from home on a laptop. Instead of clicking through dozens of tabs to find the one you’re searching for, you can use this easy Mac hack to glance through your windows more efficiently.
Mac split-screen mode allows you to stick two apps (or two separate browser windows) on different sides of your display. That way, you can easily glance between windows without having to click through or use the Command + Tab shortcut to toggle through windows. Mac split-screen view is great for looking at data while writing a report, playing a video while you multitask or keeping a chat window open while you’re working.
Here’s how you can set up split-screen mode on Mac to enhance your productivity.
Read More: Best MacBooks for 2024
How to enter Split View on a Mac
1. Make sure neither window you want to use is in full-screen mode.
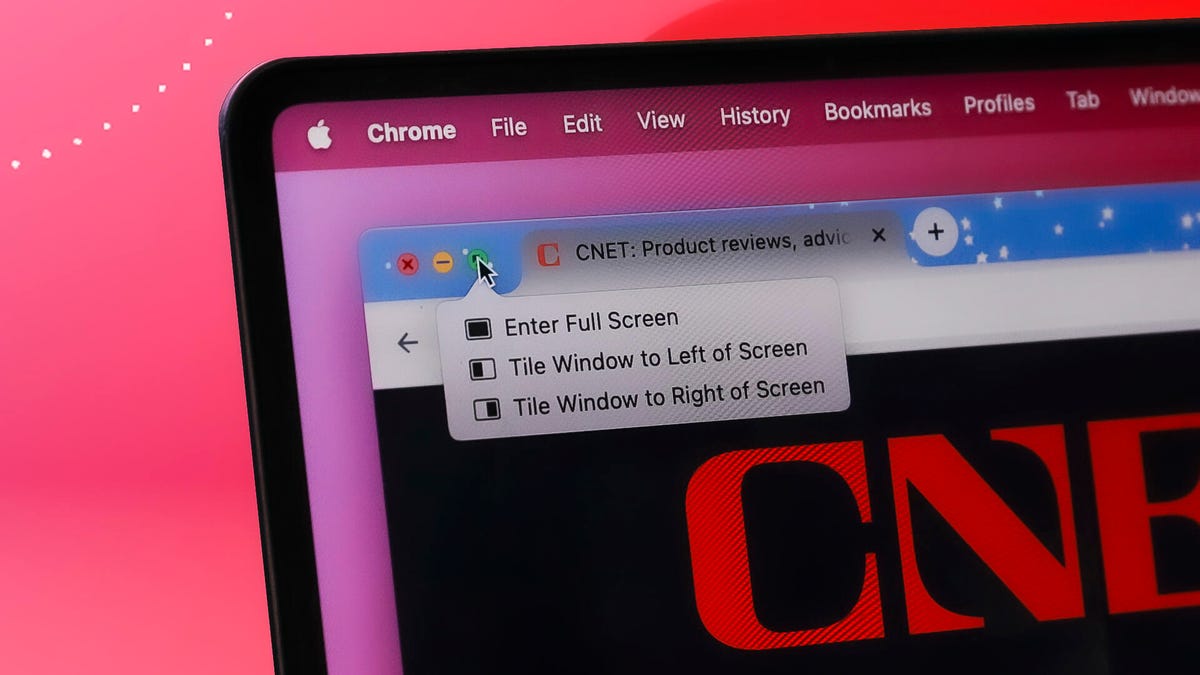
2. In one of the windows you want to use, place your cursor over the green button in the top left. Instead of clicking to maximize the window, hover until you see a drop-down menu.
3. Select Tile Window to Left of Screen or Tile Window to Right of Screen. Your Mac will automatically enter split-screen mode.
4. From there, other open windows will be displayed on the opposite side of the screen. Click the window you want on the rest of your screen, and it will fill the remaining half.
5. If you want to adjust the size of the windows, use the slider in the center of the screen.
In Split View, you'll be able to look at both windows simultaneously. Multitask away!
Read more: This Is One Thing Every Mac Owner Should Know How to Do
How to exit split screen on Macs
If you're done using the split-screen layout, here's how to get out of it:
1. Move your cursor to the top of the screen until you see the sizing buttons at the top left of each window.
2. Click the red button to close that window or the green button to exit split screen.
3. Don't panic! Your other window is still open -- it's just hidden in full-screen mode. To access it again, press the Mission Control button (F3) on the top row of your keyboard.
4. You should see two options at the top of the screen: Desktop and whatever window you had in split-screen mode. Click the other window, and use the green sizing button in the top left if you want to exit full-screen mode.
If you're the kind of person (like me) who might need more than two windows open, you can always manually resize windows to fit three or four on your screen at once. The experience just won't be as visually clean as using tiled windows.
What is the keyboard shortcut for split screen on Mac?
Mac keyboard shortcuts are abundant and handy, including one for split screen. Start by using control + command + F to enter full-screen mode. From there you can hit F3 to pull up Mission Control, then drag and drop the second app you want in your split screen next to your original window. It should display a preview of what the split screen will look like, along with a “+” (plus sign) next to it. Click back into the newly tiled apps and you'll be in Split View.
If you want to get into Split View even faster, you can create your own keyboard shortcut. Go to System Preferences > Keyboard > Keyboard Shortcuts > App Shortcuts. You can click the + button to add a command named "Tile Window to Left of Screen" using your desired shortcut. Once you've activated the shortcut, your active window will tile to the left side of the screen and you can simply select a second window to be added to your split screen.
Read More: The Keyboard Shortcut You'll Use More Than Ctrl + Z
Why won't my Mac do split screen?
First, make sure you're not currently in fullscreen mode. The split screen only works from the normal window view. If that's not the issue, go to System Preferences > Desktop & Dock and scroll to the bottom to see whether Displays have separate Spaces enabled. If not, enable it.
If you don't see that option in the Mission Control menu, make sure you've updated to MacOS 10.11 or later. You can check your current OS version by clicking the Apple icon in the top left menu and then selecting About this Mac. If you're using an earlier version, you'll have to update by clicking the Software Update button on that screen.
Keep in mind that not all apps support split screens. If you've tried everything else and the app still won't tile in split-screen mode, the app probably doesn't offer split-screen mode.
How do you split screens on a Mac without full screen?
The official split-screen function on Macs (called "Split View") automatically splits two windows in full screen. If you don't want the full-screen view (perhaps because you want to be able to quickly navigate between browser tabs), you can manually drag your windows to fit the desired space. This option gives you a little more customization than Split View.
For more, check out the best new MacOS features that enhance Mac-iPhone connectivity and how to unlock your Mac if you’ve forgotten your password.