Many of you did not upgrade from Windows XP to Windows Vista, but are planning to upgrade to
Windows 7. Tsk Tsk. How dare you leave the Microsoft upgrade path? As a punishment, you can't
upgrade directly from XP to 7; you have to do what's called a clean install, which means you have to
jump through some hoops to keep your old data and programs.
Not to worry, we'll show you a couple ways to deal with the pain of installing Windows 7 on your XP
machine. And afterward, Microsoft will forgive you your trespasses.
Before you start, do these three things.
First, run the Windows 7 upgrade advisor. It will let you know if your computer can handle any version
of Windows 7.
Second, check the Windows 7 compatibility center. This is different than the upgrade adviser. It will tell
you if you need to update your drivers or apps to make them work in 7.
Third, make a copy of your hard drive, just in case things go horribly wrong. I recommend using
Macrium Reflect: it's a free download available from Download.com.
OK now you're ready to upgrade.
Start by gathering all the installation files for all your applications. Windows 7 will put your data in a
Windows.old file for you, but it won't reinstall your apps.
Make sure you have all the CDs or if you downloaded programs, back up any install files you have on
an external drive. Also don't forget to gather all the license keys either off product boxes or from e-
mails. You'll want them all handy in a place outside the computer you're upgrading.
The last thing before we get to the actual Windows 7 disc is to download and run the Windows Easy
Transfer Wizard. This will allow you to back up all your files and settings to an external hard drive. A
differen tone than the one you imaged earlier.
Go to windows.microsoft.com and search for Windows Easy Transfer. Download the right version and
install it.
Launch the wizard and make sure your external drive is plugged in.
You can send your data to a network location. But in this example we're choosing an external drive.
The program will check for what can be transferred then give you an opportunity to password-protect
the data.
Finally, choose your external drive and begin the backup. You shouldn't use your computer while this
process is running.
It will take awhile to move all your data over. Once it's done, you can set that drive aside--you won't
need it until after Windows 7 completes updating.
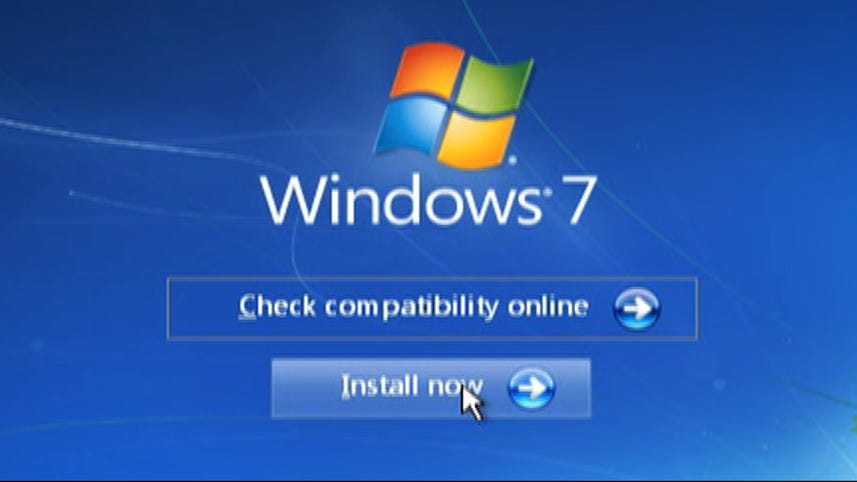
Finally, you're ready to insert the Windows 7 disc. When doing a clean install, it doesn't matter if you
restart and boot off the disc or just run it from within Windows.
It will give you one last chance to check compatibility. If you're sure you don't need that, go ahead and
click "Install now."
It will ask if you want to go online and get updates. I say yes. It could save you some time later.
Agree to the EULA.
Choose Custom install. With XP, Ii you choose upgrade, the installation will fail.
Next, pick the partition or drive you're installing Windows 7 on.
A warning box will alert you that you're going to lose your old version of Windows and your old files will
be saved in C:/Windows.old
And Windows will commence installing.
Your computer will reboot a few times and eventually the Wizard will return, this time running in
Windows 7. At this point, you'll be able to do things like set up a password, set security preferences,
set time and date, etc.
Finally, you're running Windows 7! And you have device driver issues. Let's take care of that.
Launch the device manager by pressing Start and typing Device Manager in the search box.
If you see yellow exclamation points, those devices have driver issues. The easiest way to fix them is
to double-click the item, then click the update driver button. Select Search automatically for updated
driver software.
If you're lucky, that will fix your issues. If you're human and you still have a few devices with issues, try
looking at the Windows 7 Upgrade Adviser to see if the device and its new driver are listed.
If that doesn't work, check the manufacturer's Web site.
Once you get your devices running to your satisfaction, time to install your old programs. Gather your
CDs and external drives or whatever you used to store the programs earlier and get to installing. For
some programs, you might want to download the latest versions.
Finally, you can restore your data. It's all there in a folder called Windows.old, where you can manually
move everything back into the proper directories under Windows 7. But we don't have to mess with
that, since we did the Easy Transfer Wizard earlier.
Make sure your external drive is connected. Then click Start, choose computer, and under hard disk
drives, choose the external drive where you stored your transfer data. Find the file you should have
named "Windows Easy Transfer--Items from old computer" and double click.
You can choose which accounts to move, and the transfer wizard will figure out the rest.
If it fails, you're data is still in Windows.old. You'll just have to move it by hand.
And there you have it. You've upgraded, slowly and slightly painfully, from Windows XP to Windows
7.
If you want to save a lot of this hassle, you can get a program that will move all your data AND your
installed applications for you. The PCMover Windows 7 upgrade assistant from Laplink costs around
$30.
It will restore all your data and programs again without you needing to do any dragging and dropping or
gathering of discs and license keys.
Whichever way you decide to go, once you're done, do one last thing. Image your drive again with
Macrium Reflect so you have a backup of your new Windows 7 machine.
And that's it. Hope this helps you make the jump. I'm Tom Merritt, CNET.com.