Making the switch: a Windows user's first MacBook (part 2)
Welcome to part two of our feature on switching to Mac, where we'll tackle keyboard shortcuts, text editing, file management and more!


In part one, we changed some OS X settings to make a Windows user more comfortable, went over touch pad gestures, window management, apps and the dock. If you've just secured a new Mac, it's best to start there!
Welcome to part two of our feature on switching to Mac. Here we'll delve into keyboard shortcuts, give you some tips on text editing, get OS X to write to NTFS volumes, cover file management, codecs and network connectivity.
Keyboard shortcuts and strange symbols
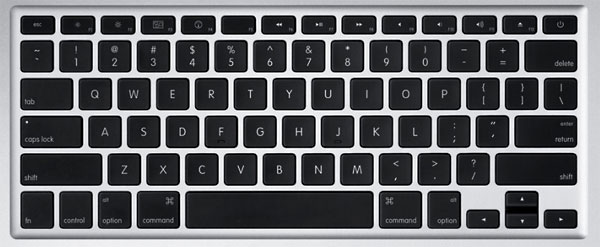
By now, the fact that the Control button seems to do nothing will be highly frustrating to you. The general, although not universal, rule is that any keyboard shortcut that used to use Ctrl on the PC will likely use Command on the Mac.
Command + C will copy, for instance, Command + V will paste and Command + X will cut. Command + Z will undo, but you'll want Command + Shift + Z for redo. There are other oddities, too; while Command + W will close tabs in Safari, you'll need Control + Tab or Control + Shift + Tab to switch tabs, as Command + Tab is already used for application switching.
Show me a sign
You'll also notice strange symbols in the menus, which represent keyboard shortcuts, but short of the Command key they don't actually appear on your keyboard. Here's a little cheat sheet to help you out:
| Command | Alt/Option | Control | Shift | Escape | Tab | Delete | Return |
Shortcut heaven
We could spend forever covering all of the keyboard shortcuts in OS X, but, frankly, Dan Rodney's been doing it very well for as long as we can remember. Bookmark his page; we guarantee that you'll learn something new.
Screenshots
Screenshots in OS X are an easy affair: press Command + Shift + 3 to take a snap of the whole screen. For something more discerning, Command +
Text editing and the Mac keyboard

There are quite a few changes that you'll have to reprogram your fingers for when editing text in OS X, particularly to do with navigation (thanks to the lack of dedicated Home, End, Page Up and Page Down keys). But let's start with the biggest mind-screw: the delete key.
In OS X, delete is the equivalent of backspace on, well, pretty much every other operating system, removing the character that precedes the cursor. To get it to function as delete, or as Mac users call it, "forward delete", you'll need to hold down the Fn key, as well.
But what of navigation? Well, for a start, Option + the left and right arrow keys are used to make the cursor skip one word at a time.
The equivalent of Home is Command + arrow left, while End is predictably Command + arrow right. Command + arrow up goes to the top of the document, Command + arrow down to the bottom.
Apple actually offers two versions of Page Up and Page Down — press Fn + the up or down arrow to scroll one level up or down without moving the cursor. If you want to move the cursor as well, add Option into the mix. Strangely, while adding Shift to most of these combinations will select text, just like on Windows, it won't work on Fn + Option + vertical arrows; only on the Fn + vertical arrows shortcut.
Getting OS X to write to NTFS volumes
(Credit: Apple)
If you've got a bunch of external hard drives or large flash drives lying around that have been used in Windows, there's a good chance that you've used NTFS so you can write files bigger than 4GB in size.
The problem is, OS X can read NTFS, but it sure as heck won't write to it.
The easiest way to overcome the problem is to pay for Paragon's NTFS for Mac or Tuxera NTFS for Mac, which will set you back US$19.95 or €25, respectively. Most, though, will likely prefer a free solution.
The free way
Getting NTFS-write capability on OS X Lion for free can be a pain, as the most popular projects are now defunct, don't work properly with Lion and Google searches don't prove that useful. Thankfully, we've found the right path to get things working on Lion with no error messages.
- Download NTFS-3G for OS X, OSXFuse and fuse_wait.pkg
- Install NTFS-3G for OS X, and, after you agree to the licence, hit the Customize button and deselect MacFuse. Hit the Install button. Once the install has finished, it'll ask you to choose a caching method. UBLIO will give you extra speed, but you'll have to make sure you safely eject your drive every time to prevent write errors. Choose, and when the installer prompts you to restart, instead click the Installer menu at the top left of the screen and choose Quit Installer.
- Install OSXFuse, making sure to select the MacFuse compatibility layer
- Run fuse_wait.pkg; once done, restart your machine
- You should now be able to write to NTFS partitions.
File management
If there's one thing that's woefully underpowered in OS X, it's Finder. You can't cut and paste a file or folder to substitute as a move operation; it hides huge amounts of the significant folder structure; managing files between nested folders is a nightmare, even with column view enabled, not to mention horizontal scrolling in column mode is oddly slow; and getting file information requires you to right click and choose Get Info. Despite not really receiving a notable update in over a decade, Windows Explorer eats it for breakfast.
Sadly, to get something decent in OS X is not a cheap affair, and the alternatives are quite slim. We haven't yet stumbled upon something that offers Explorer's handy tree view, but there are two decent options that you can pursue.
Path Finder

While a lot of Quicksilver's functionality has been usurped by Spotlight, one remaining useful feature is Custom Triggers — keyboard shortcuts that you can set to launch applications or files. Let's say we want to set Command + E to open Path Finder: press Control + Space to invoke Quicksilver, then click the down arrow in the top-right corner of the app and select Triggers.
Click the plus icon at the bottom of the app and select HotKey. Begin typing path finder until it identifies the app, and it should automatically set the action to Open. Click Save, then click in the column of the newly created action, which reads HotKey — a window should extend to the right.
Click inside the field next to the HotKey title, and press Command + E. Close the Triggers dialog. Now every time you press Command + E, Path Finder will load.
Path Finder is the most popular alternative, although it costs a huge US$39.95. It brings in cut and paste, folder-first sorting, tabs, breadcrumb navigating, built-in Terminal, process manager, filter by name, easy DMG creation, context menu editing, path copy and Drop Stacks (a drop box where you can temporarily store all sorts of files, then just drag the stack where you like to copy them all at once). There's so much more in here, and, if you're serious about file management, it's the most comprehensive option out there.
It doesn't tell you folder sizes in column view, and although you can use Command + Fn + F1 to open a new window (providing you haven't quit the program in the first place), it's nowhere near as easy as Explorer's Windows + E shortcut. You could, however, always bridge this gap using Quicksilver's Custom Triggers.
TotalFinder
A cheaper option is to use a Finder plug-in — TotalFinder, which may offer just enough features for most folk. It'll set you back a cheaper US$18, and it offers dual-pane browsing, cut and paste, path copy, tabs, folders on top and our favourite feature — Visor.
If you really miss the Windows + E shortcut that loads Windows Explorer, Visor goes some way towards filling the gap. Turn it on, then a double tap of Option will bring Finder sliding up from the bottom of the window. Esc will hide it again. It's natural and wonderful.
We still want an easy way to ascertain folder size in column view rather than having to fall back on Get Info, but it mostly satiates our management needs.


Codecs: getting your existing videos and audio working
Video
You should absolutely install VLC for your video playback on OS X — nothing has as much codec support.
If you'd prefer to expand Quicktime's codec capability, though, you're going to have to rely on third-party components. Your best bets are Perian, Flip4Mac and Apple's own third-party components page.
While we're on the subject of video, don't forget to install Flash for Safari — OS X does not come with it by default.
Audio
Audio support is a little more difficult, as iTunes' dominance on OS X is so complete that competitors seem to shrink away. There are ways to make iTunes recognise FLAC, WMA and OGG, but they're not necessarily the prettiest solutions, and all the players that claim to playback FLAC are now-defunct projects that don't work on Lion.
If you've got a FLAC collection, your best bet is to stick with VLC, or convert them with something like Max.
Connecting to network shares
You're probably used to punching in a double backslash and hostname or IP in Windows Explorer to reach a network share on Windows — something like this:
\\NetworkShareConnecting to a Windows share through OS X is almost as easy. You'll need to have Finder active (just clicking the desktop will do it), then select the Go menu and click on Connect to Server (alternatively, you can press Command + K). Instead of the double backslash, you'll need to prefix the hostname or IP with smb://, like so:
smb://NetworkShareComing up in future instalments: Making a Lion back-up, running Windows through BootCamp, sharing files and more.
Found something that made your life easier as a Windows switcher? Let us know in the comments below.