How to digitise your old videos
Do a spot of spring cleaning and you're likely to find a whole stack of videotapes lying around forlorn, sad and forgotten at the back of a shelf or cabinet somewhere. What should you do with these tapes?


Do a spot of spring cleaning and you're likely to find a whole stack of videotapes lying around forlorn, sad and forgotten at the back of a shelf or cabinet somewhere. What should you do with these tapes?
If they're just recordings of The Midday Show or General Hospital, it's probably a good time to clear up some space and throw them in the recycling bin. But what if they're home videos or episodes of the ABC's Late Show?
You could watch them, keep them and hope for the best, but videotapes, even in their prime, have a nasty habit of snapping, distorting and degrading over time.
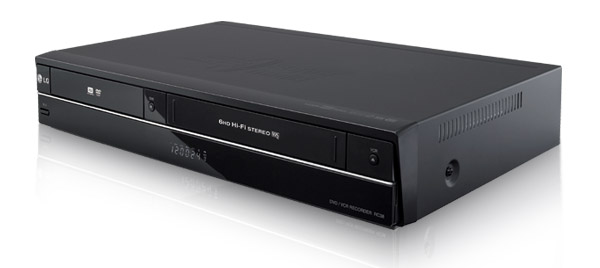
Option 1: convert it into a DVD
Pro: easy; can utilise equipment you've already got.
Con: won't let you edit or spiff up your recordings; DVD discs are limited to an hour of video at max quality.
If you've got a DVD recorder in your home theatre set-up this one's almost a no-brainer. All you need now is a either the camcorder on which your home videos were recorded or a working VCR. Should you have a VCR/DVD recorder combo, all's the better as you don't have to worry about wiring — just fire the machine up and follow the instructions in the manual.
Otherwise, just connect the output ports from your video cassette player or camcorder into the inputs on your DVD recorder, and you're ready to go. All you need to do now is cue up your videos to where you want to begin recording, and then press Play on your VCR/camcorder and Record on the DVD recorder.
Using the composite ports on your source device and DVD recorder will yield passable results. For the best image quality, though, use the S-Video or component video ports, if they're present on both your VCR/camcorder and DVD recorder.
An addendum to option 1: edit those DVDs
Pro: easy; free.
Con: there might be a slight loss of quality during transcoding.
Remember how we just said in the text above that you couldn't edit or spiff-up recordings transferred over from tape to DVD? Well, that's not entirely true.
Install Handbrake on your PC or Mac and you can use it to transcode those newly minted DVDs into a more edit-friendly format. Once the transcoding has been done — this might take a while depending on how powerful your computer is — you can suck those files into a video-editing program.
Older Windows PCs will have a copy of Windows Movie Maker installed, which has all the simple movie-editing tools you'll need. Users of newer versions of Windows can download a free copy of Windows Live Movie Maker from the Microsoft website.
Mac users can fire up the copy of iMovie that's included with OS X and begin editing away to their heart's content.
Option 2: encode it on a PC or Mac
Going down this route gives you the most control over the digitisation process, but the array of possibilities here might make you throw up your hands in despair.
Option 2a: use your video card
Pro: utilises hardware you already have.
Con: finding free software to do your bidding is a pain.
If you've got a computer of a certain age, you may be lucky to have a video card that's equipped with on-board video-capturing hardware. Trace the cable from your monitor back to the video card on your PC. Should you see a set of composite ports (yellow, red and white RCA plugs) or an S-Video port, you're in luck.
Running the relevant cables from the output of your camcorder or VCR into the back of your computer is the simple part. Finding free software to perform the video digitisation is a trickier matter. The first port of call should be Windows Movie Maker if you're still running Windows XP — the Windows Vista and 7 versions of Movie Maker don't allow you to capture analog video.
Next up try the website for the maker of your video card. If you find no luck there, you can try Debut Video Recording Software for free for 14 days.
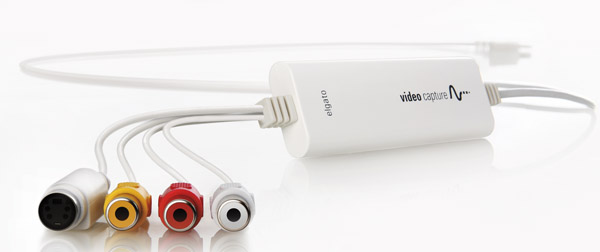
Option 2b: add some video capture hardware
Pro: software is included with hardware.
Con: can require a lot of hard disk space.
If your computer doesn't have any video inputs included, you'll need to fork out for a video capture device. There are two basic flavours, a USB dongle or a video capture card, with the latter only applicable if you've got a desktop PC and you're comfortable with a little light hardware installation work.
The Elgato Video Capture, Roxio Easy VHS to DVD 3 Plus and Pinnacle Dazzle DVD Recorder Plus retail for between US$50 and US$120, plug into an available USB port and come with the software required to digitally record video from tape, as well as perform some basic editing.
A few things to remember
If you go down the do-it-yourself path, you'll need to set aside a fair amount of computing time. Transferring an hour of video takes at least an hour, as the video tape has to be played at normal speed for it to be read properly by either your DVD recorder or computer.
Should you elect to encode your tapes onto a computer, set aside a large amount of hard disk space. An hour of uncompressed digital video will consume at least 10GB of space. Depending on how fast your computer is, compressing the raw digital video into something smaller and more portable will require an extra outlay of time.
Without wanting to sound like a broken record, budget even more time if you're planning on editing your home movies into something tighter and more watchable; video editing is a time-consuming process, even for professionals.

Option 3: outsource it
If the do-it-yourself options sound like too much work or, despite our best efforts, are too confusing, then getting someone else to digitise for you may be preferable. Depending on the number of videos you need converted, it may even be the most cost-effective option.
Scancorner.com.au will digitise videos for AU$8 an hour, while Digitise Your Life will perform a similar service from around AU$30 per tape and are willing to do editing as well, for an extra fee.
Conclusion
The option that's right for you depends on many factors, with the key ones being budget, the quantity of videos that need to be digitised, and the amount of time and effort you're willing to invest.
Whichever route you decide to walk down, don't forget to make plenty of backups of your newly digitised videos. DVD discs won't last forever and are prone to scratching, and you never know what date the Grim Reaper has set down for your computer or hard disk.
Also, don't forget that the footage on analog tapes is standard-definition quality, so even the most expertly digitised video will fall well short of Blu-ray crispness.