If you are experiencing slowdowns and other problems from the lack of available hard drive space, there are several things you can do to get yourself up and running again.
Topher KesslerMacFixIt Editor
Topher, an avid Mac user for the past 15 years, has been a contributing author to MacFixIt since the spring of 2008. One of his passions is troubleshooting Mac problems and making the best use of Macs and Apple hardware at home and in the workplace.
Is your Mac taking a little slower to boot, open applications, and otherwise perform some tasks? If so then one reason may be if your hard drive has minimal free space left on it. As with most operating systems, OS X uses a virtual memory system for managing memory, and this system optimizes RAM by using the hard drive as an intermediary storage location for unused memory contents. This process is similar to moving unused papers from a desk to a drawer temporarily, to free up more desk space so you can work optimally.
As with a cluttered desk, a full hard drive may slow things down by encroaching on your computer's ability to optimize RAM usage. Therefore, if you have a full hard drive, you might consider cleaning it up a bit.
There are several ways to determine if your hard drive is full, with one being to choose About This Mac from the Apple menu, and then click the More Info button. In here, select "Storage" in the toolbar; you should see a graph of your drive's usage. The only hard drive in the list that matters is your boot drive; the rule of thumb here is to keep about 10 percent of your hard drive free, though this depends on specific use. However, if you are closing in on the last 10-20GB of your drive, you are likely getting into the red zone.
Do keep in mind that the Storage calculation in the About This Mac window offers only an estimation of the drive's usage that is based on the system's Spotlight indexing routines. If there is a problem with these routines, the system may improperly report space used in the About This Mac panel. You can remedy this by reindexing the drive, or you can simply select your hard drive in the Finder and press Command-i to get information on it, where you can see a true calculation of the drive's space usage.
If you determine that your drive is too full, you can do a number of things to try freeing up some space:
A full Trash may be easy to overlook, and may end up using a lot of space. The same goes for the Downloads folder in your account.Screenshot by Topher Kessler/CNET
Empty the Downloads folder
As you browse the Web and download files, the system will collect them in the Downloads folder, but will not regularly clean or otherwise maintain this folder. Therefore, after a while you may find the folder can get exceptionally large in size. In most cases the contents of the downloads folder are just temporary and intermediary files such as DMG disk image installers. Therefore, you can often simply empty the entire contents of this folder without losing a thing, but if you are uncomfortable with blindly removing everything, you can peruse through it and move what's needed to your desktop, and then delete the rest.
Empty the Trash
It may seem trivial, but if you have items in the trash, empty it to delete them. Unlike the Windows Recycle Bin, the OS X Trash does not regularly empty files. Instead, it serves as a storage location for unwanted files, which you will have to empty manually. The advantage to this is that you will always be able to locate a trashed item to put it back, if necessary, but it does require you to explicitly empty the Trash to remove items permanently. Therefore, choose the option to do so either by right-clicking the trash, or by using the Finder menu.
Note as well that the Trash in OS X is specific to user accounts, so even if you empty yours, another household member may not be doing so. Therefore, ensure that other users have also emptied their Trash folders.
Uninstall unused applications
While many applications are small self-contained packages that reside in your Applications folder, there are a number that install massive resources into your system's library folders and elsewhere. These can easily take up gigabytes of space, so if you are not using a particular program then remove it.
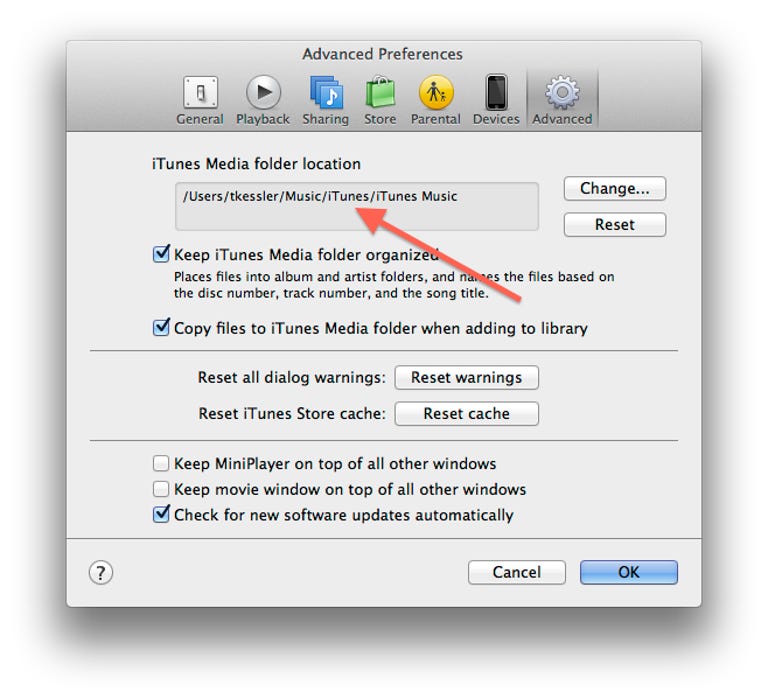
You can move your iTunes media folder to a new location and then change its path in this setting, to prevent it from using space on your boot drive. Similar approaches can be taken with iPhoto and Aperture.Screenshot by Topher Kessler/CNET
As we upgrade our systems and migrate to new ones, some programs we no longer use may stay dormant in the Applications and Utilities folders, and simply waste space. If your OS and hardware has advanced enough through your migrations, these programs might not even run without first being updated. Go through your Applications folder and remove any unused third-party programs (preferably with a developer-supplied uninstaller).
Move application libraries to external drives
One of the major ways you can quickly use up hard drive space is through iTunes, iPhoto, Aperture, and other programs that use their own library structures and databases for media. Given that these can hold music, movies, and many copies of photographs, they can get quite large and result in massive drive usage. Therefore, if you have an external drive, consider moving the library to this drive and updating your program to point to the library in this new location. Doing this can easily free up many gigabytes of space.
These large squares represent massive ~30GB virtual machine files in my home folder, other large squares represent movie files and the iPhoto library, all of which can be moved to an external drive to free significant space on the boot drive.Screenshot by Topher Kessler/CNET
Check for large files
Sometimes errors in how a program runs can result in it generating massive log files and other temporary files. At other times you might have inadvertently moved or copied a collection of files to an unknown location, and then forgot about them. In these cases the files that use your drive space may go unnoticed for a long time, but you can help root them out by using a graphical file sizing tool such as Grandperspective or DaisyDisk. These will index your drive and show you relative sizes of files and folders, allowing you to identify and reveal the ones that are taking up the most space.
Keep in mind that these tools will include system files, so before you delete items they find, be sure they are not important system files. You can get help for this on sites like Apple's support discussion forums.
Check the drive for errors
Finally, be sure the hard drive is not experiencing any formatting problems. The calculated size on disk and available space is determined by the filesystem format, so if there are problems with it, the system may incorrectly determine how much space is available. Not only can such problems result in misinterpretation of file size, it can also lead to data corruption that can cause crashes, hangs, slowdowns, and data loss. Therefore, be sure to use Apple's Disk Utility program to check your hard drive for errors.
If any errors are found, first be sure to fully back up your system, and then reboot to the OS X recovery drive (or to an installation DVD) and use Disk Utility there to perform the repairs.