Photoshop and Lightroom Super Resolution: How to quadruple your photo size
Zoom in on details and print pictures bigger with Adobe's new AI photo-editing trick.


- Shankland covered the tech industry for more than 25 years and was a science writer for five years before that. He has deep expertise in microprocessors, digital photography, computer hardware and software, internet standards, web technology, and more.


Adobe's Super Resolution feature in Lightroom and Photoshop is remarkable technology that uses artificial intelligence to quadruple the size of your photos. It's not perfect, but it's a great way to breathe new life into older shots and to print photos larger with twice the number of pixels in both width and height. Here's what it is and how to use it.
To build the Super Resolution feature, Adobe trained its Sensei artificial intelligence technology on millions of real photos. It compared originals with quarter-size versions so the system could learn the best way to blow them back up again. It applies that behavior to your own photos, making very well-informed guesses about how to increase their resolution.
Yes, Photoshop is fabricating pixels that weren't there in the first place, and no, it's not going to magically add detail the way Rick Deckard does with "enhance" commands in the sci-fi movie Blade Runner. Those caveats aside, I find it works well on many images, particularly when expanding edges, where it often does so without adding artifacts like mushiness or jaggy pixelization. Even faces -- the parts of images that we're often most concerned about -- come out well.
Super Resolution works through the Adobe Camera Raw tool in Photoshop. Adobe trained the feature to work on raw photos, the format that photo enthusiasts and pros prefer for editing flexibility and image quality. But Super Resolution can work on conventional images, like the JPEGs and HEICs your phone probably captures.
With that said, let's jump in. I'll explain first how to use Super Resolution on its own, then how to apply it to JPEGs, and finally how use it in Adobe's Lightroom software for editing and cataloging photos.
How to use Super Resolution in Photoshop's Adobe Camera Raw
Begin the Super Resolution process by opening a raw file. Photoshop will open raw files in the Adobe Camera Raw tool directly.
Next, right-click the photo and select the Enhance option. You can also use the keyboard shortcut Command-Shift-D on MacOS and Control-Shift-D on Windows.

You'll see an Enhanced Preview dialog box with a couple of options to control the process. First, the Raw Details option Adobe added in 2019 improves how raw files are rendered. Below that, make sure you've checked the Super Resolution checkbox. To see the expected results, click and drag to pan around the preview image, or click on the magnifying glass icon to zoom out and then click again on the patch you want to scrutinize.

Next, click the Enhance button and wait. Photoshop shows its estimate for how long the process will take -- several minutes in some cases -- but often it gets done faster in my testing, sometimes just a few seconds to turn 12 megapixel photos into 48 megapixels.
If you want to bypass the Enhanced Preview dialog box, hold down Option on MacOS or Alt on Windows as you click the Enhance option.
After that comes the fine tuning. I recommend zooming in closely to edit details like sharpness, texture and noise reduction using the sliders on the right edge of the tool.

Last, click either the Done button, which will save the new version next to the original with "-Enhanced" added to its filename, or Open, which opens the image in Photoshop.
How to use Super Resolution on a JPEG
To apply Super Resolution to JPEG, HEIC or TIFF, you'll first have to change Photoshop's preferences to open those file formats in Adobe Camera Raw by default. Unfortunately, you can't just use the Filter menu's Camera Raw Filter menu command.
First, open Photoshop preferences, go to the File Handling section, then click Camera Raw Preferences. In the next dialog box that appears, click the File Handling section. Change the JPEG/HEIC dropdown to "Automatically open all supported" images, and do the same with TIFF images if you want that, too.
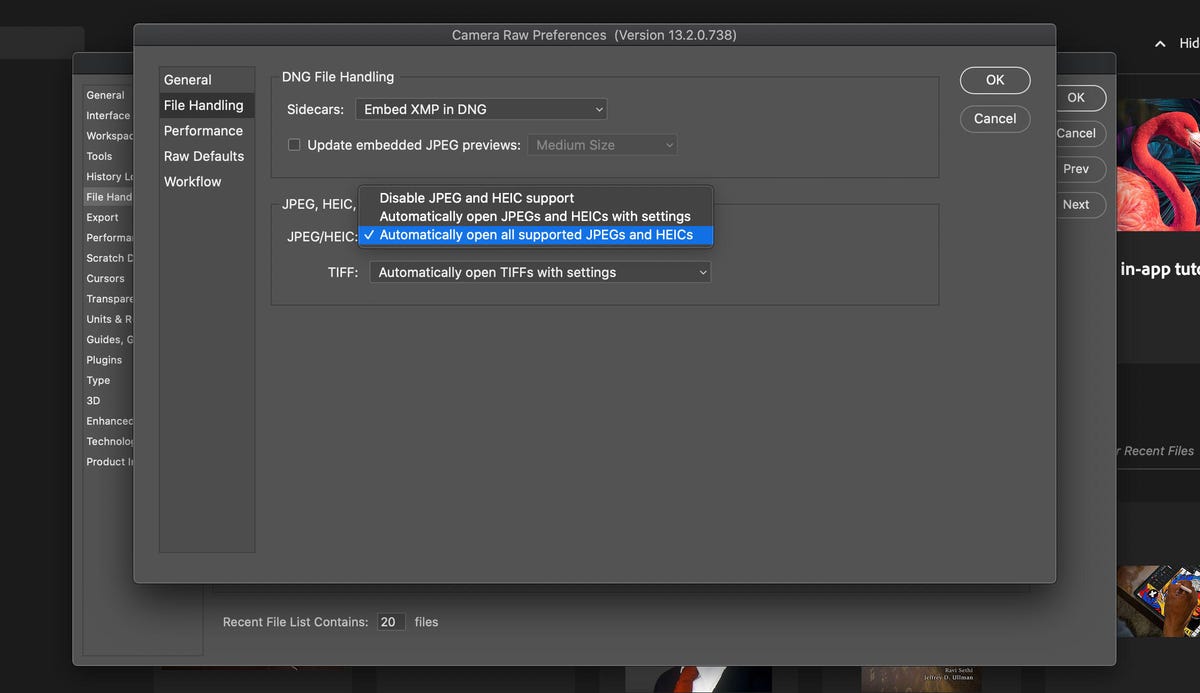
Note that this will mean these images will open in Adobe Camera Raw even if you don't want to use Super Resolution and the rest of the Adobe Camera Raw editing options. Personally, I like them, since I do most of my photo editing in Lightroom -- a close relative to Adobe Camera Raw. But if you want Photoshop's regular behavior, you'll have to switch it off in Photoshop's preferences again.
DSLRs and mirrorless cameras from Sony, Nikon, Canon and other camera makers all have the option to shoot raw, but smartphones are getting better at it too, with Apple's ProRaw and Google's computational raw technology.
How to use Super Resolution from Adobe Lightroom
For a few months there, it was tough to use Super Resolution if you use Lightroom for cataloging and editing your photos. Happily, with the June 2021 Lightroom release, the feature is built in.
Using it is simple, but it's a step off the beaten track from your usual editing and catalog operations. Select the photo in Lightroom's Library mode, then choose "Enhance" from the Photo menu. You can also right-click on the image to get the option in a pop-up menu.
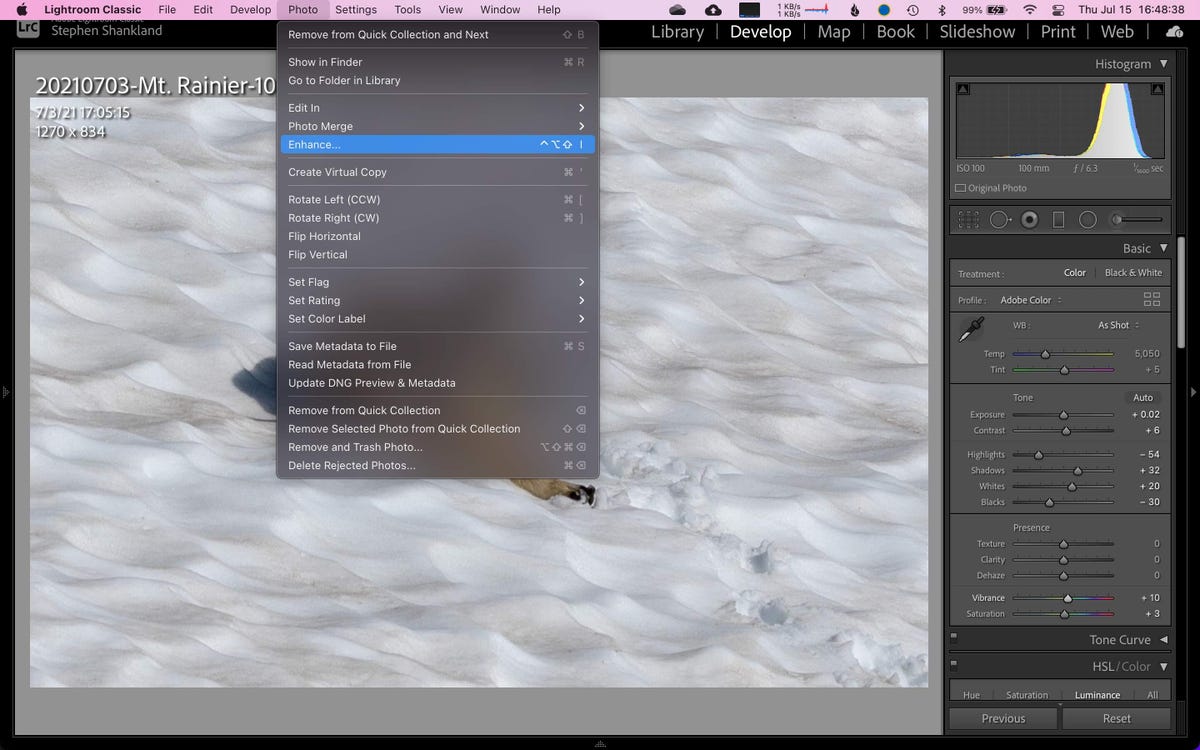

After a moment to generate a preview, you'll see a dialog box that lets you pan around the preview, zoom and out, click to compare before-and-after previews, and check Lightroom's estimate for how long the job will take. Click "Enhance" when you're ready.
As with Photoshop, it's best to pixel peep to check your detailed edits zoomed in. You might want to turn down sharpness, particularly in areas like hair, where Super Resolution can make mistakes, or to crank up noise reduction. I've also found that manually adjusting purple and green fringing problems in the Lens Corrections panel can be useful to reduce color artifacts.

Note that the keyboard shortcut for Enhance is different for Lightroom and Lightroom Classic, Adobe's two very different versions of Lightroom. For Lightroom Classic (which stores photos on your computer's storage system) it's Ctrl-Alt-I on Windows and Ctrl-Opt-I on MacOS. For Lightroom (which stores photos in the cloud and syncs them across your computer, phone and other devices) the shortcut is Ctrl-Alt-E on Windows Cmd-Opt-E on MacOS.
Also, in Lightroom Classic, you can skip the Enhance dialog box and just kick off a Super Resolution expansion with Shift-Ctrl-Alt-I on Windows and Shift-Ctrl-Option-I on MacOS. It'll apply the previous Enhance settings, so if you unchecked Super Resolution before, you'll have to reselect it through the dialog box first.
Super resolution in Lightroom can handle JPEGs as well as raw images, though it'll turn the JPEG into a DNG file. As with all DNG files, you'll have to export a JPEG for easy sharing.