Password-protect e-mail on your iPhone and iPad
The mail client built into the popular iOS devices can't be set to require a password. But you can secure the e-mail on an iPhone or iPad by disabling the standard mail program and replacing it with the free Gmail app or by using a browser-based e-mail service.


After last week's post describing two apps that keep your iPhone and iPad data private, a reader posed this question:
Is there any app that allows you to use it like the 'mail' app on an iPhone etc., but has a password lock facility? Else children will be reading all my mail.
I'm sure Apple had a reason for not allowing iPhone and iPad users to require a passcode to access the device's mail app, but I don't know what that reason was.
I came up with a free workaround that requires creation of a send-only account for the iPad or iPhone. I also found a $2 app that lets you passcode-protect multiple mail accounts on an iPhone or iPad.
Both solutions require that you disable all but one existing mail account on the device. At least one mail account has to be enabled to allow use of the iPad/iPhone option to share photos and other files via e-mail.
The workaround entails four steps:
- Create a free mail account you'll use only to send messages from the device.
- Forward mail received at the new account to your regular inbox to ensure you don't miss replies to the messages you send from the iPad.
- Disable all other mail accounts on the iPhone or iPad.
- To read your mail, you use either Google's Gmail app for iOS or your browser to sign into a password-protected Webmail account.
Since you'll use the new address only for the messages you send from the iPhone or iPad, the only mail you'll receive at the account are replies -- at least in theory. Some recipients are bound to add your send-only address to their contacts list (or more likely have it added to their contacts automatically).
To prevent replies and other mail sent to your special iPhone/iPad send-only address from being displayed in the device's unsecured mail program, set the new account to delete incoming messages after forwarding them to your regular mail account. That way the send-only account's inbox will stay empty.
Gmail lets you choose another account to use as the "sent from" address and to which replies will be sent. Theoretically, these settings will also keep the send-only account's inbox empty, but it's safest to forward and delete all mail sent to the send-only address.
Create a send-only mail account for your iPhone or iPad
You'll have to create your send-only account on a PC or Mac rather than on your iPhone or iPad. Take your pick of the many free e-mail services to use for the account. The only criteria is that the service allows you to forward and automatically delete mail sent to the account.
I chose Gmail simply because I'm used to the service and don't mind Google scanning the content of my messages. More-secure alternatives include Hushmail and PrivacyHarbor.com (two secure e-mail services I wrote about in May 2011's Privacy-centric alternatives to Google, Gmail, and Facebook). I don't know whether these services support the forwarding and other options I describe here.
It took about a minute to create a Gmail account with "ipad" appended to one of my existing account names. Setting the new account to forward incoming messages to my regular inbox and to automatically delete received mail so it wouldn't show up in the inbox took an additional five minutes or so.
After you sign into the new account, click the settings button in the top-right corner of the main window, choose Settings > Forwarding and POP/IMAP. Select "Add a forwarding address," enter the address, and click Next > Proceed. You'll be notified that a confirmation code has been sent to the address you just entered.
Open the confirmation message sent to the forwarding account, copy the confirmation code in that message, paste it into the text box that appears under the account in the Forwarding section of the new account's settings, and click Verify.
The forwarding option is disabled by default, so click "Forward a copy of incoming mail to," choose the account (it's likely selected by default), and click "delete Gmail's copy" in the second drop-down menu.
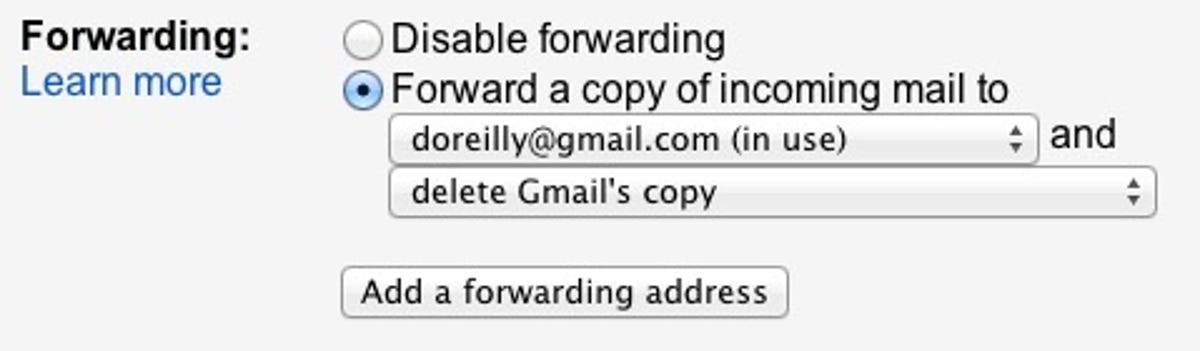
Note that if you archive incoming messages rather than delete them automatically they can be accessed on the iPad or iPhone by choosing All Mail in the left pane of the device's mail program.
To prevent the messages you send from the iPhone or iPad to be accessible to other users, click Accounts and Import, choose "Add another email address you own" in the "Send mail as" section, enter the account name and address, uncheck "Treat as an alias" (to prevent unnecessary inbox clutter), choose "Specify a different reply-to address," enter the reply-to address, and click Next Step.
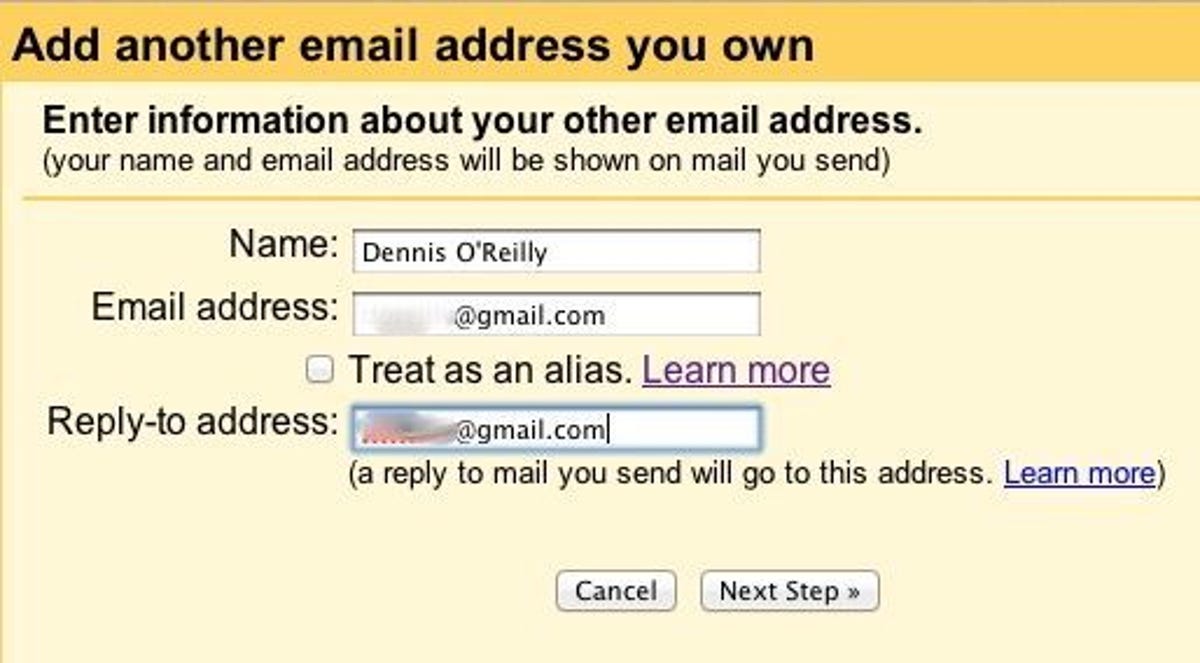
Choose Send Verification, enter the code sent to the address you selected to send mail from, and click "Make default" back in the "Send mail as" section of the Accounts and Import settings.
If you use another account as the sent-from and reply-to addresses, you shouldn't have to worry about forwarding and deleting mail sent to the send-only account. Selecting alternative send/reply addresses and forwarding/deleting all incoming mail is just a form of insurance.
Now add the new account to your iPhone or iPad via the machine's Mail, Contacts, Calendars settings. Select Add Account, pick the pertinent service, and enter the account information: your name, the e-mail address, the password, and a description. Click Next to verify the account.
Disable all other mail accounts on the iPhone or iPad
To prevent messages sent to your everyday accounts from being available to anyone who uses your iPad or iPhone, open the device's settings, choose Mail, Contacts, Calendars on the left, and select each mail account one by one (except the send-only account you added in the previous step). Set the account's Mail setting to OFF and press Done.
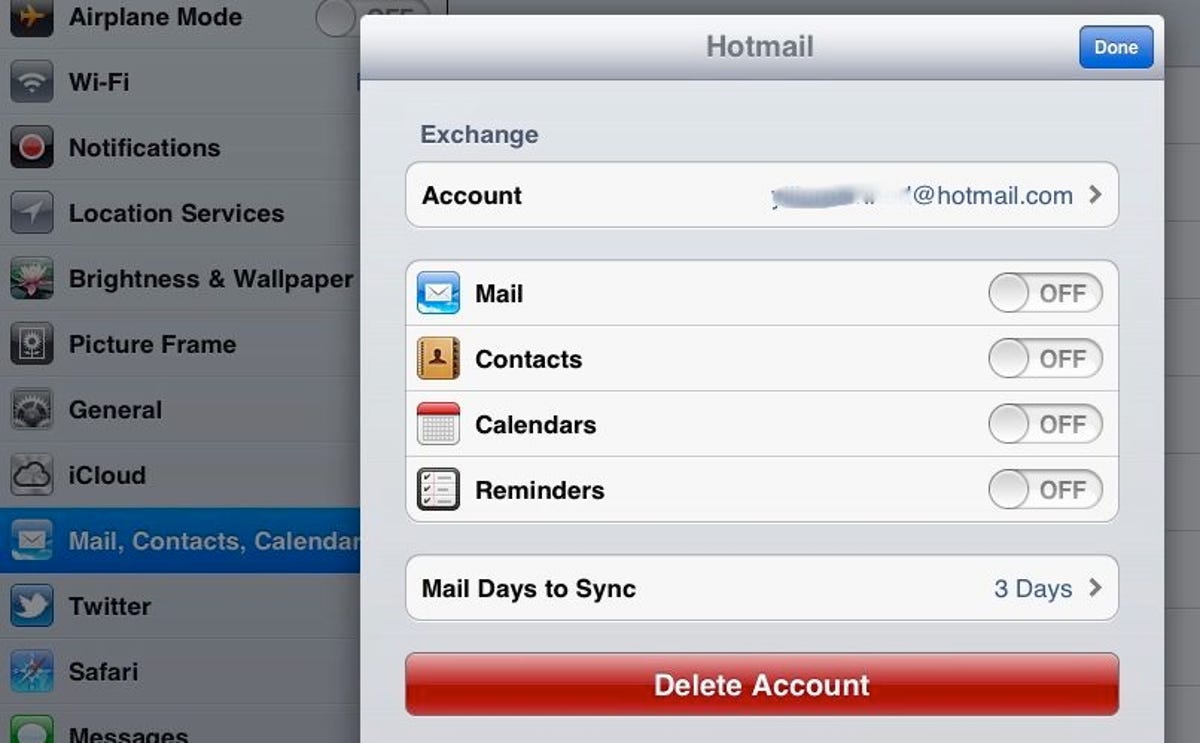
When you're finished, only the "send from iPad" account should be enabled for mail. Since messages received at this address are automatically forwarded and deleted, the inbox will remain empty. You won't miss replies to mail sent from the iPhone or iPad because they will appear in the inbox of the account you chose as your forwarding address.
Use your browser or a separate app to sign into your regular mail account
After making these changes, you'll need to use your browser or a dedicated app to receive mail. The free Gmail app for iPhone and iPad is an improvement over the standard mobile Gmail interface.
In addition to requiring that you sign in, the app has an attachment icon in the message window so you can add a photo as an attachment to the message after you've begun composing it. It's so frustrating to be writing a message only to realize too late that you want to attach a photo or other file. I only wish I could use this option to attach files other than photos.
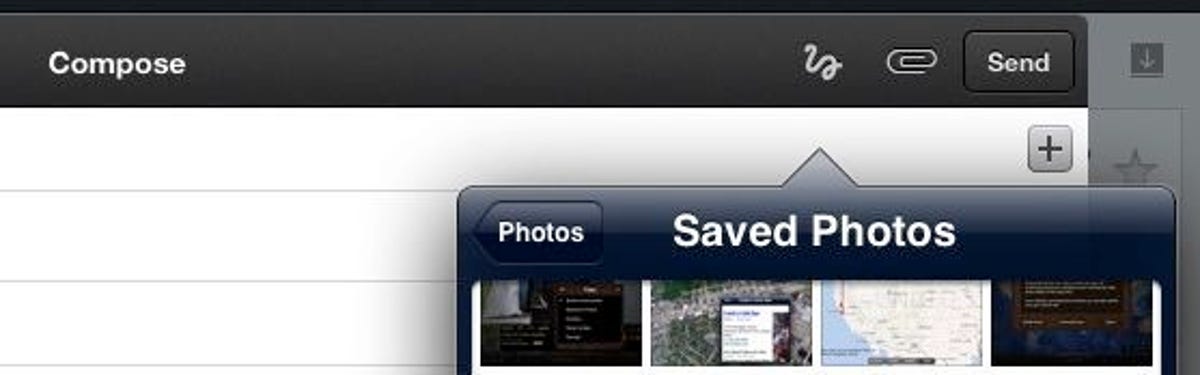
(It's a mystery why the iPad and iPhone require that you select the attachment first and then choose Share or the option to send e-mail. Over the years I've grown accustomed to writing the message first and attaching the files second. Am I the only one puzzled by this design choice?)
Another option for securely accessing multiple mail accounts on an iPhone or iPad is the $2 Secure Webmail app from Apps Gone Bananas.
The program requires that you enter a passcode or press a preset sequence of dots before you can access your mail accounts. You can use the program to download or view attachments, or send them to external applications.
Secure Webmail supports Yahoo Mail, Hotmail, AOL, Outlook Web Access, and other mail services in addition to Gmail. The program worked well when I tested it, but as long as you can remember to sign out of the free Gmail app when you're not using it, you can use a send-only account to prevent unauthorized access to your mail on an iPhone or iPad without having to spend $2 for a separate app.