Managing the OS X 10.7 Lion restore drive
The Recovery HD partition is a new feature to the Mac OS. Here are some options for managing it.


Unlike previous versions of the Mac OS, when you install OS X 10.7 Lion your system will be set up with a restore partition. This is a hidden 650MB partition that, like the previous installation DVDs for OS X, can be used to boot the system and provide tools to resintall OS X, format hard drives, and perform other maintenance and troubleshooting tasks on the system.
You can boot to the recovery drive in a couple of ways, including pressing the Option key at startup and selecting it from the boot menu or by holding Command-R at start-up; however, if you have FileVault 2 enabled in Lion, then you will only be able to access the recovery drive by using Command-R.
While it's a convenient option to have, people may wonder about options for managing this recovery volume, both for systems that do not have one and for those that may show multiple ones.
Create a portable OS X Lion recovery volume
If you are planning on creating a boot or recovery disk for OS X Lion, I recommend you create one from the downloaded installer so you will have all the files you need to install Lion again; however, another option is to create a smaller recovery drive for Lion using this recovery partition. The convenience here is that it can be done from any Mac on which a recovery partition has been created (some systems such as those using RAID drives as boot volumes may not have a recovery partition), and is small enough that it can fit on a CD-ROM, if needed.
To create a recovery drive, you have two options. The first is to create a clone of the Recovery HD volume itself to another drive, and the second is to restore the disk image in the recovery partition to another drive. Cloning the Recovery HD volume is more convenient in that it is not only quicker to do but it also uses less space (though both options will conveniently fit on a 2GB flash drive).
For both options you will need to reveal the hidden Recovery HD to manage in Disk Utility, and in order to do this you will need to enable the Debug Menu in Disk Utility by entering the following command in the Terminal, and then selecting "Show every partition" from the resulting menu (see this article for more information).
defaults write com.apple.DiskUtility DUDebugMenuEnabled 1
At this point you can select the hidden Recovery HD volume and restore it to a drive of choice by selecting it and using the Restore tab in Disk Utility, or create an optical disc from its contents by selecting it and to create a disk image from it in the File > New menu, followed by burning it to your desired optical media.
The second option is to forgo making a clone of the Recovery HD partition itself and instead create a boot disk using the boot image that is stored within the recovery partition. This will create a boot drive that will not have machine-specific information, but will also be slightly larger in size. To do this, follow these steps:
Mount the recovery partition
Select the revealed Recovery HD partition in Disk Utility and click the Mount button in Disk Utility's toolbar.
Display hidden disk image
The recovery drive contains a number of features, but the boot image that is used to load the recovery OS and utilities is hidden. To display it, run the following command in the Terminal (copy and paste, if necessary), and provide your admin password when prompted:
sudo chflags nohidden /Volumes/Recovery\ HD/com.apple.recovery.boot/BaseSystem.dmg
Drag the recovery image to Disk Utility
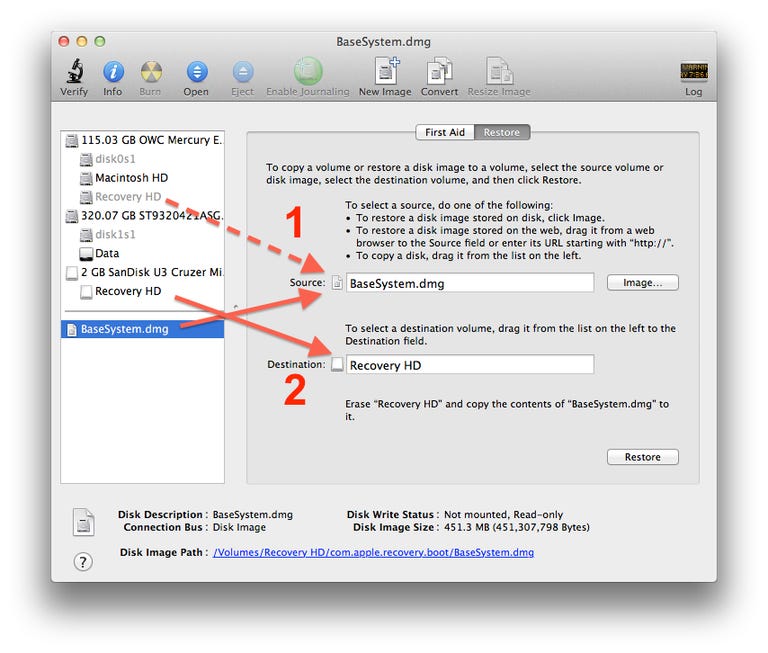
First drag either the image or the recovery drive itself to the source field, then drag the formatted volume to the destination field (click for larger view). In the Finder, open the Recovery HD drive and then open the com.apple.recovery.boot folder, and you should now see a file called "BaseSystem.dmg." Drag this to the list of disks in Disk Utility so it is available to the program.
Burn or restore image to the desired drive
At this point you can either burn the image to an optical disc, or you can restore it to a flash drive or hard drive that is available to you. To burn the image to a DVD, select it in the drive list and click "Burn," and then follow the on-screen instructions to burn the DVD.
If you want to restore the image to another type of drive, you will need to have a drive of at least 2GB in size and then attach it to the system and format it when it appears in Disk Utility so you have a fresh volume. Then select the "BaseSystem.dmg" disk image in the sidebar and click the Restore tab in Disk Utility. At this point you should see the "BaseSystem.dmg" file in the Disk Utility Source field, but if not then drag it to the Source field. Next drag the newly formatted volume on your disk to the Destination field and click Restore.
When the restore is complete, run the following command to make the BaseSystem.dmg file hidden again (it is the same as above, only with "hidden" instead of "nohidden":
sudo chflags hidden /Volumes/Recovery\ HD/com.apple.recovery.boot/BaseSystem.dmg

Removing extra restore partition from drives

While the Recovery HD partition is convenient, you may run into some confusion if you have attempted to install Lion to more than one drive on your system. The reason for this is that each installation will create its own Recovery HD partition if one is not present. Therefore, if you install to more than one drive, then if you start up to the boot menu by holding the Option key you will see two or more Recovery HD options available to you.
The way around this is to remove the recovery partitions for your secondary drives, and only keep it for your boot drive. Warning: do not remove the "Recovery HD" volume from your boot drive, especially if you have enabled FileVault in Lion.
To remove unneeded Recovery volumes, first enable Disk Utility's Debug menu and then select the option to see all volumes. Then select the Recovery HD volume you want to delete and erase it using the Erase tab. At this point the volume should appear on your desktop as an empty 650MB drive.
Next select the drive device itself in the Disk Utility sidebar and click the Partition tab, where you should see two partitions shown. Select the smaller 650MB partition and click the minus button to delete it, followed by expanding the remaining partition to use the entire disk size, and then click Apply to save the changes.
To ensure the remaining volume uses the maximum space available to it on the drive, instead of resizing it in Disk Utility as stated above, you can use the "diskutil" terminal command to maximize its size on disk. To do this, first select it in Disk Utility and then press Command-I to get info on it (or click the Info button in the toolbar). Then make note of the Disk Identifier label (something like disk1s2, or disk3s2). Then run the following command:
sudo diskutil resizeVolume /dev/IDENTIFIER R

In this command, replace the word "IDENTIFIER" with the one you looked up for your volume, and then press enter. Provide your password, and the command will maximize the drive's size on disk.
A few words on cloning
The last aspect of handling Lion's recovery partition is with cloning your OS installation. Cloning a hard drive is a convenient method of backing it up; however, many cloning utilities will only clone one volume at a time, unless you do block-level cloning of the device itself, which will include all partitions. If you have your system set up to do cloning with a tool like Carbon Copy Cloner or SuperDuper!, then the recovery partition will not be cloned. The clone will still boot and function normally, but it will not have the option to boot to a recovery volume.
One option you can do to get around this is first create a block-level clone of your system to the external backup drive so all partitions are included, and then continue updating the cloned system volume to ensure it stays current.
The recovery partition is built so you can reinstall OS X and perform various maintenance tasks; however, If you ultimately experience a full disk crash and either need a new disk or have fully partitioned and formatted your current one, then merely copying a system clone back to the drive will not be enough to fully restore the system. Therefore, you will need to first run the OS X 10.7 installer (either from a self-created boot disc or restore drive as done above) to create the Recovery HD partition, followed by cloning your OS installation back to the disk.
Because of the requirement to run the OS X installer again when recovering your OS installation, you may find it easier to maintain a Time Machine backup for this purpose, instead of relying on a system clone to do this task. A clone is useful for getting yourself immediately up and running if needed, but so far may not be adequate by itself for fully restoring a Lion installation.
Questions? Comments? Have a fix? Post them below or e-mail us!
Be sure to check us out on Twitter and the CNET Mac forums.