Making the switch: a Windows user's first MacBook (part 3)
Missing Windows? You can run OS X and Windows on the same system, thanks to a little something called Boot Camp Assistant.


In part one, we changed some OS X settings to make a Windows user more comfortable, went over touch-pad gestures, window management, apps and the dock. In part two, we went over keyboard shortcuts, screenshots, text editing, writing to NTFS, file management, codecs and network shares.
Welcome to part three of our feature on switching to Mac. This time, if you truly miss Windows, we'll walk you through dual booting your laptop so that you can head back to the familiar blue OS. We'll be using Windows 7 — others should work, but we recommend you stick to the newest version of Microsoft's OS.
Heading to Boot Camp
You'll need a few things before embarking on your Windows mission:
- A USB flash drive that you're willing to format for Apple's Windows drivers; providing you have a DVD burner, a blank CD or DVD will also work
- An internet connection; now that Apple no longer includes the OS X DVD in the box, the OS downloads the Windows drivers directly
- A Windows 7 install DVD, if your Mac has a DVD drive
- A bootable ISO file of Windows 7, and an additional 4GB+ USB key if you don't have a DVD drive (MacBook Air, Mac Mini).
If you have all of these things, carry on.
Boot Camp Assistant
The application we want is called Boot Camp Assistant, and it can be found in the Utilities folder under your Applications folder. Once you find it, run it.
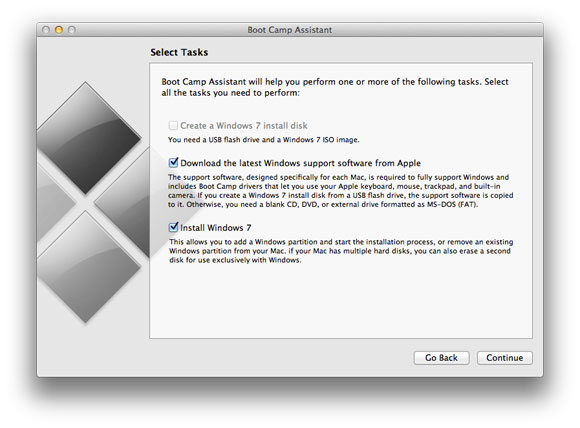
After breezing past the first screen, you'll get the main options for Boot Camp. Make sure the option to Download the latest Windows support software from Apple is checked, so you get the drivers, and also the Install Windows 7 option. In a foolish decision, Apple prevents you from using the USB boot option if you have an optical drive in your Mac — you'll need a MacBook Air or a Mac Mini for it to not be greyed out.
It's a fairly simple procedure if you do use a USB drive — just make sure it's at least 4GB in size, put it in, open the ISO file and follow the prompts. The drive will be formatted by Boot Camp Assistant, so make sure you can afford to do so.
On the other hand, if you're using an install DVD, feel free to put it in now.

Next up, we need to set where OS X will download our Windows drivers to. If you use an external drive (USB flash drive), note that even if you've formatted it, OS X will format it again before downloading the drivers onto it. Once you've selected the option you want, click Continue.
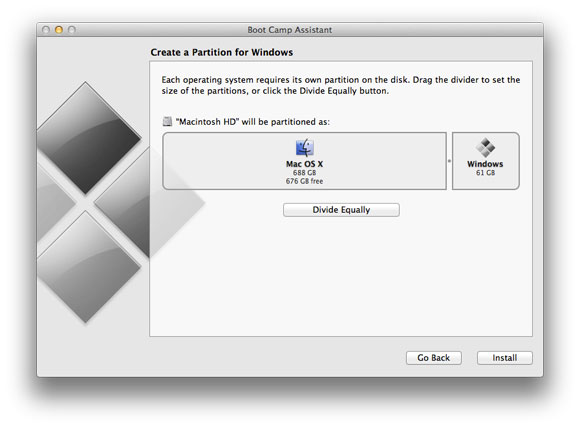
Partitioning a hard drive is a way of virtually splitting a single hard drive into parts, so it appears like two separate physical hard drives to the operating system. While you can partition a drive pretty much as many times as you like, Boot Camp Assistant will only let you split your drive in two, and will only work if you have a single OS X partition in the first place. (There are ways to manually add extra partitions as well as to install Windows, but they're beyond the scope of this article.)
Here comes the toughest bit: deciding how much space to give to Windows. To give you a rough idea, 40GB will give you enough space for Windows, the full Adobe Creative Suite and Microsoft Office, with a little space to spare for personal files. Obviously, those with smaller hard drives, like those in the MacBook Air, will be more sensitive to the space that Windows will take up. Windows 7 64-bit requires approximately 20GB of space for the install, so you can make your judgments from there.
There's another case you may wish to consider: managing personal files in both Windows and OS X. Both run on separate partitions, and transferring between the two can be a pain. Saving everything to the one place can have real benefits.
OS X is able to read your NTFS-formatted Windows drive, and, once the Boot Camp drivers are installed, Windows will be able to read your HFS+ formatted OS X drive. But what they won't be able to do is write to each other, making cross communication a pain.
The free way to achieve centralised storage is to treat your Windows (NTFS) partition as the place to save files (that is, make a bigger Windows partition!), and install NTFS-3G in OS X, so it can write to that drive.
If you want to write to your OS X partition, you'll need to buy a program like MacDrive.
When you've made up your mind, hit the Install button.
Installing Windows
The MacBook will restart, and a typical Windows installation will ensue. There are a few gotchas that you need to be prepared for along the way; for example, only the physical track-pad click will work for now, which means that you're limited to left click.
Proceed as per the Windows-installation instructions — you'll need to select a Custom installation instead of an Upgrade, which should be disabled, anyway. When the installer asks Where do you want to install Windows?, select the Boot Camp partition. Make sure you've selected the right partition; you don't want to wipe out your OS X install!
When you're sure, click the Drive options (advanced) link near the bottom right. This will expand more options; click Format, then OK on the dialog that pops up. When it's done, click the Next button.
One last thing: don't bother setting the date or time yet — it'll be wrong, but you'll want to install Apple's drivers before adjusting anything, or else your OS X time will be affected, as well. Follow the prompts to finish installing Windows.
The Windows desktop
We're here! A few points of note:
- Once again, only the physical left mouse click will work
- The resolution will be incorrect
- You won't be able to use any of the function buttons, including the optical-drive eject button.
You can also eject a disc by holding down the mouse button while the MacBook boots.
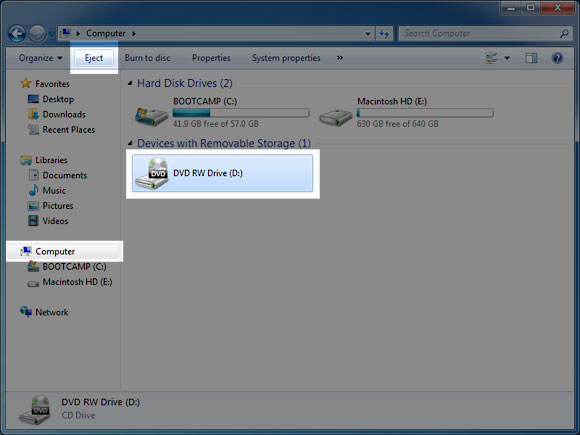
Let's fix these problems by installing the Apple drivers. If you burned them to CD or DVD, and you installed Windows from a DVD, then you're going to need to get that disc out of the drive first. The easiest way to do so is to open Windows Explorer, select Computer from the tree menu on the left, select the optical drive in the right pane and choose Eject from the menu under the address bar.
If you copied the drivers to a USB flash drive, it's easy enough; just make sure that the flash drive is plugged in, open Windows Explorer, select the drive, open the Windows Support folder and run Setup. The only suggestion we'll make here is that you opt-in to Apple Update for Windows; that way, you can get updated Boot Camp drivers as they come.
Apple takes the shotgun approach to drivers, attempting to install every driver for every possible MacBook and seeing what sticks, so the install will take a little while. When it's done, click Finish, and you'll be prompted to restart. Do so.
Once Windows has rebooted, the eject button will work, the resolution should be set to native and you can set the date and time. To do so, click the clock in the system tray, select Change date and time settings, click the Change date and time button, adjust as necessary and then hit OK, then OK again.
Boot Camp control panel — all of your important settings are here.
(Screenshot by Craig Simms/CBS Interactive)
Boot Camp options
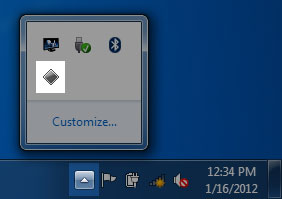
There will now be an extra grey-diamond icon in your system tray in the bottom right, although it'll likely be hidden; if you can't see it, click the up arrow to reveal.
Click on it, and choose Boot Camp Control Panel — this will create a UAC prompt, so click Yes.
The Startup Disk tab will allow you to set Windows or OS X as your default operating system. Under OS X, the same option can be found in System Preferences, if you click Startup Disk under the System section.
Under the Keyboard tab, you can set whether you want your F1-F12 keys to act as such without having to hold down Fn, and the Trackpad tab will let you turn on tap to click, and set dragging behaviours.
A word of warning: using the Apple track pad in Windows is a highly frustrating experience. While the double finger swipe to scroll works fine, you'll get a whole mess of misclicks going on if you enable tap to click. Although it has its own quirks, the Trackpad++ driver will provide a better, more reliable experience.
Keyboard tips
There are only a few things to keep in mind with the MacBook keyboard when it comes to windows: Fn + Shift + F11 will take a full-screen screenshot and copy it to clipboard, the equivalent of print screen. Fn + Shift + Option + F11 will take a screenshot of the active application.
The Delete key will work like backspace; if you want delete, press Fn + Delete.
Finally, if you haven't figured it out yet, Command acts as the Windows key.
How do I switch operating systems?
Simply restart your machine, and hold down the Option key. You'll be given a list of bootable devices. Note that only physical clicking works here.
It all went horribly, horribly wrong!
You can't access your Windows or OS X installs? Did you lose your OS X install along the way? It's time to head into recovery mode. Make sure you're hooked up to the internet, restart the Mac and hold down Command + R during boot. Here, you can recover from a Time Machine back-up if you made one, reinstall OS X from scratch (this will download multiple GB and will also wipe your machine, so tread carefully!) and access disk utility. This should be treated as a last-ditch response, so tread with caution.