How to build a wireless network
CNET.com.au's step-by-step guide to using a wireless router to share an Internet connection and build a wireless network at home.

CNET.com.au's step-by-step guide to using a wireless router to share an Internet connection and build a wireless network at home.
Locating local internet providers
It wasn't long ago that the average household had just one computer, tirelessly connected to the Internet for all to use. These days, however, the number of things that access the Internet has jumped dramatically: laptops, PCs, kids' desktop computers, many types of mobile phone and PDA, media centre PCs, and game consoles all now have a legitimate claim to your home's big data pipe.
If you've found yourself with two or more devices needing broadband connectivity, installing a wireless local area network (WLAN) is the easiest way to keep them all happy at once. By installing a router compatible with the IEEE 802.11g standard -- and all modern ones are -- you can connect your devices nearly anywhere in the house at 54 megabits per second, or at the 11 Mbps used by the previous 802.11b standard (this year, ratification of the new 802.11n standard will boost speeds to around 300 Mbps and coverage radius significantly).
Locating local internet providers
The good news: installing a WLAN is easier than ever. Here, we offer a step-by-step guide to getting your wireless LAN access point (AP) -- the hub of your wireless home -- up and running. For this guide, we've set up a Linksys WRT54G Wireless-G Broadband Router, which combines 802.11g-compatible wireless with four fixed network ports for connecting desktop PCs, voice over IP (VoIP) phones, and any other device near the main computer room.
Although numerous other brands of WLAN AP are available, most work in a similar way. While the screens you see may vary from those we've presented, the same general concepts still apply.
Step 1: Check your current setup
The basic idea behind installing a WLAN AP is to insert it in the authentication chain between your ISP and your computers. To do this, you may need to transfer your current configuration information from your PC to the AP.
The first consideration is whether you have a fixed IP address, which stays the same all the time and is necessary when running a Web or other server. If you're a home user, you probably don't have a fixed IP address, but to make sure, click on Start, Control Panel, Network Connections, then double-click Local Area Connection (if there's more than one, make sure it says 'Connected'). Click the Support tab. If the first line says 'Assigned by DHCP' you can skip to Step 2 now; Windows will talk with the WLAN AP to work out your IP address.
Since you have a static IP address, click on the General tab, then click Properties, then 'Internet Protocol (TCP/IP)' and click Properties. Grab a piece of paper and write down the IP Address, Subnet Mask, and Default Gateway values, then select 'Obtain an IP address automatically' and click OK.
Make sure you record your details if you have a fixed IP address
Step 2: Install your access point
To install the WLAN AP, unplug the Ethernet plug from the back of your computer, then plug it into the Internet port on the back of the access point. Ensure the AP is plugged into the mains, then plug one end of the supplied Ethernet cable into the port on the back of your computer. The other end of that cable should go into one of the four switched ports on the back of the WLAN AP; it doesn't really matter which one, but we'll choose #1 for now.
Since everything is plugged in, test your Internet connection by opening up a Web browser. If your home page loads, you're in business and can jump to Step 3. If not, do a full power cycle by unplugging the power to your modem and your WLAN AP, then shutting down your computer. Plug in your modem, count to 20, plug in the WLAN AP, then turn on your computer and open your Web browser. This will force the devices to renegotiate their Internet connection details and, all going well, should get you online.
If you have ADSL and this didn't work, don't despair; you'll need to set up PPPoE to authenticate your access point to the ISP's network. Go to the next step.
| Step 1:
Check your current setup Step 2: Install your access point Step 3: Log onto your WLAN access point Step 4: Access point housekeeping Step 5: Check client devices Step 6: Encrypt your network | Step 7:
Other methods of security Step 8: Plug in other devices Step 9: Set up access restrictions Step 10: Set up Quality of Service Step 11: Building your new network |
Step 3: Log onto your WLAN access point
Now that your devices are connected -- to each other, if not the Internet -- it's time to start configuring your WLAN AP.
Open up a Web browser and type the address 192.168.1.1 (or 192.168.0.1 if this doesn't work) into the URL bar. Enter the router's default username and password; this will be in your user manual but, in our case, the username is linksys and the password admin.
Log onto the access point using a standard Web browser
When you first log onto the WLAN AP, you'll get to the Basic Setup configuration screen.
If you got online successfully in the previous step, skip to Step 4. If not:
- If you wrote down your IP address details in the previous step, change Internet Connection Type to Static IP, then enter the details you wrote down in the appropriate boxes.
- If you're using ADSL and couldn't get online in the previous step, change the Internet Connection Type field to PPPoE, then enter the username and password you use to log onto your ISP. If you don't know these values, check with your ISP. You may also need to uninstall any PPPoE software that came from your ISP.
Once you have made these changes, scroll to the bottom of the screen and click Save Settings, then close all your Web browser windows and open a new one. If you're still not online, cycle power as described in Step 2. If you're still not online, it's time to ring your ISP and find out whether there are any extra settings you need to configure.
Step 4: Access point housekeeping
Now that you're happily online, you should set up a few other options to make sure your access point is operating optimally. Here are a few of the main ones.
Time zone (Setup screen)
Firstly, log onto the WLAN AP as described in Step 3. From the Basic Setup screen, scroll down and adjust the Time Zone to GMT+10 (for Sydney, Melbourne or Brisbane) or whatever time zone you're located in. Scroll down the bottom of the screen, then click Save Changes.
Give your access point a name (Wireless screen)
Every wireless LAN AP has its own SSID (Service Set Identifier), a name that your devices use to make sure they're connecting to the right wireless LAN. By default, all WLAN APs are set to some derivative of the vendor's name - 'linksys' in this case - but you'll probably want to change this to something unique.
On the WRT54G, this setting is on the Wireless/Basic Wireless Settings page. Type in your new SSID and choose whether you want to broadcast your SSID or not. Broadcasting the SSID makes your network visible to any of your devices -- and anybody passing by -- but disabling SSID keeps your network much more private. However, if you don't broadcast your SSID you'll need to explicitly type it into every device you want to connect to the WLAN.
Another setting to consider is on which of the 13 WLAN channels, or frequencies, the WLAN operates. The WRT54G uses channel 11 by default, and this is probably fine; only change this setting if you later encounter significant interference.
DHCP Server (Setup screen)
The WLAN AP's built-in DHCP server is responsible for farming out and revoking IP addresses to your connected devices. If you're using DHCP, you may want to limit the number of devices that connect to your WLAN at once; to do this, change Maximum Number of DHCP Users to a smaller number (we use 10).
You may also want to control the range of addresses the DHCP server assigns. On the WRT54G, the DHCP server begins handing out addresses starting at 192.168.1.100 by default. To make management of your WLAN easier, change the starting IP address to one more than that used by the router; for example, in our example the router is listed as being at 192.168.1.1, so we set the starting DHCP address to 192.168.1.2. This makes it easier down the track, should you want or need to explicitly restrict device access using your PC's firewall.
Don't forget to click Save Changes if you adjust any of the DHCP settings.
Change your WLAN AP password
Since everybody in the world can find out your WLAN AP's default password, change it by going to the Administration tab and entering a new password twice. That will prevent your kids from sneaking in and changing things around.
| Step 1:
Check your current setup Step 2: Install your access point Step 3: Log onto your WLAN access point Step 4: Access point housekeeping Step 5: Check client devices Step 6: Encrypt your network | Step 7:
Other methods of security Step 8: Plug in other devices Step 9: Set up access restrictions Step 10: Set up Quality of Service Step 11: Building your new network |
Step 5: Check client devices
Now that your wired PC and WLAN AP are working, it's time to get your other devices online. In most situations, this will mean linking up a notebook PC using built-in wireless, although you can also connect desktop PCs using internal PCI or external USB WLAN adapters.
If your notebook is less than three years old, it probably has built-in wireless LAN connectivity thanks to Intel Centrino technology. If this is the case, all you have to do to get online is to turn on your computer; Windows XP will find the wireless LAN and log you onto it.
Your wireless-enabled notebook should automatically log onto the network
Your notebook may show something different when connecting, since some computers prevent Windows from managing the wireless LAN connection in favour of their own connection tools.
If, for some reason, there are other ambient WLANs in the area and your computer chooses to connect to one of them, double-click on the computer icon, then choose View Wireless Networks and Refresh Network List until necessary. Once the notebook has found your WLAN, double-click on it and Windows will automatically connect.
If you have an older notebook or are connecting desktop PCs to the network, you'll need to install the software that came with your card. Usually, this installation will include installation of drivers and a walkthrough covering everything you need to get the above prompt.
Step 6: Encrypt your network
As you would have noticed in Step 5, your WLAN is easy to discover -- too easy. This may be fine if you're a sharing, giving kind of person, but you may find your generosity compromised if your next-door neighbour leaches out all of your monthly bandwidth allowance downloading pirated movies.
Encrypting your network traffic -- which also involves password protecting access to the network -- is the easiest way to prevent this from happening. To secure your network, log onto the WLAN AP then choose the Wireless/Wireless Security page.
WPA, WPA2 and WEP all encrypt data to limit access to the WLAN.
WEP, WPA and WPA2 are your best choices. In this example, our WLAN AP supports WPA and WPA2 in Personal and Enterprise flavours; choose Personal unless you're working within a business environment that has a RADIUS server handling user authentication.
As the oldest WLAN security standard, WEP can be readily cracked. It may be fine for keeping nuisance neighbours and casual wardrivers from hogging up your bandwidth, but it isn't recommended when you want to protect the data flowing over your network. Your best bet is WPA, which supports AES encryption and TKIP key-refreshing algorithms and a Shared Key (password) of 8 to 63 characters in length. Type in your Shared Key -- something you'll remember -- then Save your Changes and watch as your notebook is disconnected from the network.
This time when you double-click on the computer icon, you'll see that the network has been secured:
WLAN encryption puts a lock on the door of your network
| Step 1:
Check your current setup Step 2: Install your access point Step 3: Log onto your WLAN access point Step 4: Access point housekeeping Step 5: Check client devices Step 6: Encrypt your network | Step 7:
Other methods of security Step 8: Plug in other devices Step 9: Set up access restrictions Step 10: Set up Quality of Service Step 11: Building your new network |
Step 7: Other methods of security
Encrypting your network is one way of keeping strangers off your network, but it also slows down overall throughput slightly due to decryption overheads. Another method of security your network is to use MAC (Media Access Control) security, which restricts WLAN access to a set of known devices.
Every network-connectable product in the world ships with its own unique MAC address. To find your notebook's MAC address -- note that this is the address of its wireless network card, not its Ethernet adapter -- click Start, Control Panel, Network Connections, then double-click on Wireless Network Connection, click Support, and click Details. The Physical Address label -- a series of six pairs of hexadecimal numbers (0 through F) -- is your MAC address.
You will also need the MAC address of any phones, PDAs or other wireless devices you intend to connect to your network; refer to your device's instructions to find out where you can locate this information.
Once you've gathered the MAC addresses of each device you want allowed onto the WLAN, log onto your WLAN AP, then choose Wireless/Wireless MAC Filter and, in our case, click on Enable. Click on Edit MAC Filter List, then type in each of the addresses -- carefully - to the list.
Save your changes, then click on the Permit Only option so that only the devices you've chosen can get onto the network. You can also ban specific devices by choosing the Prevent option, but this can be hard to police unless you live inside a lead house and can control what devices other people have.
Just remember: no other devices will be allowed onto your WLAN. This means if a friend visits and wants to get online with her notebook, you'll need to find out its MAC address and manually add it to the WLAN AP setup.
MAC filtering is another way to restrict access to your network
Step 8: Plug in other devices
If you have any other wired devices -- for example, a Voice over IP phone -- you probably already have an Ethernet switch or hub installed. Unplug the devices from that switch or hub, then plug them into the other ports on the back of the WLAN AP. You won't need the old switch or hub anymore (unless you have more than four devices to plug into the WLAN AP, in which case you can plug the old switch or hub into a port on the WLAN AP).
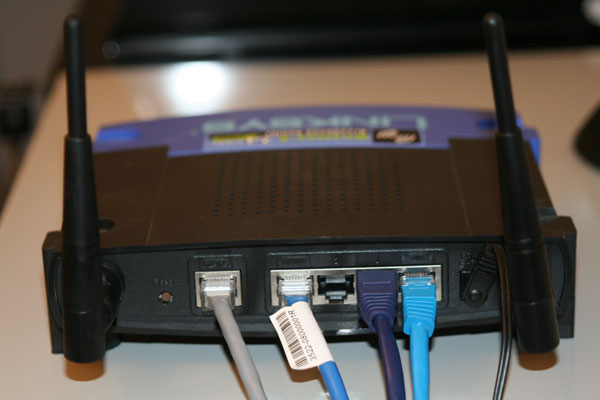
Plug the lead from your ADSL or cable modem into the jack on the left, and your fixed devices into the four switched ports on the right.
| Step 1:
Check your current setup Step 2: Install your access point Step 3: Log onto your WLAN access point Step 4: Access point housekeeping Step 5: Check client devices Step 6: Encrypt your network | Step 7:
Other methods of security Step 8: Plug in other devices Step 9: Set up access restrictions Step 10: Set up Quality of Service Step 11: Building your new network |
Step 9: Set up access restrictions (Access Restrictions)
Although encryption and MAC control let you manage who gets on the WLAN, many WLAN APs also include the ability to block specific URLs or limit wireless access to specific times.
From the WLAN AP login screen, click on Access Restrictions. The WRT54G allows creation of 10 named policies, each of which can deny or allow access to a specific list of PCs by MAC address or IP range, and can also block access to specific URLs or IP services (for example, POP3 for email or HTTP for Web browsing).
Say we want to stop the kids from downloading BitTorrent movies, sending or receiving email, or visiting time-wasting sites like YouTube or MySpace on weeknights after 6:00 pm. To do this, we click on Add/Edit Service to get the following window:
Blocking ports can help prevent unwanted network usage.
Since BitTorrent isn't included by default, we type in its port numbers (in reality, these may differ) and select TCP as the protocol, then click Add and Apply to save the changes. This will return us to the configuration screen, where we choose BitTorrent and POP3 in the Blocked Services pulldowns.
We enter the target Web sites and use the keywords 'MySpace' and 'YouTube' to keep the kids away from those sites, or other sites that reference them. Under Days and Times, uncheck Everyday, then check the weekdays and set the block to start at 6:00 pm and end at 11:50 pm. Give the policy a name, click Enable, then scroll down to the page and click Save Settings.
Many WLAN APs can ban access to certain types of online content, by day and specific computers.
Once you've made a policy, you can enable or disable it, depending on your whim, by clicking on Enable or Disable. Of course, unless your kids are under the age of 10, they'll be able to figure out how to log onto your WLAN AP - so make sure you've changed the password from the default so they can't change your policies (just don't tell them there's a reset switch on many access points that will reset the entire WLAN AP if it's held down for 30 seconds).
Step 10: Set up Quality of Service
There's one more configuration thing you may want to consider: quality of service (QoS). Configuring QoS is like providing a bus-only lane on a busy road: it tells the WLAN AP to give priority to certain types of traffic, then let all other data use whatever bandwidth is left over.
If all you're doing is Web browsing, don't worry about QoS. But if you're using time-sensitive applications like voice over IP or online gaming, you may want to give your computer or VoIP device a higher priority.
Our Linksys WRT54G makes this very easy. Log into the management console, then go to Applications & Gaming/QoS. Click on Enable to turn on QoS capabilities, then choose the type of configuration you want:
- Upstream bandwidth reserves a certain amount of bandwidth for sending information -- important when, for example, you're making Internet phone calls and need a big upstream channel.
- Device Priority lets you specify a particular device as having Low, Medium, High or Highest priority.
- Ethernet Port Priority is essential if you have a standalone VoIP device. Look on the back of the WRT54G, and note which numbered Ethernet jack you've plugged the device into. Choose this jack on the configuration screen, and that device will be given higher priority. This can improve the quality of VoIP calls considerably. It can also give your online gaming PC higher priority.
- Optimize Gaming Applications gives priority to specific common games, which the WLAN AP identifies by the TCP/IP 'port' (data tag) they use.
- Finally, you can configure WMM (Wi-Fi MultiMedia) if you have other devices offering such capabilities.
By shaping your ports and application usage, you can help all your applications work as efficiently as possible.
Setting port, device or application priorities can improve performance where you need it.
| Step 1:
Check your current setup Step 2: Install your access point Step 3: Log onto your WLAN access point Step 4: Access point housekeeping Step 5: Check client devices Step 6: Encrypt your network | Step 7:
Other methods of security Step 8: Plug in other devices Step 9: Set up access restrictions Step 10: Set up Quality of Service Step 11: Building your new network |
Step 11: Building your new network
If you only want to share your Internet connection around the house, you're all set. What you should also consider, however, is using your newfound connectivity to set up a home network between your devices. This allows you to share files from one system to another, play games against family members or friends on other computers in the house, move media files from your broadband-enabled home office to your Media Centre PC -- the options are endless.
To set up a home network, sit at each of your computers in turn. At each one, go to Start, Control Panel, Network Connections, then click 'Set up a home or small office network'. Step through the wizard, and tick the box to 'Ignore disconnected hardware' if necessary. When prompted, select 'This computer connects to the Internet through a residential gateway or through another computer on my network.'
Click until you reach the 'Give this computer a description and a name', then set the Computer Name (a short name you'll use to find each computer on the network) and description for each device (a longer description to help you tell the systems apart). On the next (Name your network) screen, accept the default or choose your own network; just be sure to set the same name on every computer or they won't be able to find each other.
If you want to share a printer so other users can print on it, select 'Turn on file and printer sharing'. Click 'Next' and wait while the computer configures the network, then click on 'Just finish the wizard. I don't need to run the wizard on other computers.' Once you've finished doing this on each computer, click on Start, My Network Places and you should find one or more SharedDocs directories; these are created on networked computers and can be used to easily move documents from one part of the network to another.
If you want to make a specific directory -- on any computer -- available to others, use Internet Explorer to find the directory, then right-click on the directory and select Sharing and Security. On the menu that comes up, click 'Share this folder on the network' and give the share a unique name. If you don't mind others updating your documents, select the 'Allow network users to change my files' option. After you click OK, let Windows do its thing, then open up My Network Places and you should see the new network share available to all.
If you want to print from one computer to a printer connected to another, you first need to share the printer. Go to Start, Control Panel, Printers and Faxes, then right-click on the printer you want to share, click Sharing... and choose 'Share this printer'. Give the printer a name, then click OK.
To print to that printer from another networked computer, you first have to set it up. Click on Start, Printers and Faxes, Add a Printer. Step through the wizard, selecting 'A network printer, or a printer attached to another computer'. Windows will search to see which printers have been shared to the network, then step you through the process of installing drivers on your local system. Once this process is done, you will be able to print from anywhere your wireless LAN reaches.
For a graphical guide to setting up a Windows XP network, visit Microsoft's website.
| Step 1:
Check your current setup Step 2: Install your access point Step 3: Log onto your WLAN access point Step 4: Access point housekeeping Step 5: Check client devices Step 6: Encrypt your network | Step 7:
Other methods of security Step 8: Plug in other devices Step 9: Set up access restrictions Step 10: Set up Quality of Service Step 11: Building your new network |