Calibrating displays: A look at the Spyder 3
A look at calibrating colors in OS X with the Spyder 3 colorimeter. It's clear people have the option between best-looking colors and uniformity of colors across multiple displays.


One of my recommendations whenever anyone gets a new computer or more specifically a new monitor is to calibrate the display so colors appear properly and as expected. This will not only allow you to adjust the richness of the colors on screen, but also allow you to have the colors appear uniformly across different monitors and output devices, which can be especially useful if your work involves design, photography, or otherwise depends on proper color matching.
What is color calibration?
Calibrating a display is essentially adjusting the output for the individual colors (red, green, blue) across various light intensity levels to generate a correction curve for those levels. This means that, for instance, if the computer outputs a half-strength signal for the red channel, the monitor should also output 50 percent of its maximum red intensity; however, most of the time this is not exactly true, and monitors will output maybe 47 percent or perhaps 51 percent of the maximum output. These varying output levels will differ for different monitors, and result in colors that are slightly off from each other. Luckily this can be corrected by creating a calibration profile that will adjust the computer's color outputs so the display's response is linear and at the proper intensity levels to generate expected secondary colors when primary RGB components in the pixels are mixed.

There are various ways to create calibration profiles, with the most common being either software-based calibration utilities or hardware colorimeter devices. Apple's built-in calibrator in the "Color" section of the "Displays" system preferences is an example of a software-based color calibrator. These usually require you to first set a proper maximum brightness and contrast of the display, and then compare a generated output level (the color in the Apple symbol) to a color that is half it's strength (represented by a pattern of alternating black pixels).
This in essence measures the color output with respect to the black level of the display and allows you to get a good reference for intermediate intensity levels when calibrating, even though it sometimes requires you to do a fair amount of adjusting to ensure accuracy.
While Apple's calibrator works on various grey levels (performing the calibration on multiple colors at once), others such as Berg Design's SuperCal may do individual color components separately. Both of these methods will work, but you will have to be aware of subtle color differences have the patience to adjust output levels while squinting and blurring your eyes to ensure accurate results.
Hardware options
Given that this attention to detail for manual calibration can be frustrating to many users, an easier, more repeatable, and perhaps more accurate method for doing this is to use a hardware-based calibration tool. These measure color output levels and relay them back to a software utility that records them and generates a calibration profile.
There have been several monitor-calibrating devices developed for the Mac over the years, including the LaCie Blue Eye, the Pantone HueyPRO, and the NEC SpectraView II; one of the more common ones that I have used recently is the Spyder 3 by DataColor, which comes in Express ($89), Pro ($169), and Elite ($229) versions--the main differences being advanced monitor testing features in the Elite version, and the lack of ambient light sensing in the Express version.
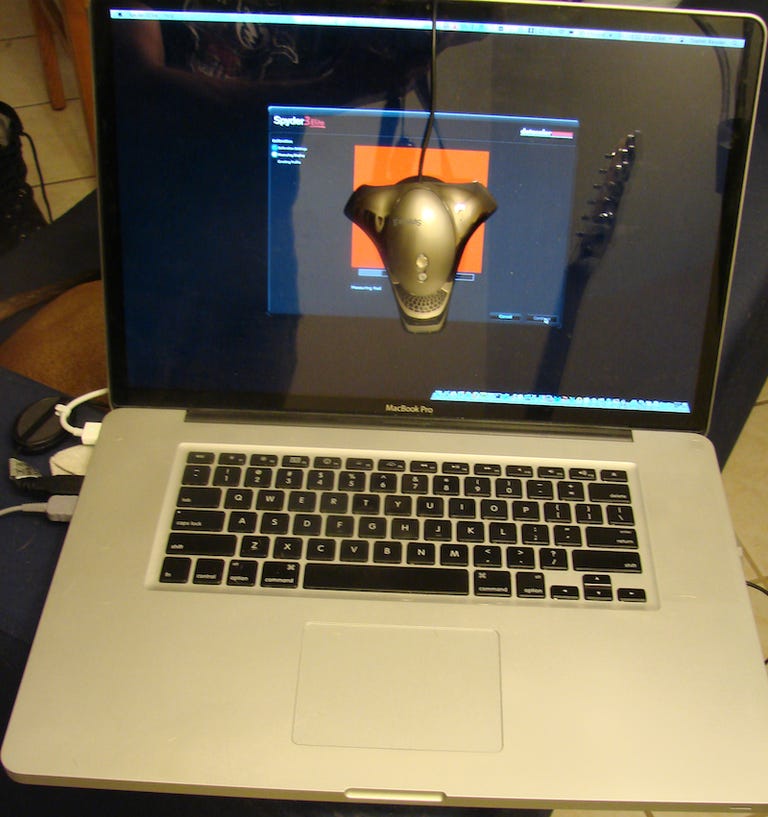
As with other hardware options, the Spyder system has a USB colorimeter device with two sensors that will measure the luminance of the display as well as the ambient light in the room, and a software utility that will create and manage the profiles.
For all intents and purposes, the system is fairly easy to use. It has a number of presets for adjusting to various white-point levels, and it can be run with a step-by-step assistant that explains each setting option for the calibration, or you can choose an "Expert Console" that will present all the settings in a single window. After you select your settings, you mount the colorimeter to the center of the display and run a measurement routine, and the system will generate a profile based on your gamma and white point settings.
Besides ease, another perk of the Spyder utility is that during the calibration it will ensure the display brightness levels are within acceptable levels. If you set the brightness of the display too low, the utility will pause and have you adjust the brightness to fall within a given range before continuing.

It is, of course, expected that you keep the sensor on the display at all times during the calibration unless instructed otherwise. If the sensor is moved and does not pick up values within an expected range of colors, the program gives an error and has you recalibrate.
Though having more warnings than none may seem to be a better approach, in this case it is not necessarily a benefit. For instance, if the sensor is dislodged enough that it would result in an error but is still used for calibrating, the results will be so inaccurate the user will clearly need to re-calibrate. On the other hand, a slightly dislodged sensor may still detect an acceptable luminance range and not show an error, but give inaccurate results.
The calibration with the Spyder 3 unit takes about 5 minutes from start to finish, and it is relatively easy to just manually press the unit to the display during this time to avoid any sensor movements, instead of relying on hanging it by its cord as is instructed in the manual. After calibrating the display with the Spyder 3, the software shows a gallery of images and allows you to manually switch between the previous profile and the one generated with the Spyder 3 unit. If you do not like the new profile, you can then go back and adjust some settings to create a new calibration.
Advanced Features

While the Spyder 3 program will automatically create the calibration curves for your display, the program has some advanced options that include manually editing the calibrated curves if needed, and also checking the colorimeter itself by measuring various properties including temperature, intensity, and RGB levels for any color you set.
In addition to these, the latest version of the program (version 4.0) has some new testing features that can be used to test the health and capabilities of the current display. The Advanced Analysis tool will allow you to test the screen's color saturation capabilities, the color tone responses, luminance and contrast, as well as screen uniformity. These may take some time and interaction to run, but when complete will print up in a formatted report that not only is very informative on its own but can be compared to reports taken at different times to see how the display is changing with use.
The last feature of the utility is a menu extra, which can be set to remind you to recalibrate your display after a specified interval. This can ensure colors stay the same through changing ambient lighting, as well as compensate for potential changes in the monitor itself over time. If you keep the Spyder connected, the extra should also show the status of ambient light in the room; however, I could not get it to properly work. The sensor only activates if the Spyder measurement programs are running, but when these programs are active the menu extra will not use the sensor. This makes the menu extra basically only useful for launching the Spyder programs.
The results

The Spyder 3 system has an impressive array of options, and the colors between every display I calibrated (four in total, including a projector) ended up having indistinguishable color differences. This is something I could not accomplish with software-based utilities, which all resulted in slight but noticeable differences at one point or another. I was also impressed at how quickly the device could set up the colors to match perfectly between various devices.
Despite the matching colors, I was a little disappointed to find the profiles seemed to have less contrast and be slightly warmer in temperature (with more red tones) than I prefer. I much prefer my Mac's display to have rich, deep colors that really stand out from the display. While the Spyder 3 was able to match colors perfectly, I could not get any setting to result in the rich, deep colors that, oddly, I could get with using a purely software-based calibrator.

This difference may be an inherent trade-off between a profile that results in matching colors versus one that may look more appealing, but to me it indicates two general conclusions from having used both methods of calibrating. The first is that if you want deeper and richer colors that are likely best for people using one monitor on one computer, then you may be better off taking the time to squint and match colors with a software-based calibration method. The second conclusion is that if you want colors to match between multiple displays (which is the main purpose of calibrating in the first place), then you are best off using a device like the Spyder. The Spyder will not only make profiles that create strikingly similar colors between displays, it will do so very quickly so if you change your work environment, you can get the colors matched up again without much effort.
Overall, the Spyder system is a fast calibration utility that can be used to quickly calibrate built-in displays, external displays, and projectors attached to your Mac. Though I have not been able to compare it to other similar hardware calibrators, it does an impressive job at matching colors between devices; however, the results may not be as deep and rich as you might like. If you are going for richness, then you might try spending time with Apple's built-in calibrator or SuperCal by Berg Design, but if you are in need to have colors between multiple devices be quickly and accurately matched, then the Spyder is the way to go.
Questions? Comments? Have a fix? Post them below or e-mail us!
Be sure to check us out on Twitter and the CNET Mac forums.