3D Printer Build Week: Days Three and Four
Our Mosaic 3D printer assembled, now we delve into software, calibration, and actually printing something.


This step took longer than I anticipated.
My goal, as stated at the end of our Day Two post, was to leave the office with our final print in progress. We actually got close, but we didn't quite make it.
Matt and I found the hardware side of building our Mosaic 3D printer about as hard as building a DIY desktop. The software side was a little more confusing.


MakerGear offers a walk-through (PDF) pointing you to the various firmware updates, driver software, and necessary applications to connect the printer to your PC, and print an object from an STL file. There's no single .EXE to launch or anything so simple and consumer-friendly. Rather, you must make decisions like: which version of Python do you need? Should you update the printer's firmware at all? The instructions are also specific to another of MakerGear's printers, the Prusa, so we had to do some extra hunting around when it came time to calibrate.
After a few hours of searching on Google and scanning MakerGear's and others' discussion groups, we found what we needed. Again, the process shouldn't stump a computer-savvy hobbyist, but it also illustrates where the process might become smoother. 3D Systems has boasted that the software for its forthcoming Cube 3D printer will be completely consumer-focused. I'm interested to see how that interpretation varies from MakerGear's instructions.
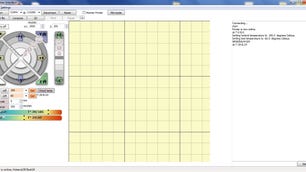
Once we installed everything, we spent most of our time in two programs, Pronterface and Skeinforge.

Pronterface is one of a few different front-end applications you can use to control a 3D printer. It's this program that takes an STL or OBJ design file and slices it up into layers and otherwise passes file specific printing instructions to the printer itself. You can also use Pronterface to drive the X, Y, and Z-directional motors, heat up the extruder and the build platform, and run the small motor that grabs the plastic filament (effectively the "ink") and pushes it into the extruder. Pronterface is the program in which you will ultimately hit the "print" button.
Skeinforge is a technically a separate program, but it links up with Pronterface once you extract the Skeinforge ZIP file into a Pronterface subdirectory. Skeinforge lets you change the settings for the printer. Among the various options, you can change the speed at which the extruder travels during a print, change the infill pattern the printer will use (hexagonal, circular, rectangular) to form up larger solid portions of your object, or adjust the fineness of the outer skin of an object.
We really only touched on the most basic settings in Skeinforge as described by MakerGear's instructions, but in all it feels like a dauntingly powerful program. This might be another place where the hobbyist and consumer markets diverge. Would a consumer printer vendor find it necessary to expose all of these options? Would it be willing to support them? I wouldn't be surprised if the depth of available settings for mass market printers becomes a point of contention among hobbyists.
We navigated through a few stumbling blocks after going through the basic setup process laid out by MakerGear. Because our Mosaic printer has a smaller build platform than the Prusa, we had to redefine the X and Y midpoints in Skeinforge, a step not included in the Prusa-skewed calibration directions. We also had to find another program for scaling the 3D designs to fit our 5-inch cubed build surface.

It was on this scaling step that we encountered ReplicatorG, a program similar to Pronterface, but seemingly more powerful. MakerBot recommends ReplicatorG for its Thing-o-matic and Replicator printers. What's nice about ReplicatorG in terms of design manipulation is that simplifies the process of rescaling a model. Simply load the STL file, hit the "scale" button, and change the numerical value and save as a new plan. ReplicatorG worked perfectly for getting our final print down to the right size.
All of the software side installation and calibration squared away, we left the office Wednesday night having successfully printed a small test object. The Knife Assistant, by Thingiverse designer Michael "ThePlanetMike" Bowers, took about 20 minutes, and only a single attempt. We were happy with the results, but we also wanted to print something a little more complex for our final run.

Surprisingly, it took us about four hours to finally achieve a successful print of Brian "yeoldebrian" Emerson's Bucket O' Octopi. A single print is only supposed to take about an hour and fifteen minutes, but we met with some difficulty.
Our first issue with the octopus came because of the scaling. We hadn't discovered ReplicatorG at this point, so it took some time to figure out how to get Brian's design to fit within our build area. Then we ran into trouble with the binder clips on our build platform, since the clip in the back right corner was blocking the entry point for the extruder head. We fixed that by removing the clip and holding the corner down with painter's tape.
Our last issue came as we were about halfway through the octopus design. The printer just stopped. This was a user error. Since I forgot to put our laptop in high-performance power mode, the system went to sleep halfway through the print and shut down the USB ports. With no buffer onboard like some other 3D printers, the Mosaic had no more data to continue the print.
Despite all that, we persevered, and we have a 3D printed plastic octopus to show for it.

I hope you enjoyed the video of our octopus in production. Check back tomorrow for our wrap-up post where we bring together everything we learned this week.