You're not using iPhone portrait mode correctly: Here's how to fix that
We walk you through all the tools Apple has to make your portrait photos look amazing.


- Patrick's play The Cowboy is included in the Best American Short Plays 2011-12 anthology. He co-wrote and starred in the short film Baden Krunk that won the Best Wisconsin Short Film award at the Milwaukee Short Film Festival.
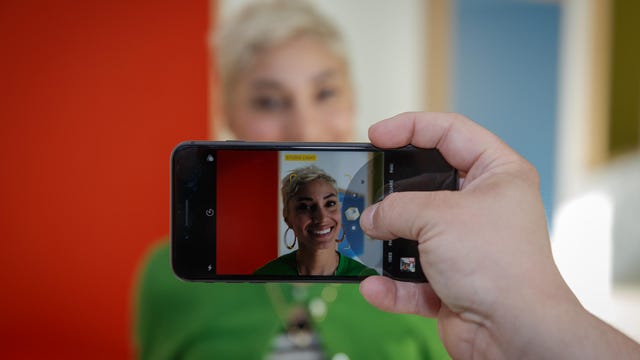
One of the coolest camera features on the iPhone is portrait mode. It makes your subject pop and can give your pictures a dramatic look. Basically, when you take a photo, it keeps the subject in focus while making the background of the picture look artistically out of focus. This popular effect replicates photos taken on a mirrorless or DSLR camera with a long lens and a shallow depth of field. Depending on the model of iPhone you have, portrait mode can be used on people, pets and even certain objects.
Read more: Phone photography 101: CNET's guide to taking better pictures
Portrait mode was first available in 2016 on the iPhone 7 Plus. Over the years, Apple improved the way it "cuts out" the person from the foreground and makes the background blurry. For example, on the iPhone 12 Pro and 12 Pro Max, a new lidar sensor is used to measure the distance from the phone to your subject and makes this distinction look better.
Apple also added Portrait Lighting Mode looks that apply popular styles of photographic lighting to your pictures. Additionally, you can change the amount of background blur behind the subject.
With all of the tools and settings Apple built into portrait mode, it can be easy to overlook their functionality or even know they're there. I gathered seven tips and tricks to help you master portrait mode on the iPhone. I should warn you that depending on the model of iPhone you have, some of these tips might not apply.
This is what portrait lighting actually does to your face
My favorite tools in portrait mode are Portrait Lighting looks. These aren't filters. Instead, they change the way the light shows up on your subject and can make your photo look stylized. There are six Portrait Lighting effects:
- Natural Light is on by default and, as the name suggests, doesn't change anything.
- Studio Light brightens your subject's face.
- Contour Light makes shadows and highlights look more dramatic.
- Stage Light removes the actual background and adds a black one.
- Stage Light Mono is the same as Stage Light -- just in black and white.
- High Key Mono turns your subject to grayscale and changes the background to white.
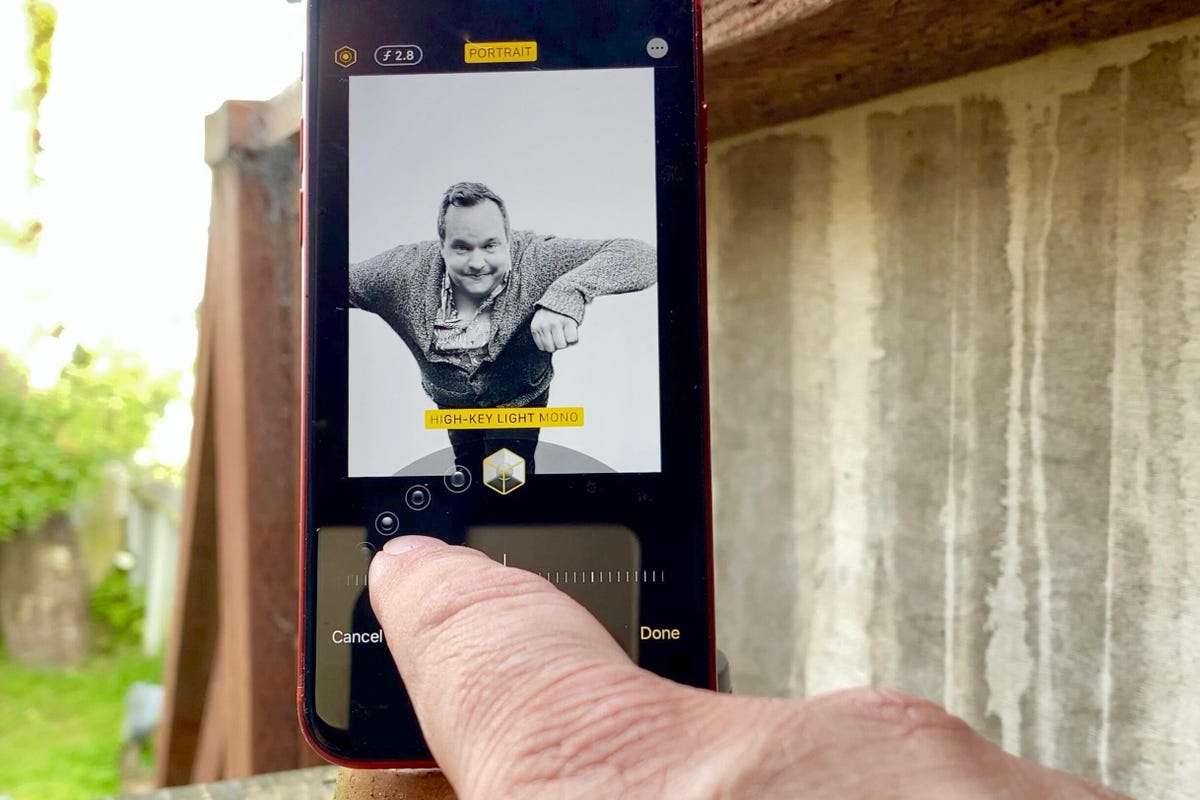
There are six different Portrait Lighting looks including High Key Mono which is shown here.
You can switch Portrait Lighting looks before or after taking a photo. But if you plan on using Stage Light, Stage Light Mono or High Key Mono, I recommend switching to that look before taking the photo. That way you can adjust the framing and subject to produce the best shot and have the most flexibility.
Read more: Want more true-to-life iPhone selfies? Use this iOS 14 trick on your front camera
Portrait mode selfies and night mode
You can take portrait mode photos with the iPhone's selfie camera. Everything you can do with portrait mode on the rear cameras applies to the front-facing camera -- except you can't zoom in or out.
Also, if you have an iPhone 12, you can take portrait mode photos with night mode. When it's dark enough and you're in portrait mode, look to the screen's top left corner. If your flash is off, you'll see the yellow night mode icon. If you don't see it, it might be too bright to activate the mode.
When it's dark enough, in the top left corner you'll see the yellow night mode icon appear.
Then, when you take a portrait mode photo, have your subject hold still and hold the phone as still as possible during the capture sequence, which can take anywhere from a few seconds to 30 seconds (if you're using a tripod). The result is a brighter looking photo.
If your iPhone lets you, make sure you are at a 1x magnification to use night mode.
Adjust the blur in iPhone portrait mode
You can adjust the depth of field before or after taking a portrait mode photo. On an actual camera, the depth of field is determined by the aperture of the lens. In portrait mode on an iPhone, when you adjust the depth of field it changes the amount of blur on the background. Adjusting the depth of field beforehand can help hide any imperfections along the edges of your subject's cutout.
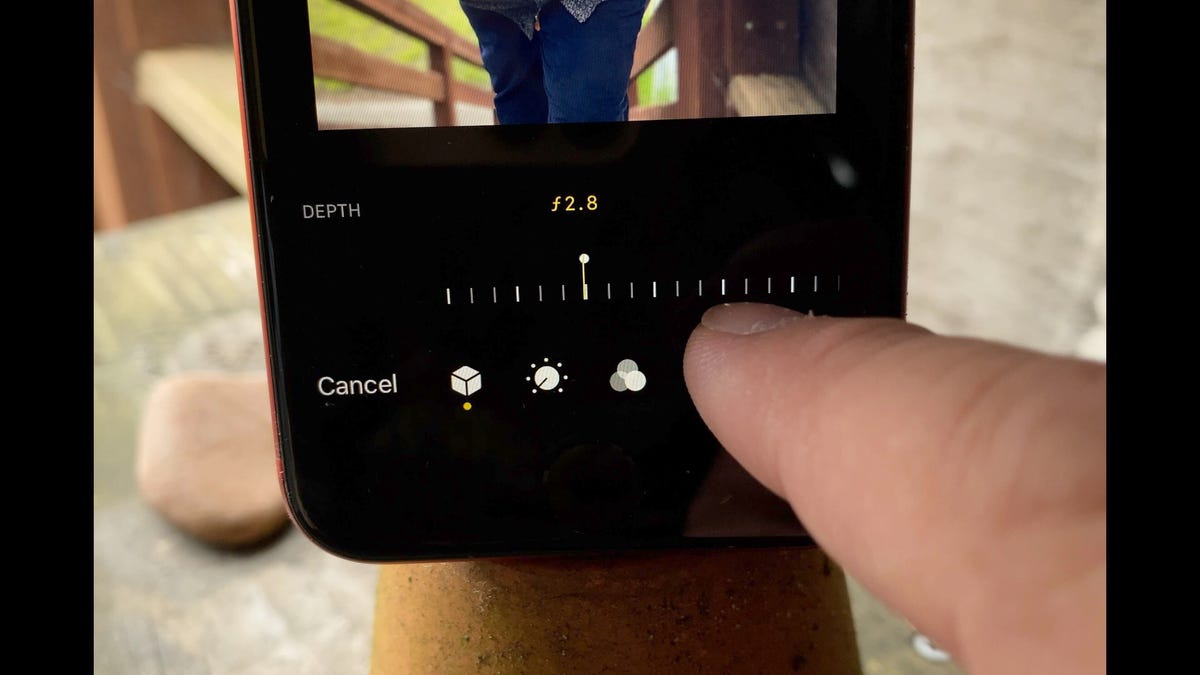
The depth slider changes the amount of background blur. Lower aperture numbers means that the background is more out-of-focus.
In portrait mode, go to the top right corner of the screen and tap on the Depth button which is a circle with the letter f in it. If you didn't know, the f stands for f-stop and is a measurement used for the aperture on a camera lens.
Read more: iPhone 13 camera rumors: The specs and upgrades we'll likely see
When the Depth button is yellow, you can use the horizontal Depth slider above the shutter button to adjust how blurry the background looks. On the iPhone, you'll see f-stop numbers which are there to help you adjust the amount of background blur. Lower f-stop numbers add more blur and higher ones indicate less blur. Unless your subject is an animal or an object with a strange shape, don't worry too much about fine-tuning the blur because you can change it after you take the photo.
How to remove portrait mode from a photo
To undo or remove portrait mode from a photo, find the photo you want to change in the Camera app and tap the Edit button. Go to the top of the screen, and toggle the yellow Portrait button off. It's that simple.
There's a right way to frame your portrait mode subject
Portrait mode works best when your subject is between two and eight feet away from the phone, which is roughly between 0.5 and 2.5 meters. If your subject is too far away (or too close), the iPhone will politely prompt you to adjust your distance. If you try to take a portrait mode photo with an out-of-range subject, the camera will take a regular picture instead.

In portrait mode, some iPhones can shoot at 1x, others at 1x or 2x and yet others at 1x or 2.5x magnifications.
If your subject is stationary, try moving closer or farther away. Also, on certain iPhone models you have an option to take either a 1x or a 2x or 2.5x portrait mode photo, which is kind of like a close up. To switch between magnifications tap on the 2x or 2.5x button on the bottom left of the screen. If you want to go back to a wider view, tap the 1x button.
When you frame your shot, make sure that your subject has a little distance between themselves and their background. If they are in front of a wall, turn your subject 90 degrees to add some perspective and depth to the photo.
Tap your subject's eye to focus and adjust exposure
When setting up your portrait mode masterpiece, look for any onscreen options in yellow. Specifically, look for the Natural Light label at the bottom of the screen to turn yellow. This indicates that the iPhone has identified and focused on your subject, and that it can separate them from the background. Also look for the yellow rounded-corners of an invisible rectangle to appear around the subject's head. If you don't see the yellow corners, tap the subject's eye in the frame to help the iPhone find the focus and exposure.
Edit portrait mode photos
After you take a portrait mode photo, you can tweak things to your taste in the Camera app. A fast way to find any and all of your portrait mode photos on your iPhone is to open the Camera app, go to the Albums tab, look under the Media Types section and tap the Portrait album.
Once you select your photo, tap the Edit button. When you edit a portrait mode photo, you get two extra tools. One lets you change Portrait Lighting looks and adjust how much of the look is applied. The second tool changes the amount of background blur.
You can adjust the amount of a portrait lighting look that is applied to your photo.
For Portrait Lighting, go to the top left corner. Tap on the Portrait Lighting icon, which looks like a hexagon. At the bottom of the screen, use the Portrait Lighting carousel to switch between looks. Use the horizontal Portrait Lighting look slider under the Portrait Lighting carousel to adjust the amount of the effect that's applied.
To change the blur tap on the Depth button in the top-left corner, which is an oval with the f-stop number in it. When you activate it, the button's icon will turn into a yellow circle with the letter f in it. Then, adjust the horizontal Depth slider at the bottom of the screen.