 Why You Can Trust CNET
 Make your own LED tilt-lamp
Learn how to wire together your own tilt-activated LED lamp, perfect as an accent light or gift.


In a recent issue of Make Magazine, David Bakker shares a tutorial on how to make an LED tilt lamp, called a "draailampje," which he says is Dutch for "flip light." Flip it one way to turn it on, flip it the other to turn it off. It's one of those projects that I immediately want to build because it's relatively simple, cheap and stylish enough that my wife won't complain if I make a few for around the house.
So when the weekend rolled around I hit the hardware store for some of the basic ingredients: mason jars, CR2032 watch batteries, stranded insulated wire and a spool of 16-gauge bare copper electrical wire that I thought might work well for attaching the components to.
One note on the copper wire. Wire labeled "craft" or "insulated" will have a thin coat of plastic or clear varnish that makes it difficult to use for this project. Look for the uncoated, solid copper wire in the electrical section of your local hardware store. I was able to get a small reel (25 feet) for under $10, and that's enough for dozens of these. This 20 -gauge wire I found online would probably do the trick too.

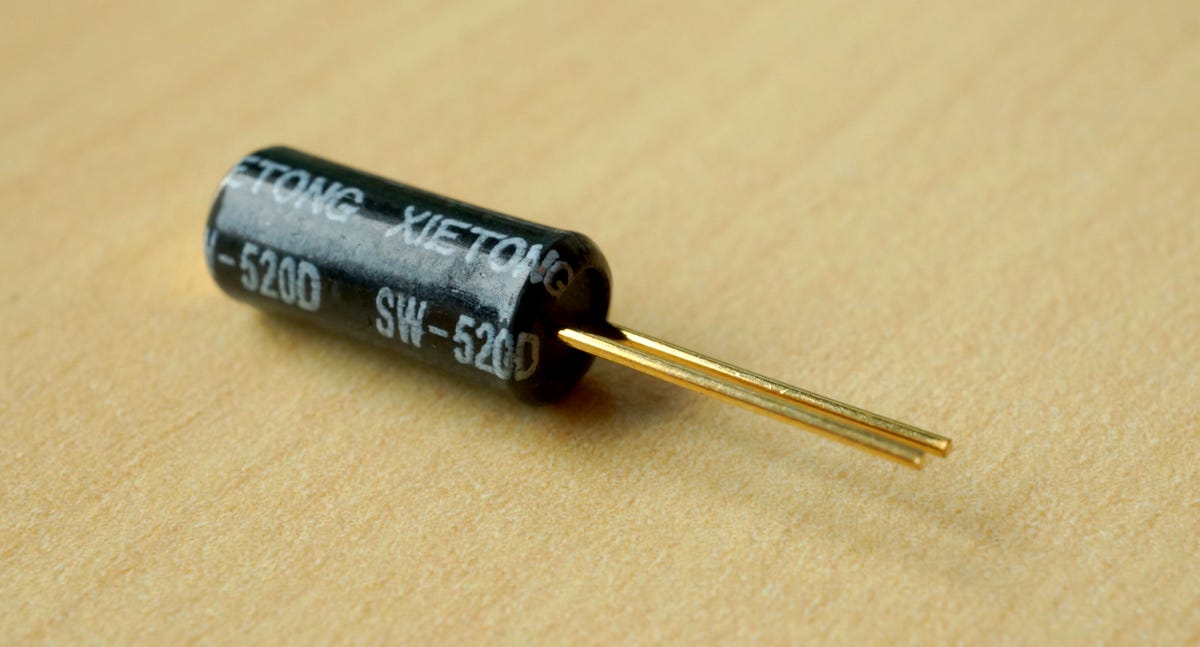
A few of the critical parts are really better sourced online. The battery holder can be purchased by the handful on eBay for just a few dollars. The same goes for the real heart of this project, the tilt switch. The tilt switch is literally a small tube with a metal ball inside that bridges the gap between two wires when held right side up, and breaks that connection when the ball rolls to the other end of the tube. It looks high-tech, but it's insanely old-school. It's the sort of thing Thomas Edison would have considered archaic.
To differentiate this project a little further from David Bakker's original, I used a big, honkin' 10mm candle-flicker LED from Evil Mad Scientist Shop. Any LED will work, though.
As far as tools go, you'll need a soldering iron, a glue gun, small pliers and wire clippers. Some helping hands or a couple of surgical clamps will also make it a bit easier to solder together the small parts involved. Oh, and safety goggles! I almost took a sharp, clipped bit of copper in the eyeball on this one, so cover up your peepers!
The build
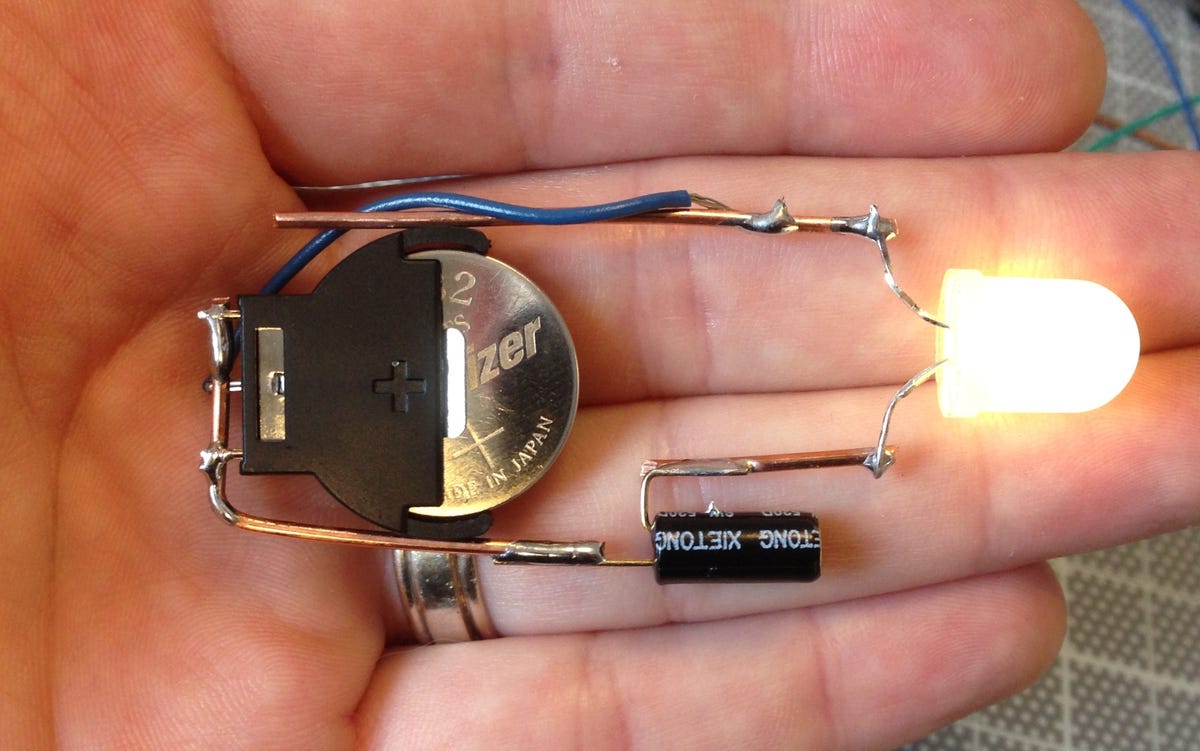
First up, take a length of copper wire and bend it in a U shape around the end of the battery holder. This assumes you have a battery holder like this one, where there are two delicate terminals on the positive side and one on the negative side. If your holder looks different, try looking at David Bakker's original recipe for this project.
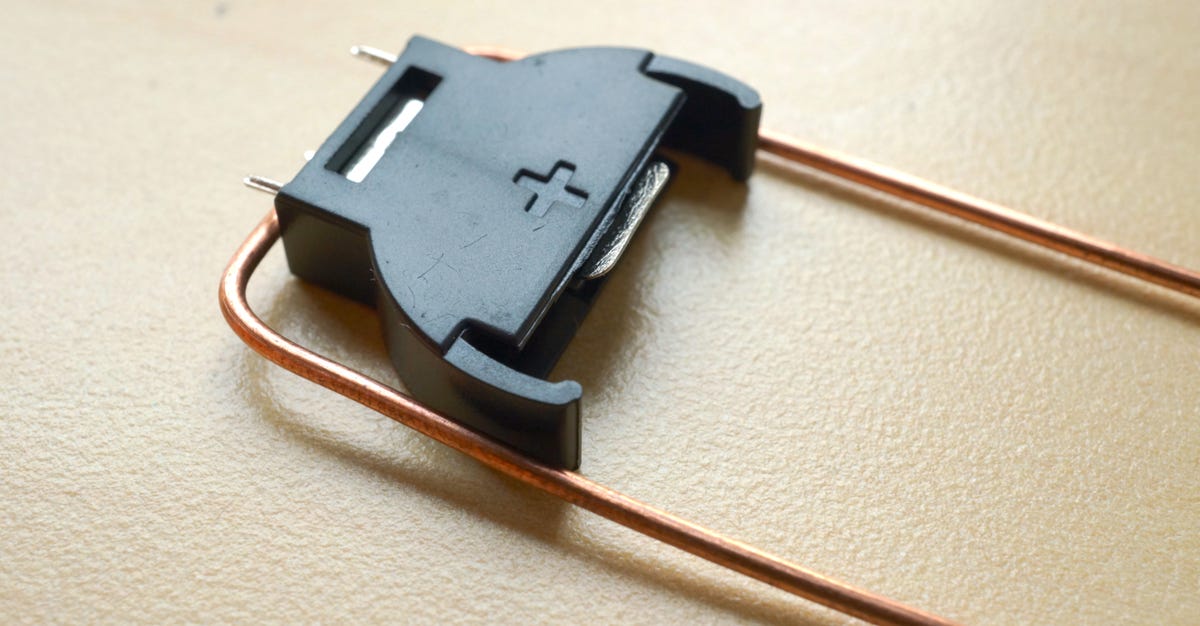
Also note that it doesn't hurt to use a long length of copper, because you can always clip off the extra when you're done, or work the extra length into something artsy.
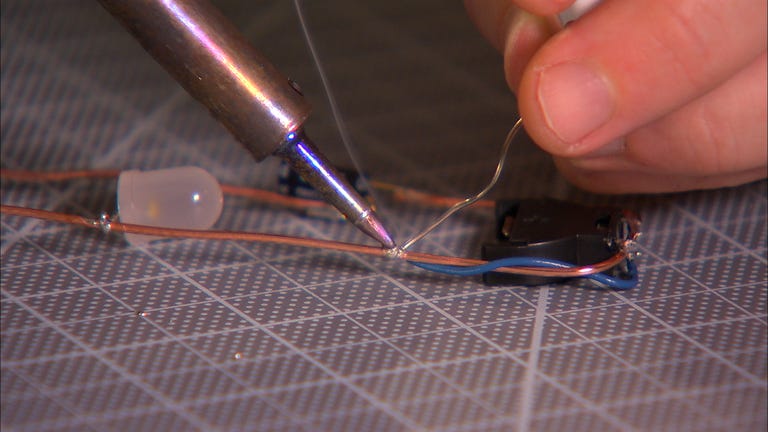
Next, rest the two terminals from the positive side of the holder on the wire and solder them in place.
While we're at it, flip the battery holder over and solder a short length of stranded wire to the negative terminal. Just leave it there for now.
Next, you'll want to wire the tilt switch to one of the legs. For my taste, I wired mine with the feet pointing toward the lid so that it activates when it's turned upside down. There's no reason you couldn't wire it facing the other direction, though. In fact, the original draailampje design is wired with the tilt switch activated right side up.
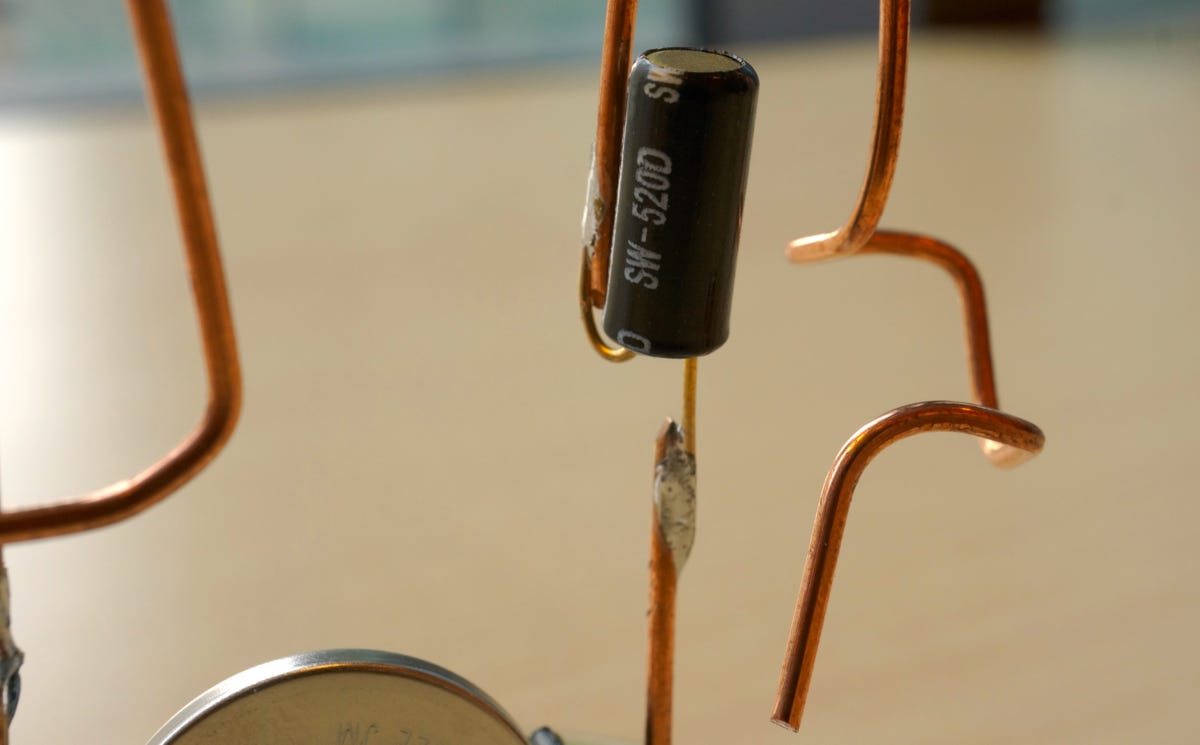
Find a place midway up on one of the copper wires (it doesn't matter which one at this point) and give it a snip. Next, solder one of the two legs of the tilt switch to the bottom of the now-shortened copper leg. Then, take the other leg of the tilt switch, bend it all the way down and solder it to the length of copper wire you clipped off.

Next up, let's add the LED. Take the longer of the two leads from the LED and wrap it around the copper wire coming from the tilt switch. That's going to be your positive side. Then wrap the other lead from the LED around the opposite side, solder both of them in place and clip off any extra wire from the LED. Your LED could be pointing up or down, it doesn't matter.
Now that the LED is there to help hold the shape of the circuit, it's time to go back up to the battery holder and take the stranded wire you soldered to the negative terminal, and expose the opposite end of that wire. Wrap the exposed wire around the copper leg opposite from the tilt switch, and solder it down.
With that done, you can clip away the copper that connects this negative leg to the positive terminals and you now have a complete circuit. Pop in the battery and give it a test.
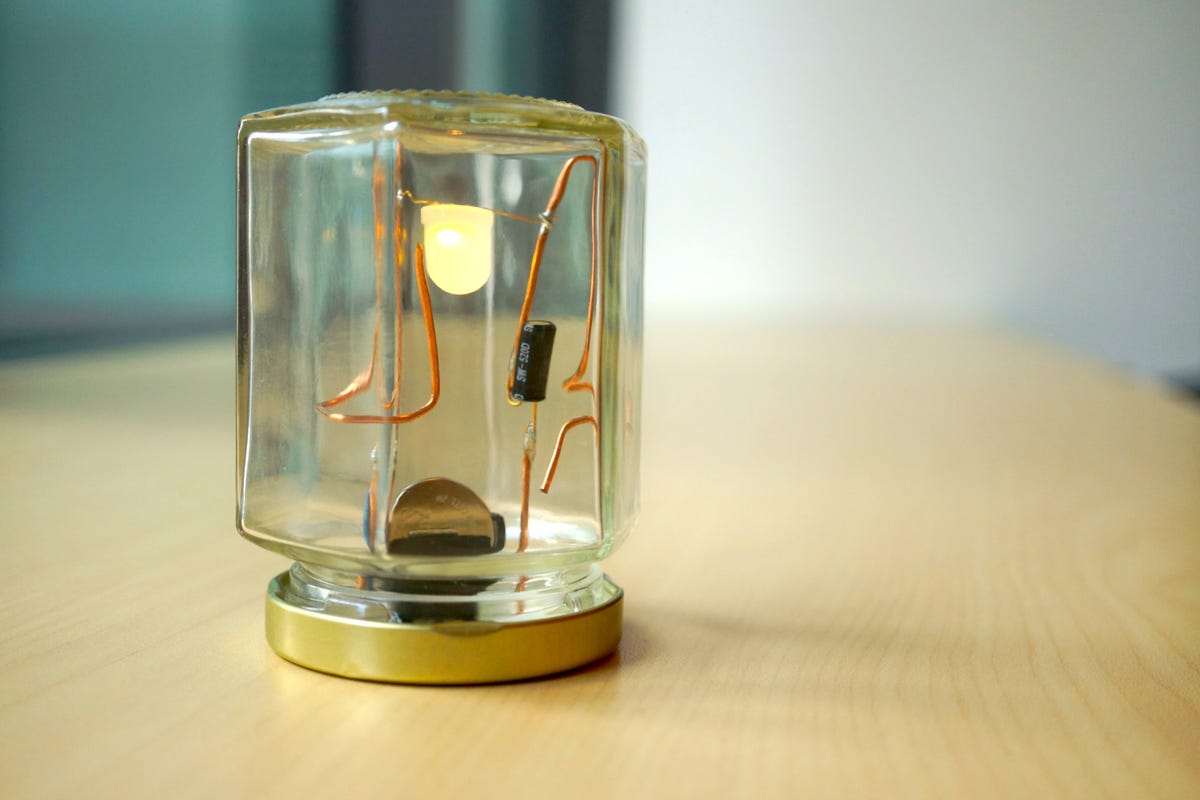
For the last step, you need to mount it inside the jar. I recommend using hot glue, since it will get the job done and also insulate the wire from the lid of the jar.
While the glue gun warms up, place the circuit inside the jar and see if it fits. If the ends are too long, you can either clip them or have some fun bending them into a design, so long as the ends don't touch each other.
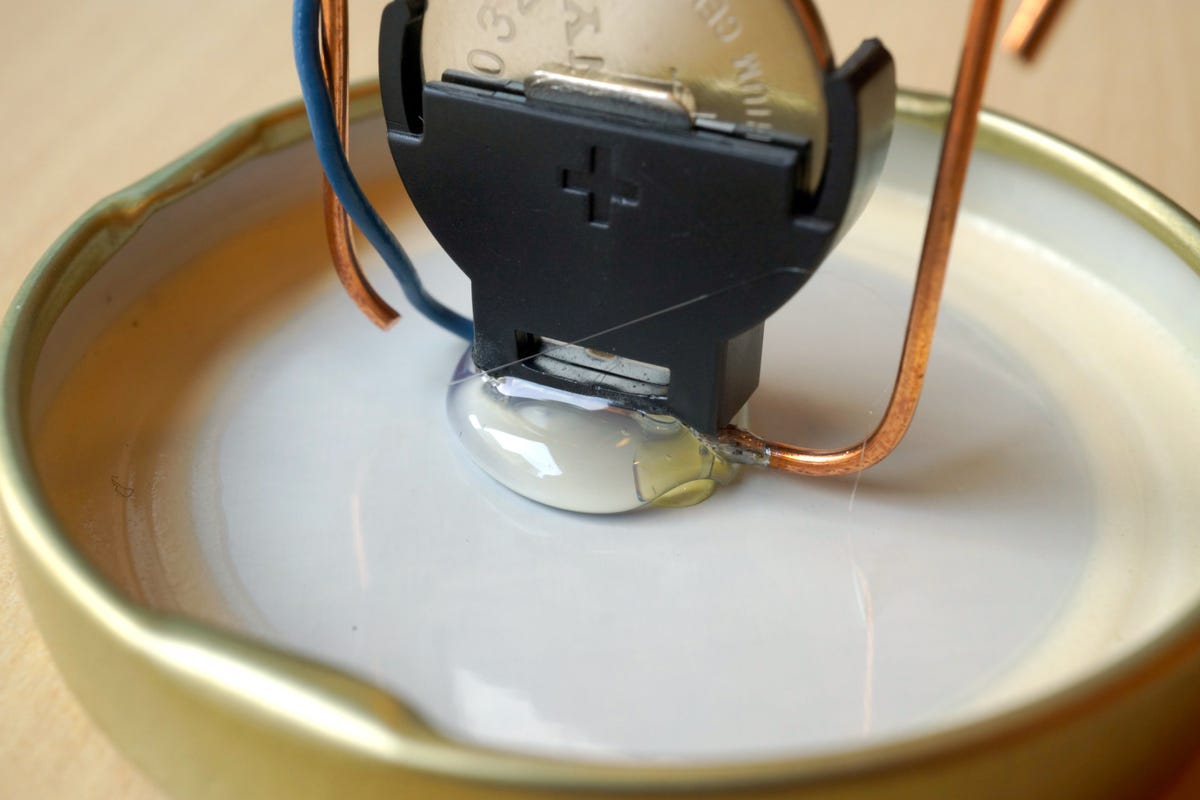
Once the glue is hot, put a big glob inside the lid and then press the terminal end of the battery holder halfway into the glue -- enough to get stuck, but not enough to make contact with the lid. If it looks good, screw it onto your jar and give it a test.
You just made a draailampje! Now make a few more to perfect your craft and give the pretty ones away as gifts. I predict it will be at least a year before we see knockoffs in Crate & Barrel, so until then your friends will think you're a wizard.