Learn to rock with GarageBand
Step-by-step instructions on setting up your own home recording studio.

Rock hair? Check. Leather pants? Check. Air guitar skills? Check. Move over Rover and let the music nerds at CNET.com.au show you how to set up a simple home recording environment with GarageBand.
Setting up your own digital recording environment used to be a fairly specialised area only a short time ago. Hardware was expensive, software was difficult to learn for beginners or hobbyists, and recording instruments into a digital format cumbersome. With recent software, hardware, and plug and play technology, the job is much, much simpler.
In this tutorial we'll use Apple's GarageBand to record a variety of instruments for you to mix and export. This piece of software comes free with every new Mac (at the time of writing) and gives users an easy introduction to digital music production. The downside for Windows owners is that GarageBand only works on Mac OS X.
If you're using Windows, some alternatives to GarageBand with comparable features include:
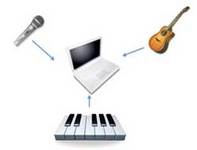
Here is a visual comparison of the two set-ups:
If you're going to connect instruments directly into your computer then you'll need the correct cables. For guitars, MIDI keyboards, and microphones Griffin Technology provides instrument to USB cables at a reasonable price.
If you're after a slightly more professional set up via an audio interface then there's quite a few different devices out there. Cheap audio interfaces are available for less than AU$100, but we recommend devices a little bit more expensive that will do the basics plus have a few more bells and whistles that will allow you to do more advanced capturing and exporting once your skills become more advanced. M-Audio's Fast Track Pro is one of those devices which works well with GarageBand.
This will open up the GarageBand interface. If this is the first time you've played with GarageBand it's worth spending some time getting used to the way the application works. While we'll cover the basics in this article, this is a large topic so if you want to know every feature and functionality then Apple's support website is a great resource. For a quick overview see the visual map below:

By default there will be a track called "Grand Piano" on the screen when first starting GarageBand. If you have a USB MIDI keyboard plugged in then click on Window -> Keyboard, otherwise you can use the Mac's keyboard as a musical keyboard by clicking on Window -> Musical Typing. This will prompt a keyboard on the screen and will allow you to start playing and hearing sounds from the USB MIDI keyboard.
To play a different type of software instrument, simply double click on the Grand Piano icon and pick another instrument. Out of the box there's more than 100 or so instruments to choose from with the possibility of thousands of different sounds. If that isn't enough, there are Jam Packs available from Apple for around AU$150 per pack.
Once you have the sound, riff, or melody you like it's time to record. Before rushing to press the record button allow for a count in by clicking on Control -> Count In. Now, press the big red button to start recording your software instrument. At this stage, it's not important to play perfectly, one of the benefits of GarageBand is you can create loops or riffs and mix your work later.
Congratulations, you can now record software instrument sounds on your Mac.
 directly into the Mac | 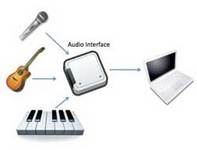 via an audio interface |
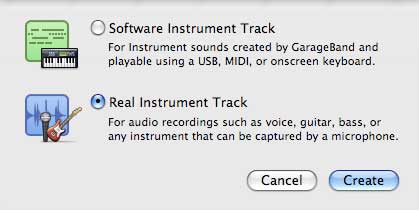
This will create a new track in GarageBand. On the right-hand side a prompt will appear called "Track Info". Select the type of instrument you have plugged in to your Mac. To play and hear your instrument make sure that you have clicked "monitor on" from the drop-down list.
To tune your guitar or bass select the instrument track in GarageBand. Click Control -> Show Tuner in LCD and play a note. Tune your instrument as desired.

At this stage you can start playing your instrument and should hear yourself through the computer speakers. With the monitor on you can change the effects by clicking on the "Details" tab. Here you can change the sound of your instrument by selecting different amp, echo, reverb, compressor, and gate settings. If you're a guitar or bass player this is the same as having a multi-effect pedal — which is a hell of a lot of fun to play around with. If you lack musical talent, try using a distortion amp — it's an easy way to make music sound cool and tough without the gazillion hours of practice it takes to master a guitar or bass.
Hot Tip:
If there's a considerable lag between playing an instrument and the sound coming out of the speakers then try and free up your Mac's system resources by closing down applications you don't need open.
Having found your groove, recording a real instrument is the same as the software instrument. Simply allow a count in, and press the red button to start recording. If it helps, GarageBand has a built in metronome to help you keep time. Click on Control -> Metronome to enable or disable it.
If you're looking to have a jam session with band mates to record vocals, guitar, bass, and drums together, GarageBand can record up to eight real instruments at the same time. To do this, simply click on the Record Enable button next to each track you've set up. To do this you will require an audio interface with input channels for each instrument.
Editing and Mixing
Once you've added tracks, loops, riffs, and various hooks in GarageBand you may actually want to arrange them together into a song. The basis of arranging your music in GarageBand revolves around "regions". Different types of regions will appear differently on the GarageBand timeline:
- Blue regions are real instruments created from loops
- Purple regions are real instruments you've recorded
- Green regions are software instruments from recordings and loops
- Orange regions are imported from audio files
These regions can be arranged and edited via dragging, dropping, resizing, copy and pasting, and splitting. Most of these are fairly user-friendly to get the hang of. However, the task of arranging, editing, and mixing your music is going to vary greatly depending on the style of music you want to end up with. It will also take some time to master some of the more advanced features of mixing and arranging your music.
One of the most extensive resources to learn every trick in the GarageBand book is the free PDF provided via Apple on its support website. This guide is worth the read if you're looking to master GarageBand.
Now that you've set up a simple home recording studio using GarageBand, it's easy to continually progress and add new dimensions to your music. Eventually you may want to invest in more expensive software and hardware, but starting off with GarageBand will provide a solid grounding for music recording and editing. But for now, have fun with GarageBand, and in the words of Bon Scott "Let there be rock"!