How to sell your MacBook Pro with Touch Bar
There's an extra step you need to know about.


Touch Bar not doing it for you? No matter the reason, if you are ready to move on from your MacBook Pro with Touch Bar, there's an extra step you need to take before you sell it or pass it along to a worthy successor.
Before we get to the extra Touch Bar step, here's what you need to do to get any MacBook ready for sale.
Step 1: Sign out of all accounts
The first step is to back up the files and data you want to keep, either by moving them to iCloud (or your preferred cloud service) or an external hard drive. With your important files safely offloaded, you can now begin the process of removing all traces of you from your MacBook. Here's what you need to do:
Sign out of iTunes
Open iTunes and go to Account > Authorizations > Deauthorize This Computer.
Sign out of iCloud
Go to System Preferences > iCloud and click the Sign Out button.
Sign out of iMessage
Open the Message app and go to Messages > Preferences and click the Accounts tab. With your account selected on the left, click the Sign Out button on the right.
Unpair Bluetooth devices
If your MacBook will be leaving your possession but not your premises -- maybe you're selling your MacBook to a roommate or passing it along to your kid -- then you need to unpair any Bluetooth devices that you aren't including in the deal. To do so, go to System Preferences > Bluetooth, select a device you want to unpair, click the X button to the right of its name and then click Remove.
Step 2: Clear data from the Touch Bar
Take a look at Step 6 of this Apple Support page on getting your Mac ready to sell. It outlines how to "clear any information stored by the Touch Bar."
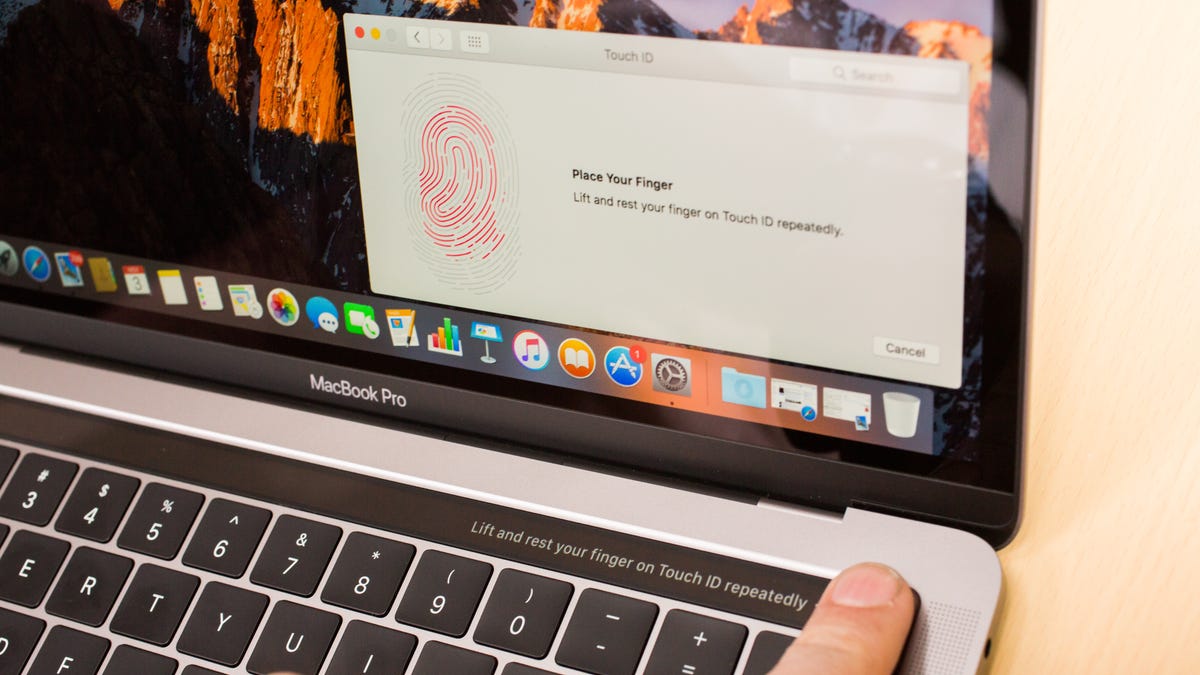
Does the Touch Bar store information that's separate from the hard drive? Apple did not immediately respond to my request for comment, so I can only surmise that the Touch Bar stores your Touch ID data. According to this Apple Support page, your passcode and fingerprint data are stored in a separate chip Apple calls the Secure Enclave. Perhaps it is this Secure Enclave that you erasing to remove your Touch ID information stored by the Touch Bar.
You can quickly remove any Touch ID fingerprints you registered on your MacBook Pro by going to System Preferences > Touch ID and mousing over a fingerprint profile and clicking the X button and then clicking Delete. Apple Support, however, tells you to use a Terminal command while in recovery mode to clear any data stored by the Touch Bar.
Here's what to do:
Shut down your MacBook Pro and then power it back in MacOS Recovery mode by immediately holding down Command-R after hitting the power button. If you see the MacOS Utilities window, then you have successfully entered MacOS Recovery. Ignore the options in the MacOS Utilities window and instead click Utilities in the menu bar and choose Terminal. Enter this command in Terminal.
xartutil --erase-all
Hit Enter, type yes to confirm your intentions and then hit Enter again. Quit Terminal and restart your MacBook per usual. You can check to see if your Touch ID was, indeed, erased by going to System Preferences > Touch ID and looking to see if your fingerprint profiles were erased.
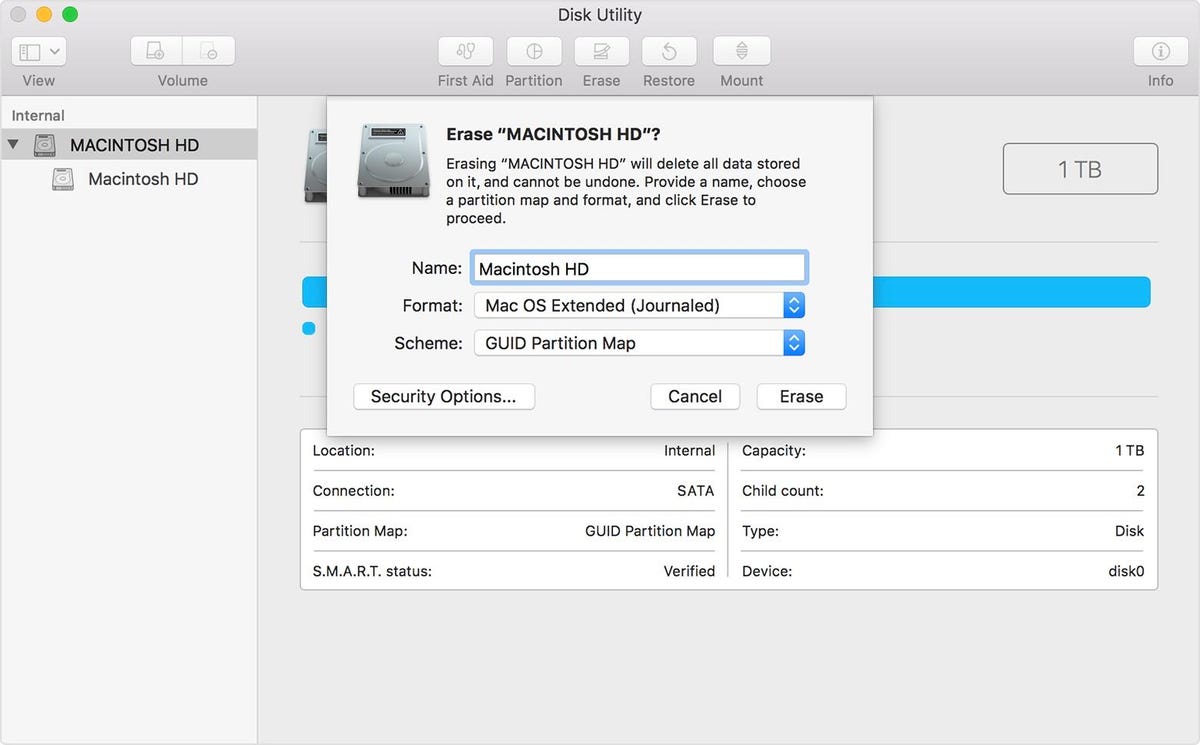
Step 3: Erase and reinstall MacOS
After removing all traces of yourself so the next user of your MacBook Pro can start with a fresh slate, you'll also want to erase your disk and reinstall MacOS. To erase your disk, head back to MacOS Recovery and choose Disk Utility from the utilities window. Next, select your device or volume in the sidebar of Disk Utility and click the Erase tab. You should be able to leave the three fields for Name, Format and Scheme as their default selections before clicking Erase to erase your disk.
After your disk is erased, start up again in MacOS Recovery mode and this time choose Reinstall MacOS from the utilities window. Select your disk then click Install. Don't enter your information when your MacBook restarts to the setup assistant. You can just shut it down and let the next owner enter their information and set up the machine.
Now you're ready to sell your MacBook. If you plan on getting another Apple computer, consider trading it in. Otherwise, follow our complete guide to selling your MacBook.