How to build your first PC
While there are plenty of off-the-shelf solutions that you can buy, you'll get the most reward by getting down and dirty and building your own PC. Here's a rundown of what you'll need to do.


If you were a tech head, there was a time when you absolutely always built your own PC, and would never consider buying off the shelf.
This is the tl;dr video for what is an admittedly huge feature. If it looks interesting, there's significantly more detail over the ensuing pages.
Those were the halcyon days. When our forebears, who bared fores harder than anyone had forborne before, did not go to ein shoppe, and they did not order from thine Alienware, Dell, HP or Apple, but with their own bare fists, intellect and nudity constructed their own doomsday device. PC. I meant PC.
While we may be more in the halitosis days now, with most major vendors tending to focus on mobile rather than desktop, if you're at the thin edge of the extreme wedge, you too can still be part of the glorious master race of PC builders. It may be a series of whacking bits in other bits, but by the holy rings of Saturn, it makes magic.

Shopping list
Before you begin your quest to gather parts, you'll need a checklist to ensure that when you order, you don't forget anything. Even the most experienced of us will accidentally leave a part out from time to time, so it's good practice to keep something like an Excel spreadsheet of everything you need. The same spreadsheet can also help you keep track of which stores are selling parts for the cheapest (don't forget to include shipping!).
Here's a quick rundown on what you'll need at the bare minimum on your list:
CPU
Heatsink and fan (HSF)*
Motherboard
RAM
Graphics card*
Hard drive
Power supply
Case
Cables^
Operating system
*Optional: many processors come with their own heatsinks.
^Optional: most of the cables you'll need are often supplied with the motherboard.
Note that this guide assumes you have access to a working internet connection, and to an already functioning machine for support. If you're starting from absolute scratch, you may have to skip some steps and return to them later.
Central processing unit (CPU)
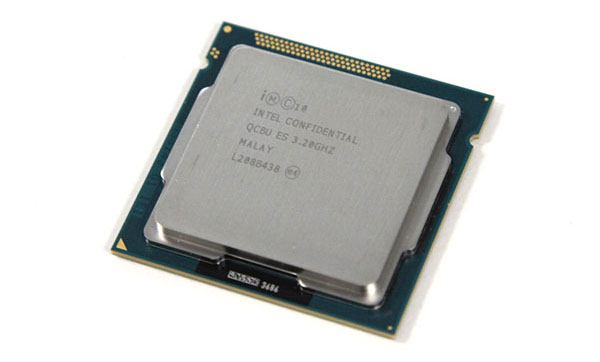
Responsible for most of the heavy lifting in the computer, the CPU is often described as the brains of the operation — nearly everything routes through it. Intel pretty much dominates this field in terms of performance, with AMD trailing as a second supplier.
Once upon a time, clock speed was the be all and end all of CPUs — how many megahertz (MHz) or gigahertz (GHz) it operated at. It's no longer such a big thing; by and large, most CPUs will handle most tasks these days. It's made further irrelevant by turbo boost-like features, which automatically clock the CPU faster up to a certain heat tolerance. Yes, you're getting more bang for your buck without doing a thing.
There are also cores to consider. At its most basic, the core of the CPU is the bit that does most of the work. While originally, single CPU only had one core, eventually things got small enough to fit two cores in the one package, then four, doubling and quadrupling the capability of the chip — assuming you had software that could take advantage of it. There are chips with even more cores, but at the consumer end, four is the limit for now.
It's important to separate the concept of cores and threads — the core is the bit that does the work, the thread is the work. In a lot of CPUs, the number of assignable threads is equal to how many cores it has. So a quad core CPU can be assigned four threads.
On it's i7 chips though, Intel uses something called HyperThreading, which makes a CPU appear as if it can handle two threads per core. As such, a quad-core i7 CPU appears to the system as if it has eight cores, a dual-core as if it has four.
In programs that support multithreading (being able to use multiple threads at once), it's not as big of a performance increase as having a straight eight cores; rather, HyperThreading looks to see where there are spare cycles that aren't being used on the CPU, and assigns them to a virtual core, so that work can be done more efficiently.
You could spend forever talking about what clock speed you need, cores, caches and the like, but we're going to make this easy for you: buy the Intel Core i5 3570K. It'll tackle almost anything you throw at it, and its turbo mode gets close enough to that of the higher-priced i7. If you intend to overclock (push the part faster than its factory condition), it's rather good at that, too.
You can justify the i7 if you do extremely CPU-intensive, multithreaded tasks (video encoding, 3D rendering), in which case the higher clock speeds and HyperThreading will be of benefit. Once again, we'd suggest a K-series processor: the i7 3770K.
CPU heatsink and fan (HSF)

Heat is the natural enemy of all computer parts. CPUs run hot, so they need something to cool them. While most CPUs come with their own heatsink and fan (HSF), it's entirely possible to buy your own HSF aftermarket, and in fact we recommend it. Not only does it often mean better cooling, but also larger fans, which generally mean quieter operation.
One thing you'll need to look at is clearance. First, make sure that the heatsink isn't too tall for your case, then make sure it won't interfere with any components around your CPU socket (whether it overhangs the RAM, preventing removal, or is exceptionally close to your video card), ports (generally the eight-pin aux power) or motherboard-mounted heatsinks.
You can also water cool your case, but this is beyond the scope of this article, and deserves an entire feature in itself. If this is your first time building a PC, we'd stick to air cooling for now — although the Corsair H100 should be as close to set and forget as you can get.
Thermal interface material (TIM)
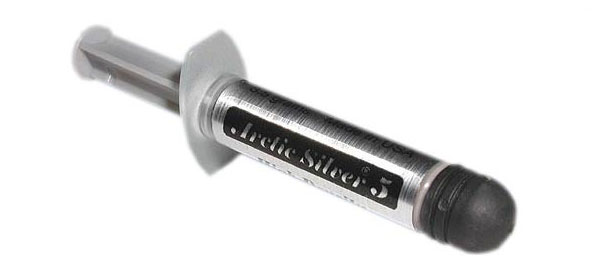
Most aftermarket coolers will come with their own tube of thermal interface material (TIM), sometimes called thermal compound, or just "goop". This is a usually grey-coloured substance that assists the transfer of heat from the CPU to your heatsink. If you don't get some with your heatsink, it's perfectly possible to buy it by itself.
Motherboard

The motherboard is the base upon which the entire system is built. Everything you buy will plug in to this giant circuit board in one way or another.
Whether you buy an Intel or AMD CPU, you must buy a specific motherboard to match. CPUs are often described in terms of sockets; for the mainstream audience, the current sockets are LGA1155 (Intel) and FM2 (AMD). As long as you match the CPU with the socket type on the motherboard, you'll be set.
Buying a motherboard these days is an easier affair than it used to be, as reliability has gone up quite a bit. Simply look for the features you're after in the price range you want, and in the size you need.
What size motherboard you get will be dictated by what you want to plug in it, and the size of your case. Generally, there are five motherboard form factors currently on sale: HPTX (ridiculously huge, generally multi-CPU workstation boards), E-ATX (extended ATX; will usually require a full tower case), ATX (the most popular size; mid-tower cases and larger will fit them), micro ATX (which are smaller and have a limited feature set, but still powerful; specialised small cases only) and mini ITX (same as micro ATX, but smaller again and even more limited).
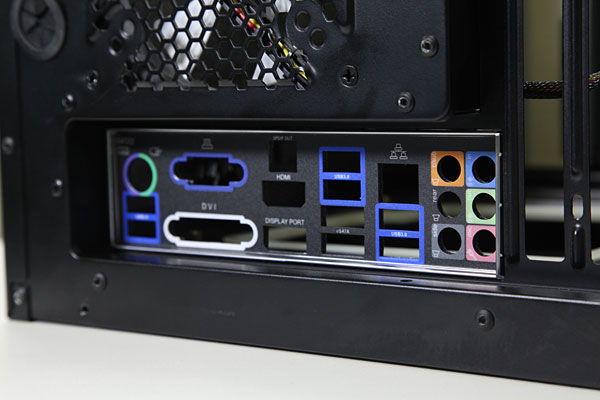
USB ports and SATA ports (the latter for hard drives and optical drives) are things that should also be under consideration. USB 3.0 has a very real speed benefit over USB 2.0 if you're using compliant devices. If you're buying an SSD that's of the 6Gbps SATA standard (often misnamed SATA III), make sure you have a 6Gbps SATA port to take advantage of it.
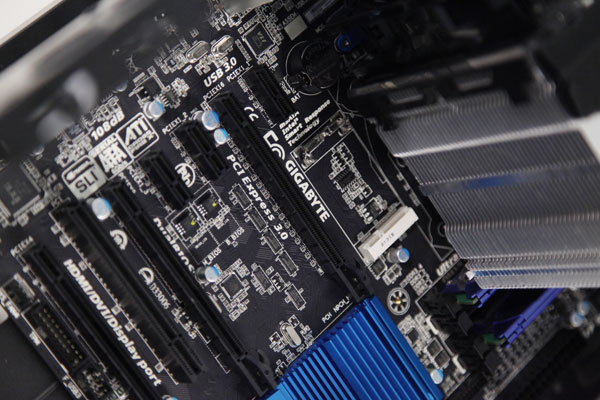
PCI Express (PCI-E) slots, which are used for add-in boards like graphics cards, sound cards and storage controllers, should also be a major focus. These are rated in terms of speed: x16, x8, x4 and x1. While the x1 slots are usually obvious by their incredibly short length, quite often board makers can confuse by supplying slots that are x16 in physical length, but electrically only have eight or four PCI-E lanes going to them — that is, they are effectively only x8 or x4 slots. To make things more confusing, PCI-E generally comes in two revisions: PCI-E 2.0 and PCI-E 3.0. The latter doubles the speed as a general rule, and is typically only used for graphics cards.
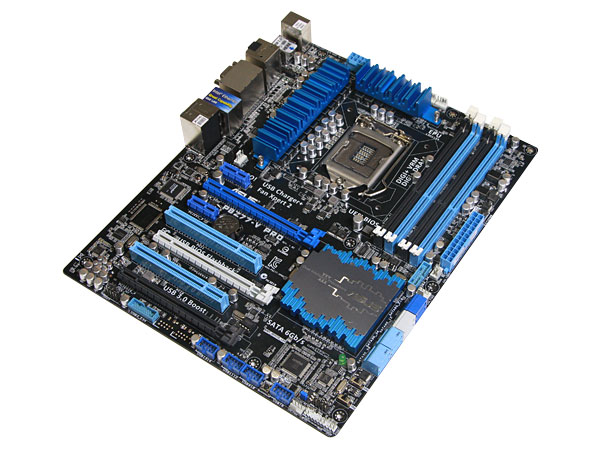
Be aware also that there's often not enough bandwidth on a modern board, so PCI-E slots can be assigned to share bandwidth between them. For example, on Gigabyte's GA-Z77X-UD3H, if you use the PCI-E x4 slot, all PCI-E x1 slots are disabled. If you use the x16 and x8 slot, the x16 drops to x8 in speed.
If you want advice on brands, generally Gigabyte or Asus are a safe bet.
Random access memory (RAM)
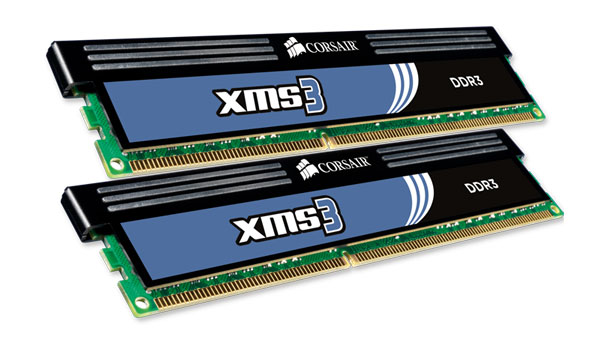
Sometimes just called "memory", RAM is the temporary area where information is stored when a program needs to work on an operation. It's stored here instead of the hard drive because it's immensely quick, but it also has a downside: it's volatile, meaning that when the power turns off, all of the data stored on it disappears.
Unless you're an overclocker, you'll generally want to buy RAM rated at the speed that your motherboard can take. At the moment, most desktop boards run on a type of RAM called DDR3, and a modern Intel board will generally want something that operates at 1600MHz. For general use, you'll want to aim for around 8GB, although for heavy video production and Photoshop use, you could benefit from double that. In both cases, you'll want a 64-bit operating system and software, as 32-bit programs can't access more than 4GB of RAM (and, depending on hardware enumeration, often less).
When you don't have enough RAM, the computer will create what is called a "swap file" on your hard drive, and use that space for temporary data storage instead. This is incredibly slow, and can grind your computer to a halt, so it's always good to have a little head room when it comes to RAM (an SSD can also alleviate swapping pain).
You'll also need to be aware of what memory configuration your motherboard runs at — or, rather, what channel mode.
If it runs dual channel, it means that a pair of RAM sticks can operate together to increase throughput, so you'll need to buy RAM sticks in multiples of two for best performance. If it runs triple channel, you'll need to buy in multiples of three; quad channel, in multiples of four. If you want to make it easy, there are dedicated dual, triple and quad channel packs you can buy, all with varying degrees of fancy heatsinks, specs, and features. Unless you intend to overclock, buying cheap RAM from a reliable brand like Corsair, G.Skill or Kingston is perfectly fine.
Graphics card
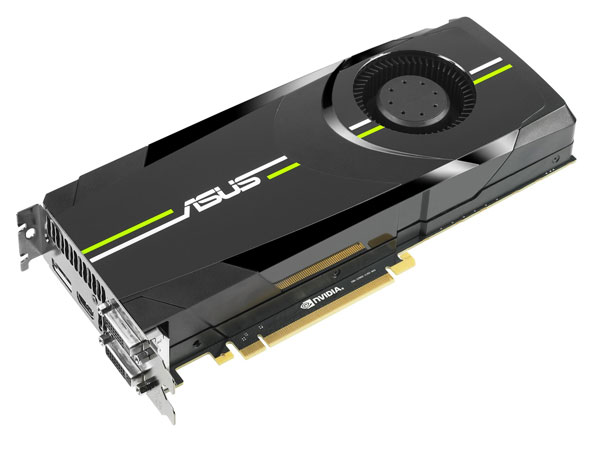
Also called the graphics processing unit (GPU), these days many CPUs come with one built in, meaning that you may not even have to buy a graphics card if you don't intend on doing any high-end 3D gaming. If you take this path, make sure to buy a motherboard that has HDMI, DVI or DisplayPort ports built in (whatever you need to plug in to your monitor).
If you do intend to game (and it's one of the major reasons why you'd build your own desktop), then you can get very serious indeed very quickly, with a decent card setting you back around AU$500. The best price/performance card changes all the time — at the time of writing, the Radeon HD 7970 is exceptionally well priced, however we'd tend towards the GeForce GTX 670 for quieter operation. This advice will no doubt age rapidly — so we'd advice checking out Anandtech's excellent Bench tool to get an idea of performance across multiple games, then compare using a price search engine like StaticIce.
It's not just gaming where a GPU can help: Adobe's Creative Suite gets more GPU-accelerated features with every release, and most video-encoding software will support GPU decode/encode of some sort, although none of them can seemingly agree on whether that should be CUDA (Nvidia), QuickSync (Intel) or OpenCL (technically anyone, but only really employed by AMD).
Hard drive
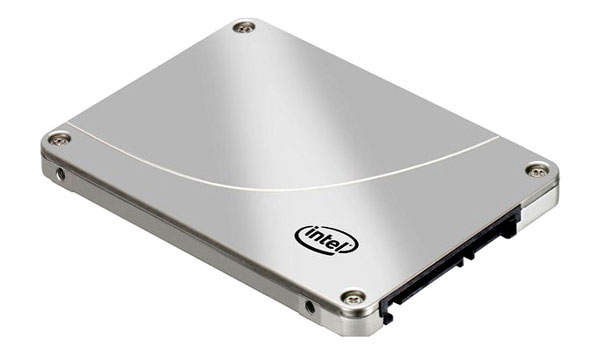
Think of an SSD as a cross between RAM and a typical mechanical hard drive. It's not as fast as the former, but it's much faster than the latter, and has no moving parts. It also draws less power, emits less heat and takes up less space than a traditional hard drive. Unfortunately, it's still quite pricey per GB, so sizes are quite small for the price you'll pay.
As such, the method du jour these days is to grab a smaller solid-state drive (SSD) to run your operating system and programs on, and a much larger terabyte mechanical hard drive to store your downloads and games.
We'd absolutely recommend getting an SSD. Booting up is incredibly fast compared to a normal hard drive, and you don't get those periods of endless grinding, when the computer seemingly does nothing. If the case that you're buying can't mount a 2.5-inch drive, make sure to buy a 3.5-inch to 2.5-inch converter.
If you do end up getting a mechanical drive, make sure that it's at least 7200rpm. The 5400rpm drives are noticeably slower, especially when equipped as an operating system drive.
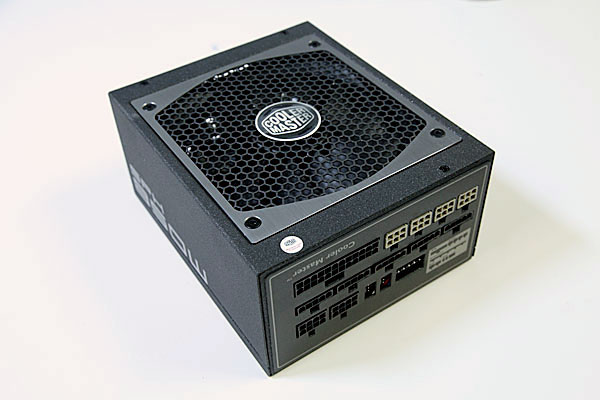
Power supply (PSU)
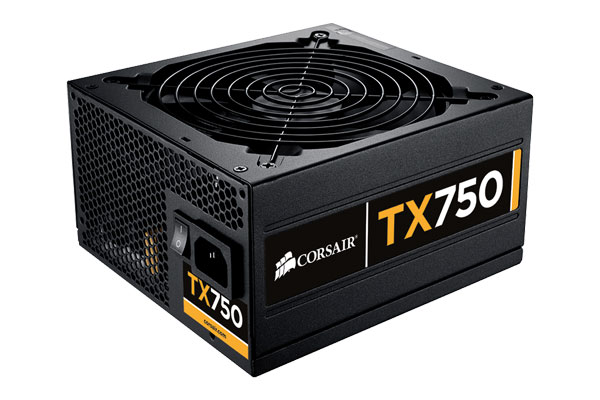
If you want flakiness, then buy the cheapest power supply you can find — it'll guarantee instability and crashing like there's no tomorrow.
Otherwise, pay for something from a known good brand, like Corsair or Seasonic. If you're unsure of what wattage you should buy, use a PSU calculator from the likes of Newegg or Thermaltake.
There are a few other options to think about: some smaller cases require shorter PSU lengths, and you can even get a power supply with removable cables (modular) to help with airflow and neatness.
Case (chassis)
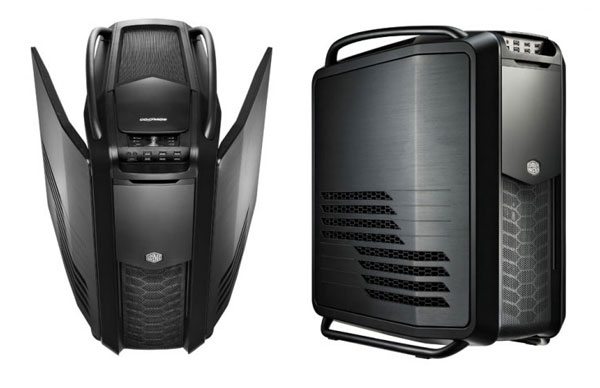
The case, or chassis, will set the tone of your build. Will you buy a dominating full tower case, or an itty-bitty mini ITX? Steel or aluminium? Are there enough drive bays for all of your storage, and does it have enough USB 3.0 ports?
Here we offer no suggestions. It is entirely at your discretion and to your tastes. Hit the reviews, find out if the case is easy to work with, has good airflow and plenty of clearance where needed and whether there are any potential drawbacks that could impact your build.
Monitor
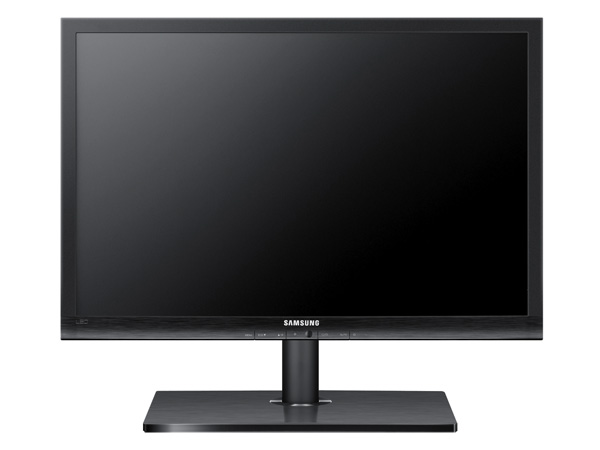
You'll want at least 1080p — that's 1920x1080. After that, things can get technical. The short of it is, there are three basic screen types: in-plane switching (IPS), vertical alignment (VA) and twisted nematic (TN).
TN is the fastest in terms of response time, but it has the smallest viewing angle and generally the worst colour representation. While we'd usually suggest avoiding TN panels, BenQ's XL2410T is excellent, and at first glance the succeeding XL2420T may do just as well.
IPS provides the best viewing angles and colour, and decent response time, but has an odd effect known as "IPS glow" — basically, if you're not in optimal viewing angles, a black screen tends to shimmer white. It's usually not too bad, until you're presented with an entirely black or mostly dark scene, and it breaks suspension of disbelief as you notice that the screen is backlit. There are different grades of IPS, and the easiest way to demonstrate this is to go to Dell's monitor page — at the time of writing, its premium (but ancient) U2410 goes for AU$799, and the newer U2412M goes for AU$399. Sure, the U2410 has more input options and a card reader, but the panel quality makes up a good amount of that cost.
VA is a compromise between IPS and TN, and usually has the slowest response times, but the deepest blacks. As far as we're aware, BenQ is the only manufacturer left making VA panels, due to its partnership with AU Optronics.
What about 3D monitors? Well, leaving aside the fact that stereoscopic 3D is an awful thing to do to your gaming and movie watching, it does come with one benefit: rather than having a refresh of 60Hz, these screens double that, to 120Hz. This means that gameplay can look significantly smoother than before.
You'll also want to ignore claims of anything that has a contrast ratio of over 3000:1, unless it's an OLED screen — this is the dynamic contrast ratio rating, not the typical; it's a feature that should be absolutely turned off, and is nothing more than a marketing dot point. From my article on abusing numbers in advertising:
The spec they're quoting here is dynamic contrast ratio (DCR), not static. It's a technology that adjusts that backlight of your TV depending on what's being shown; an attempt to get richer blacks out of darker scenes where a high black level is noticeable. Initial attempts were quite bad, not able to react quickly enough between scene-brightness changes, resulting in obvious and disruptive light shifts. Technology has become refined with time, and LED-backlit TVs are able to change the lighting in zones now, rather than just the whole panel, but it's still not in the per-pixel nirvana it needs to be, and can create some interesting artefacts.
Since it is by nature dynamic, the [monitor] won't be able to achieve its quoted 50,000,000:1 ratio all the time. The ways the measurements are taken are also questionable, and not standardised across the industry. For the black level, quite often the backlight is simply turned off. That's like saying, "this car is capable of 1200 kilometres per hour ... in a hurricane". You just don't see that sort of real-world performance.
Response time is also a big marketing furphy these days:
One of the big ones in gaming monitors is response time — that once again, manufacturers don't follow the same standard on, opting instead to choose whatever method gives the lowest number. There are generally two values: typical response time, which measures the period a pixel takes to go from black to white and back to black again (sometimes known as rise and fall), or grey-to-grey response time (G2G), where the time to transition between two grey values is recorded. The latter is a more likely scenario than a full rise and fall, but it seems to be up to the manufacturer as to which grey values are used, and it's not always indicative of performance, anyway. Maximum PC has a wonderful article debunking the entire display marketing campaign, courtesy of DisplayMate.
Did I mention that viewing angles can be measured in two different ways as well?
In this regard, the best thing you can do is hit the reviews and see if they find any problems.
But I'm getting ahead of myself; first up, you'll have to select a size. While we love Dell's U2711, we know that 27 inches is not for everyone, and once you get above 1920x1080 in resolution, you'll need a capable graphics card and a dual-link DVI cable (that's a cable that can handle more bandwidth, not two DVI cables) or DisplayPort set-up to drive the monitor. Most people will be comfortable in the 22-inch to 24-inch range.
There's also the matter of finish: screens generally come with matte or gloss finishes, the former being better for bright environments, and the latter showing more glare, but deeper blacks.
There's an added complication to matte finishes: each company tends to add its own anti-glare coating. Dell's anti-glare coating in particular, while it has never bothered me, has been known to irritate some people to the point of irrationality. There's an easy way to test whether this bugs you: head to an Office Works store or find yourself a Dell stand in a shopping centre, load up a white screen on one of their UltraSharp displays and look for the sparkle. If your eyes can't handle it, you'll need to go for another brand. In the 27-inch space in this country, that's most likely the Samsung S27850T. The D model has USB 3.0, but appears to be impossible to find, with even online sites incorrectly listing the T for the D.
If you're one of these people who react to the sparkly Dell finish, and the Samsung or BenQ don't tickle your funny bone, then it's time to hit the HardOCP forums, where every monitor is picked to death for even the smallest flaws, and you'll likely find the best match for the size you're after — or at least come out with a shortlist before the bickering starts. Just be aware that several mentioned brands and models aren't available in Australia. Other useful resources include Prad and TFTCentral.
Finally, think about your connection; while most people hook up over DVI or dual-link DVI, depending on your situation you may require DisplayPort or HDMI (although the latter, for the most part, won't support resolutions above 1920x1200). Just do us all a favour and don't hook up over VGA — it's well time that this interface died a hard, lonely, sorry death. You may also want to hook consoles or Blu-ray players up to your monitor, so be on the lookout for extra inputs.
Other bits
You may wish to buy some cable ties in order to neatly group all of your cables together and improve airflow. The truly devoted tend to do their own braiding or heatshrinking in the quest for ultimate neatness, but for most people, cable ties will do just fine. You may want to buy adhesive hooks to ensure that your cables will flow a certain way.
One thing we haven't mentioned above is the optical drive — while it's a dying component, you'll still likely need one to install Windows or other programs. Considering how cheap these things can be had for, it's kind of hard to lose. Pick something that has the feature set you want (basically, DVD burning, Blu-ray reading or Blu-ray writing), choose the colour that matches your case and hit the big "buy" button.
The keyboard and mouse are deeply personal selections, as are speakers and headphones. While we can strongly recommend mechanical keyboards and certain gaming mice — and we even have a round-up of the best gaming headsets — we recommend hanging out on enthusiast sites on each for a while, to get a feel as to what would best suit you.
Cables
For the most part, a lot of your cables will be included with the kit you buy. The motherboard in particular usually includes SATA cables and the like. If you buy an exceptionally tall case, or want to do some fancy wiring, or even have a set of fans that you want to discreetly wire up, you may need to purchase extra-long cables. Check what accessories come with your kit, and fill in the gaps where required.
Operating system (OS)
If you intend to ever join a domain at work, get Windows 7 Professional. If you have no idea what that means, get Windows 7 Home Premium. In both cases, make sure you get the 64-bit version of the OS. Windows 8 for the desktop doesn't make a whole lot of sense unless you intend on getting a touch-enabled monitor.
If you're a Linux or Hackintosh user, you're probably screaming at the screen right now. But then again, if you're either of these people, you should know how to build your own PC already, too.
Choosing your bits
We're going to assume that you're capable of internet trawling to find all of your own bits. While there are physical storefronts that still sell components, you're better off going to the likes of PC Case Gear, Scorptec, AusPCMarket, IJK and the like, while price checking on the ever-useful StaticIce.
Compatibility
Make sure to double check that all of your bits are compatible before you end up expanding your collection of expensive doorstops. This means make sure that your CPU, cooler and motherboard are all aligned to the same socket, everything fits in your case (including long graphics cards and PSUs not fitting due to space concerns) and you have the right kind of RAM lined up. Double and triple check — it pays to be paranoid. Not many stores will accept a return based on incompatibility.
Static
While we've not used an anti-static wrist strap once in all our years of building, it's the safest way to ensure that you don't accidentally zap one of your components to death before you even turn on your machine.
If your domicile happens to be constructed between several Van de Graaff generators (or you just want to play it safe), you'll need to connect yourself to your nearest planet to minimise risk. All you have to do is attach one end of the strap to your wrist, the other to a metal bit in your chassis, feel slightly sheepish and you're away.
The great tool of justice
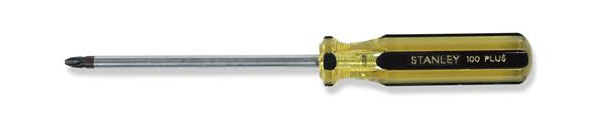
The most-used part of your build is a standard Phillips head screwdriver. It's even better if it's magnetic. Don't worry; the magnetic force is far too weak to wreak havoc with your system, and it'll be handy if you drop screws inside your chassis where they're hard to pick up.
Avengers assemble!
Before we begin, let me start by saying read the manuals. If you've never built a PC before, they hold a wealth of information. Have a page open on Wikipedia if you must to cross-reference, but if you're new to this stuff, it's vital.
I'd also like to add that the parts used here aren't necessarily a recommendation for your build, but rather simply what we had to hand.
For this session, we're going to use an Intel third-generation Core processor and a Gigabyte Z77-based motherboard, but the method should be similar for AMD CPU and boards. The major difference is that AMD still puts pins on the bottom of its processor, and the socket on the matching board has holes to accept it. Intel's got the pins in its socket instead, which make contact with points at the bottom of the processor. Regardless of which you buy, do not bend these pins. But we're getting ahead of ourselves. To the instructions!
Stop: write this down
We'll want to update the motherboard in the future, but we need a key piece of information first, and gathering it now is much easier than later, when everything is built and in place.
What we're looking for is the revision of the motherboard (usually preceded by a "REV" or "V", and somewhere between 1.0 and 4.0). Sometimes, it's written on a sticker that's been attached to the box. Other times, you'll have to study the board itself for some text to reveal which revision it is — if this is the case, check around the edges of the board, or near the PCI-E slots. If all else fails, the manual should tell you how to discover your revision number.
Inserting the CPU
Step-by-step instructions are included below.
Here's our brand-spanking-new Z77 motherboard, exposing its CPU socket for all the world to see. Here we've already removed the black, plastic cover that is often covering the socket.
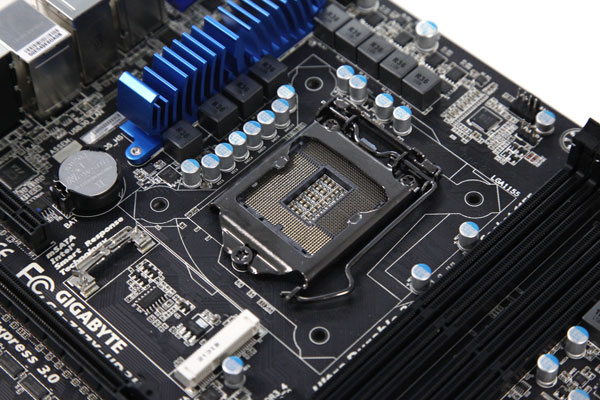
To fit the Intel LGA1155-based CPU in, we're going to need to first push down the lever that you can see on the right-hand side, move it away from the socket and then pull it back to lift the lid.
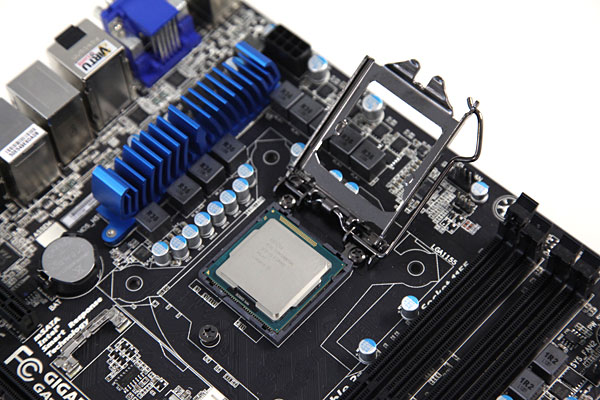
The CPU should only fit in one way; check for a notch on either side of the processor that aligns with plastic tabs on the socket. Gently drop the CPU into place, then lower the lid and secure it tightly with the lever.
Inserting an AMD processor
Inserting an AMD processor is different from an Intel one, but it's not a difficult task. For an FM2 socket, you're going to want to lift the metal lever on the side, align the gold arrow on the CPU with the indented arrow on the socket, align the pins and drop it in. Don't force it — those pins need to be kept intact! When it slots into place, lower the lever to lock it in.

Add only a small dollop of TIM. Our goal is to spread it thinly and evenly. Only add more if you run out and still don't have an even surface.
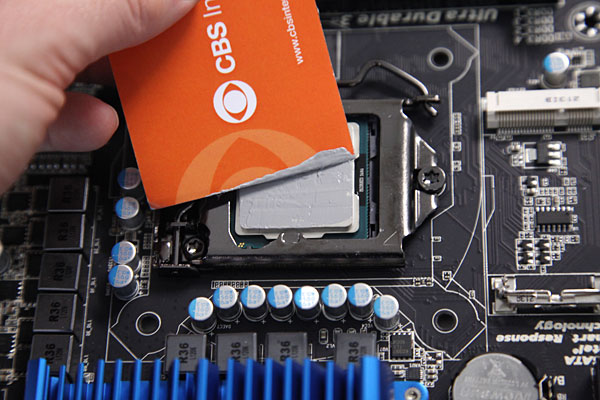
Quite often, a surface like a business card or old credit card can help; in personal builds, we tend to use the flat side of a scalpel.
Inserting the RAM
Step-by-step instructions are included below.
While at this point, many would mount the heatsink, as force of habit we usually slot the RAM in directly after inserting and coating the CPU, just to ensure that any clearance issues with the heatsink are bypassed.
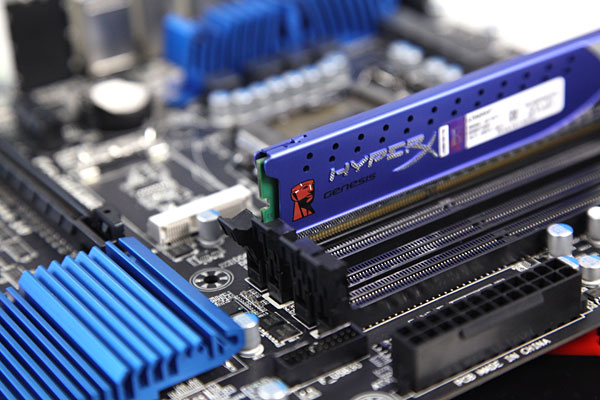
Firstly, if you're running dual or triple channel, you'll want to make sure that you're inserting your RAM in the right slots to take advantage of it. Usually for dual channel, this is the first and third slots, then the second and fourth. The matched slots are often colour coded, but check your motherboard manual if you're unsure about which slot is which.
To insert the RAM, just pop open the tabs/retention clips on each side, then line the notch in the RAM stick up with the plastic tab inside the slot. Push down evenly until the retention clips audibly click back in to place, holding the RAM down. Don't force it — if it's not going in, check you've aligned it properly, and try again.
Some Asus boards use single-sided retention clips — in this case, you'll need to lever the RAM stick in on one side first, before pushing down.
Mounting the heatsink
Step-by-step instructions are included below.
With an even and thin surface of TIM on the CPU and the RAM inserted, we now want to attach our heatsink. Every heatsink will be different, so it's best if you follow the instructions provided in the box. Note that many will have a plastic protective covering on the base that you'll want to remove first.
If you have an AMD motherboard, there's a good chance it'll already have a plastic retention bracket in place, so attaching your heatsink will be as easy as clipping it on.
Note: a lot of cases use a continuous sheet of metal for their mounting tray, making heatsink installation or removal impossible once the motherboard is mounted in the case (which is why we're installing the heatsink first here). However, modern cases have a hole where the CPU area is, allowing you to mount and remove the cooler easily, even when your whole system is built. If you plan to be inside your machine often, this can be a godsend.
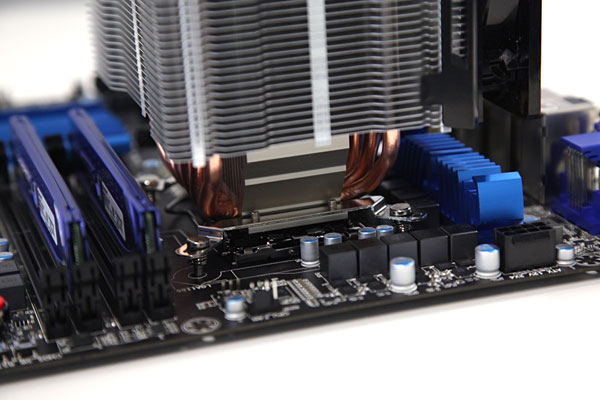
Here we have a Cooler Master Hyper 612 PWM. It requires a little bit of manual work, like all heatsinks. First, we've aligned the pins with the appropriate mounting holes in the motherboard, then made sure that the heatsink has made clean and even contact with the CPU.

We then have to flip it over, add its custom base plate, then screw some nuts in to hold everything in place. A general tip: screw in the nuts until they just make contact with the surface, and then, once all nuts are in place, screw alternate sides down until the heatsink is snug. This should help ensure level pressure across the base. Be sure not to overly tighten the heatsink; you don't want to crack or warp your board, or damage the CPU.

Now you'll need to plug your heatsink's fan in to its power supply. In most cases, it's just a header (some exposed pins) on the board, which should be marked clearly. On the Gigabyte board in question, it's labelled as CPU_FAN. Some fans will require you to hook them directly in to the PSU — if this is the case, remember to hook them up later. The last thing we want is a fried CPU due to overheating.
Mount the motherboard in the case
Step-by-step instructions are included below.
Now that we've got the finicky bits out of the way, it's time to put the motherboard in the case.
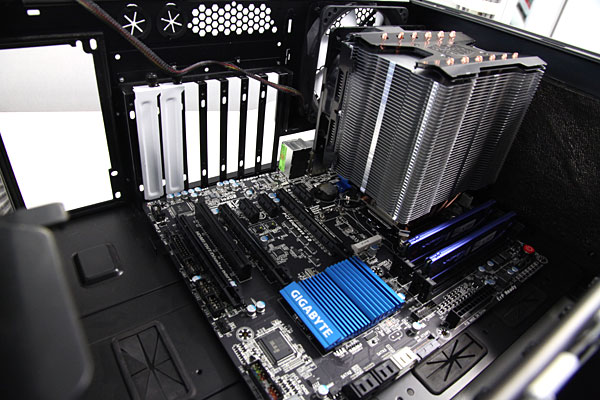
Pop open the side panel of your case — depending on what you bought, this may be operated via lever or button, or it may require unscrewing. Some cases even need their top panel removed before the side panel will open.
When you open the case, there's a good chance that you'll find a whole bunch of accessories inside (screws, replacement parts, etc). These are easily identifiable by being in cardboard boxes or plastic bags, and you'll of course want to remove them before continuing your build.
Once done, the first thing we need to do is pop in the IO shield — that little piece of metal that came in your motherboard box, and neatly surrounds the ports at the back of your motherboard. If your case already has a stand-in IO shield in place, pop it out, and push in the one meant for your motherboard.
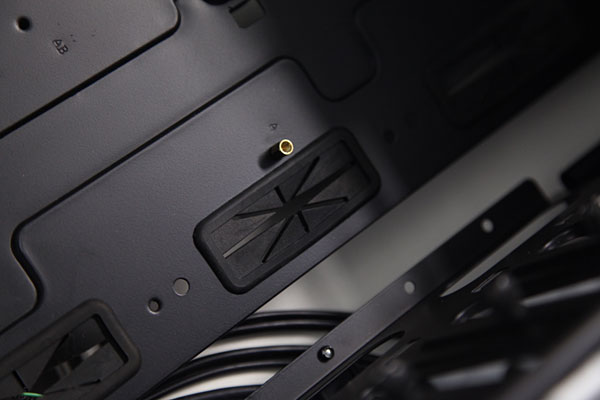
Now to get to the actual mounting. Although many cases these days come with them pre-installed, in some circumstances you'll first need to screw in something called a standoff, which allows us to screw the motherboard down to the chassis. Depending on the size of the motherboard, these standoffs will need to go in different places to align with the holes on your motherboard.
Once in, it's time to get the motherboard in place — you'll most likely have to lever it in by first aligning the rear ports to the appropriate holes in the IO shield, then lowering it down so that the holes match the standoffs. There's a very good chance that they won't exactly match, as the IO shield can often push back on the board. In this case, you'll have to push and hold the board against the IO shield, then start to screw it in, starting from the holes in the back so it holds the board in place.
Motherboard screws tend to have a stepped underside, with a circle top that's within a hexagon. Or in picture form:
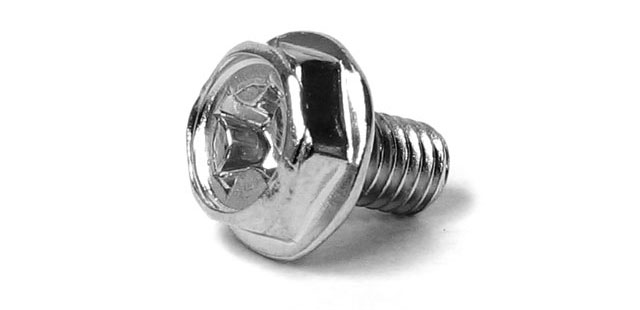
There can be variations; you might end up with dome tops or even thumbscrews, which can be removed without tools.
Don't get overzealous; tight is good, but you don't want to break the board. If you're hearing grinding noises, stop immediately (there are raised metal "safety bumps" around most screw holes to help with this). The same thing goes with attaching the heatsink — try to make sure that you screw things down evenly, so that tension is equal across the board, and not unnecessarily flexing in one particular point. Make sure you don't miss any holes; as a guide, our standard ATX Z77X-UD3H has nine mounting holes. Holes generally line up horizontally, and we find it easiest to spot them by going one row at a time.
Inserting the GPU
Step-by-step instructions are included below.
We'll only cover single GPU configurations here. In this case, you'll want to put it in the PCI-E slot, which is both physically and electrically x16. Usually, this is the longest slot next to the CPU.
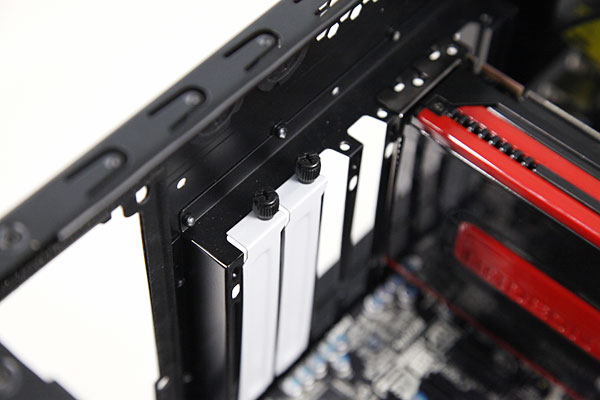
Before you do any inserting, you'll need to remove any PCI backing plates that the card uses, in order to expose your video ports so you can hook your monitor up. In the case of most modern graphics cards, these can take up anywhere between one and three "slots", so remove the aligning plates accordingly. Depending on your case, these will either be tool-less, or will require a screwdriver to remove. If you're going to injure yourself building your own machine, this is usually the point where it happens, as these things can often be stubborn.
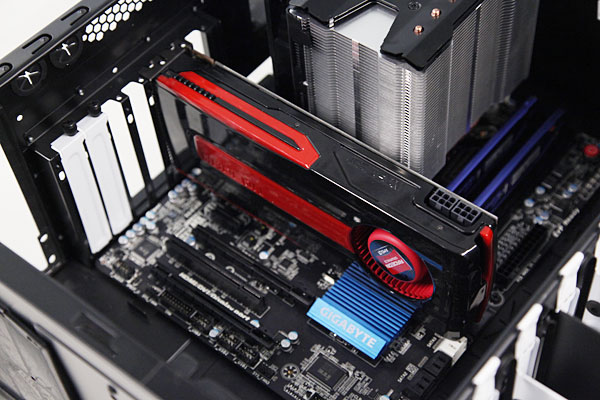
Once the passage is clear, it should be as simple as pushing the graphics card into the slot; note that removing it is another matter. Each motherboard tends to have its own release mechanism, usually something that has to be physically pushed in or held down before the card can be pulled out.
Inserting and connecting the PSU
Step-by-step instructions are included below.
While we could do an entire build in one go, it's usually savvy to test things once the basics are in place.
Slot the PSU in to place and screw it in, and if it has a manual switch at the back, turn it to off. If not, make sure it's disconnected from the wall. If you're ever doing any work with the hardware of your machine, ensure that there's no power going to it.
Next, we want to connect the PSU to the motherboard at the 24-pin connector:
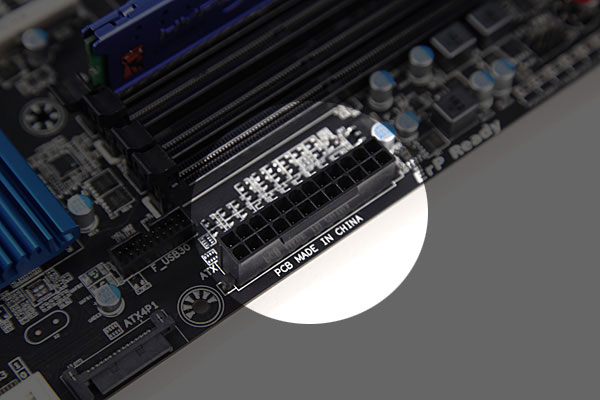
And eight-pin connectors:

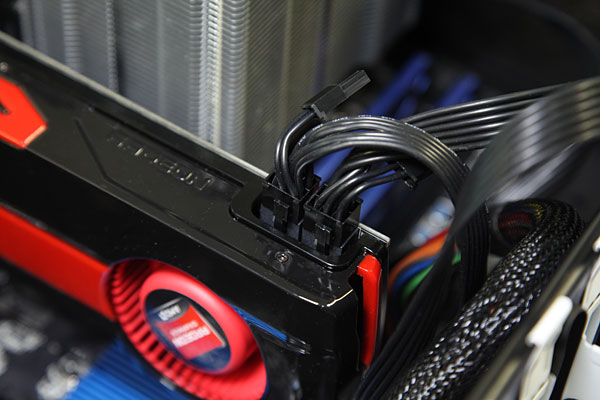
Some boards, such as the Z77X-UD3H we're using, have extra power inputs. This one uses a SATA power connector to provide more power to the graphics, for example:
Next up, we'll want to plug it in to our graphics card if it requires power. This usually comes in the form of one or two six-pin connectors, although occasionally you'll see eight-pin connectors or four-pin plugs (often mistakenly called "molex" connectors) that are usually reserved for older hard drives.
All machines have a hard power-down option. While modern machines will hibernate when you press the power button during an on state, if you need to turn it all the way off when things get stuck, you don't have to pull the plug out at the wall. Simply hold down your power button for five seconds, and power will be cut to the system.
Doing this is a hard power off; everything will immediately turn off, and you'll lose anything you haven't saved.
Test one
Time to boot up the machine for the first time. Hook in your monitor, keyboard and mouse, turn on your PSU (the motherboard will likely light up somewhere) and if there's a push button for power on your motherboard, push it.
If that last bit is lacking, turn off the PSU again — although you could short the power pins to start things up, this is a beginner's guide, so it's unlikely that you'll be comfortable doing this.
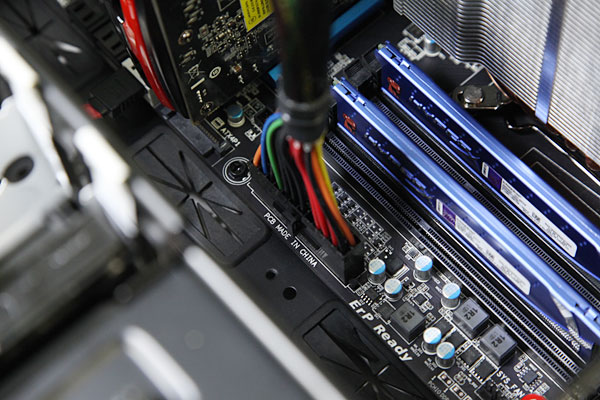
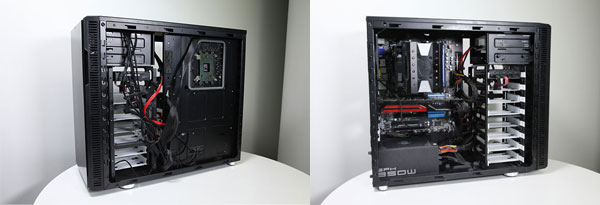
It's time to wire up your case. Unless you've got failed parts, or you've done something silly, this is by far the most annoying part of building your own machine.
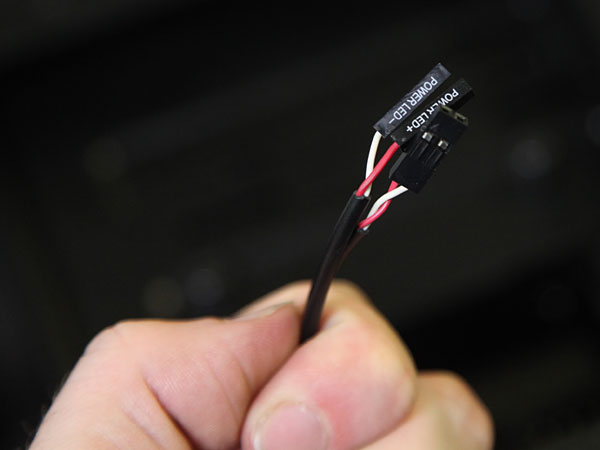
Snaking out from the front panel of your case will be a mess of wires that look similar to the image below, which allow your power button, reset button, hard-drive light and power light to talk to the motherboard. You'll need to connect them individually to a set of pins that are usually situated in one corner of the motherboard.
Quite often, you'll find that the motherboard markings and pin-outs don't match the wires coming from the case; I'm afraid that unless you've had quite a lot of practice, you'll need to refer to the manual to hook things up properly.
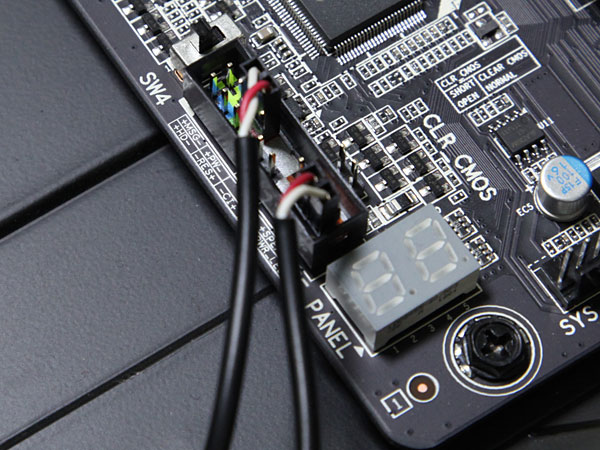
Some motherboards do colour code the pins to make things easier as above, and Asus even includes a handy little riser that you can plug everything in to first to reduce the fiddly nature of the task, something that I wish others would do.
There'll be circumstances where you'll have things hooked up to the right pins, but nothing will happen. In this case, try flipping the cables around — yes, just like in Star Trek, sometimes reversing the polarity helps. If your case has a speaker, make sure to plug it in, too; it can be good for troubleshooting.
When you're done, switch the power supply on (there's a good chance that things on the motherboard will light up), then hit the power button on your case. If things go correctly, fans should spin, the monitor should turn on and you should at least see the RAM count on your screen. If things go exceedingly well, it'll eventually complain about a lack of operating system or boot disk. Great — turn the machine off, then complete your wiring job by attaching any case-based USB ports or front-panel audio as per the video below.
Something went wrong
Here comes the not-so-fun bit: things haven't happened as planned. At any rate, whenever you're doing maintenance, turn off the PSU. You don't want to accidentally destroy anything.
If you haven't plugged in the CPU or RAM properly, there's a good chance that the motherboard will try to boot, then shut down. It may even get stuck in a boot loop of powering up and shutting down repeatedly. If this is the case, you'll need to check that your RAM and CPU are seated properly, as well as your power cables.
If your GPU fan hasn't spun up (assuming that you have one), check that it's plugged in properly, and it's receiving power as it's meant to. In the latter case, if you've not plugged in power correctly, some GPUs will sound an alarm.
You'll also want to check your motherboard for diagnostic lights. Many have either seven-segmented BCDs that show a hex code (two digits ranging from 00 to FF), that can be cross-referenced in the manual for problems. Your motherboard may also have diagnostic lights to let you know how far the system booted, or a piezo speaker that beeps to let you know what the error is. Most motherboard manuals have comprehensive troubleshooting sections to help you analyse the issue.
And lest we point out the obvious, before you turn it on, make sure that the power supply is plugged in to the wall, the power at the wall is turned on and the power supply itself is turned on if you have a switch on it.
The hard drive/s
Step-by-step instructions are included below.
So, things are booting correctly and your machine is begging for an operating system or boot disk. With the power turned off all the way to the wall, it's time to insert your remaining parts.
Depending on your case, you'll either need to screw your hard drive in to place, or there'll be fancy, tool-less bays. While hard-drive screws are generally quite shallow with a domed top, the screws you're provided with will vary from case to case.
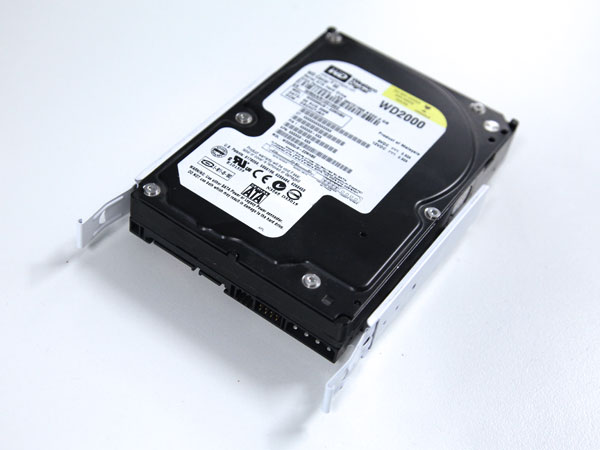
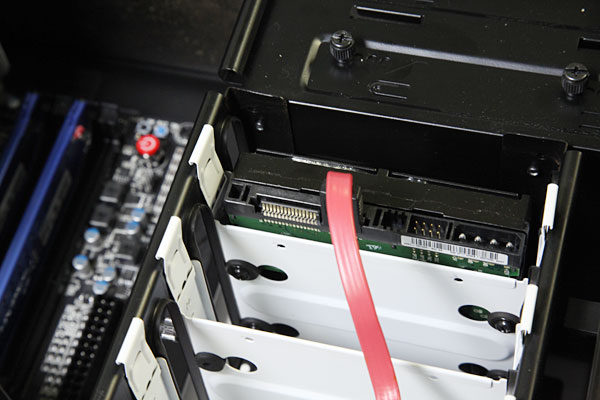
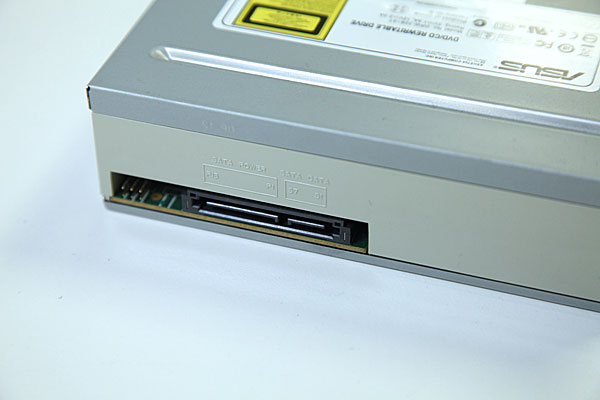
Drives tend to be rather easy to hook up these days. Hook in a SATA power connector from your PSU, then connect a SATA cable from the hard drive into the correct port on the motherboard. In most cases, if this is your OS drive, you'll want to hook it in to port 0 on the board. If you're using a 6Gbps drive, make sure it's plugged in to a 6Gbps port.
Add in other drives as appropriate, making sure to populate your high-speed drives on high-speed ports.
Optical drive
If you picked up an optical drive (that is, a DVD&plusm;RW writer or Blu-ray drive), then now is the time to put it in. Some cases will need steel brackets forcibly removed first from the 5.25-inch drive bays, while others will have removable faceplates, and others still will have quick-load mechanisms. You'll need to consult your manual as to the correct mounting procedure if you're not sure.
Once the optical drive has been mounted in the case, you'll need to connect it as you did your hard drive. Feel free to plug it in to a slow port, just don't plug it in to a non-chipset-controlled port (ie, Marvell, ASMedia, Via), as these tend to work with hard drives only.
Everything else
While this completes the standard build, you may have bought other expansion cards, like audio cards or TV tuners. Now is the time to plug them in.
Clean things up
Taking a look at your case, you'll probably notice that you've got an ugly mess of cables, or areas where you haven't been as tidy as you could be. Now that you've got a handle on how to connect things properly, it may be worth a second build, properly re-routing cables behind the motherboard tray, and, if you've got them, making use of pass-through rubber grommets. The less cable clutter there is, the better the airflow, and the easier it will be to service parts later.
It's boot time
At this point, it's advisable that you run MemTest86+, just to make sure that one of your memory modules isn't corrupt. It's a peace-of-mind thing, allowing you to rule it out as a potential problem if things become unstable. Sadly, MemTest86+ can't identify individual sticks, so if you do find a problem, you'll have to physically swap sticks in and out to test them one at a time.
With everything in play, there are a few things to do before installing your operating system on the machine.
The BIOS
The first thing we need to do is enter the Basic Input Output System (BIOS), usually by hitting Del or F2 during the booting sequence (you should be prompted at the appropriate time — if not, just hammer the key until you find yourself at the config screen). There are a lot of options here, and since it's different with each board we thoroughly recommend that you hit up your manual and do a lot of cross-referencing online. The first thing you'll want to do is change your boot order, so that it checks your CD drive first if you've got one, followed by a USB drive. This will enable you to not only install your operating system, but also run any diagnostic tools that you have to. Once done, save your settings and restart.
MemTest
The second thing we want to do is check that our memory isn't corrupted in any way, as this can be a pain to diagnose later, and you'll want to get a replacement if it's dodgy. To do so, we run MemTest off a bootable CD or USB drive, as per the box-out to the right. When you've confirmed that things are working as intended, it's time to get firmware updating.
Firmware
Firmware is the software that tells hardware how to act. The general rule used to be "don't install updated firmware if things are running well". There's good reason for the caution; if things go wrong, you can kill, or "brick", your hardware.
Since the smartphone explosion, though, firmware updating is performed by even the clueless, who are hoping to get in on the latest iOS or Android updates. Hardware has more of a tendency to ship with unpolished firmware these days, too, leading to the new general rule of "install updated firmware 'cause we screwed up or left things out". Still, caution is advised; if you lose power partway through an update, you could be boned.
While a lot of hardware now has Windows firmware updaters, there's still quite a bit that relies on boot disks, and we may as well ensure that our hardware is in the best condition it can be before we install an operating system.
Motherboard updating and tweaking
Although it can only store files smaller than 4GB, FAT32 is the most compatible file system around, making it ideal for bootable USB drives and firmware updating. If you're not sure whether your USB stick is formatted with FAT32, right-click on the drive in Windows Explorer, choose Properties and check the File System section. If it's not FAT32, click Cancel, right-click on the drive again and choose Format. Change File System to FAT32, make sure Quick Format is selected and press Start.
First up: the motherboard. The BIOS is essentially the firmware of the motherboard, and they are so radically different between vendors that we're going to have to give general instructions. Note that these days, most boards tend to use the fancier, graphics-based Unified Extensible Firmware Interface (UEFI) instead of the typical text-based BIOS, but vendors tend to use the terms interchangeably to mean the same thing, and we will, too.
The BIOS version of your motherboard will usually be shown during the booting process (as long as it's not hidden by a great, whopping brand graphic, as tends to be the case these days). There's likely going to be an update available from your vendor's website. You'll need two bits of information: the name of your motherboard, and what revision it is (this is separate from the BIOS version; don't get the two confused!).
The revision is the pain-in-the-butt bit, so we hope you gathered it earlier on in the tutorial, when we told you to on page three.
With this information in hand, you're ready to download your BIOS. We're going to do things the direct way through the board itself — this means that you'll need a second machine. If you don't have access to one, you'll need to update your BIOS later, once Windows is installed.
If there's a newer version of the BIOS than what your machine is running, download it from the support section of your vendor's website. It may be compressed in ZIP or RAR form, and in this case you'll need something like WinRAR to extract the contents first. When you have the straight, non-compressed BIOS file available, copy it to a FAT32-formatted USB key (see the box-out to the right if you're not sure what this means), restart, enter your BIOS' firmware flashing utility (usually either accessible in the BIOS itself, or through pressing a specific hotkey at boot time), choose to update your firmware and select the appropriate file on your USB stick.
Even drives have firmware updates
If you picked up a gaming keyboard and mouse, there's a chance that there are firmware updates for them, too, but you'll need to wait until Windows is installed to apply those.
SSD vendors are generally pretty upfront about firmware updates, and they make them easy to find on their websites. Some will require to be run in DOS mode, and hence will require boot CDs or USB drives; some prefer Windows to be installed first. Either way, it's good to update your firmware before you've written too much to the drive, as none of the companies will cover you if your data is lost in the process. The more that's written to the drive, the bigger a pain it is to back up before you update.
Usually, SSD updates come with performance and feature tweaks. Mechanical hard drives, not so much; generally, a new firmware only gets outed if something has gone wrong.
As such, mechanical hard-drive companies like to hide the fact that there are firmware updates for their products by generally not listing them under their download sections, operating off the mantra of "if it ain't broke...".
They do exist — for Seagate, Google is usually your friend — just enter your brand, model name and the word "firmware", and you'll find gems like this.
Western Digital is harder. Unless there's a proven issue (like idle time-outs in RAID configurations), it generally doesn't publicly post firmware — you'll have to email Western Digital, and there'll likely to be no response. Although the hard-drive divisions of each have since been acquired by the former two companies, Samsung and Hitachi have typically operated in the same way.
Although their importance is diminishing, optical drives also have firmware updates — these generally do nothing more than add better media compatibility.
Installing the operating system
Before installing, comb through all of your BIOS options. There are settings that you'll be unable to change later without breaking your install, like setting your drive mode to AHCI.
Here is where you're going to have to do a lot of reading online and in your manual; there are simply too many variations to cover in a general tutorial. Once you're confident that your BIOS settings are correct, check that your boot order is first referencing the DVD or USB (whatever you'll be installing your operating system from), insert your operating system install disk and then save and exit.
Installing an operating system is usually a pretty straightforward, step-by-step guided affair, but there can be some esoteric errors, so make sure that you have an internet-connected device to look them up, should they occur.
Drivers
A driver is a bit of software that tells the operating system how to work with the hardware in your PC. You may find that a lot of your hardware won't even work until a driver is installed. A driver-install disc should be supplied with each bit of your hardware, but as a general rule it's best to grab the latest version from individual vendor websites. You don't want to run on the drivers that come with Windows, either, as they are generally not optimised for performance, but rather for compatibility.
There are a few tips to adhere by: the best place to grab your graphics-card driver is either directly from Nvidia or AMD; components on your motherboard like network ports, Wi-Fi or audio may need drivers from the likes of Intel, Marvell or Realtek (your motherboard manual should include what chips it has used). If you've got an Atheros chipset, you may have to do a Google search, as the silly blighter doesn't have driver downloads on its web page.
If you picked up an Intel motherboard, there's a lot of software like chipset drivers and storage-management tools that can also be installed.
Some drivers won't even have an installer, just a bunch of files. In this case, Windows will need to be pointed to where you've downloaded and extracted them, either when it prompts you that it's found hardware without a driver, or through Device Manager (Start, type "device manager" and load the application that appears). Device Manager is an extremely handy way to keep track of what hardware has drivers missing, and you can initiate an install by right-clicking on the problem device and choosing Update Driver Software.
Stand tall, noble PC builder
After this point, you begin the long, hard road of tweaking your operating system to how you like it, and installing apps and games — this is your own adventure to embark upon. Hopefully in front of you is a proud new PC, built by your own bare hands and ingenuity. Over time, you may even gain a hankering for installing more custom parts, sprucing up the appearance of your internals, modding and maybe even water cooling.
Welcome to the fold!