Google Photos is no longer unlimited: How to switch to Apple's iCloud Photos
Google got rid of its free unlimited storage plan for Photos users, and not everyone is happy about it. You have options.


Google Photos is no longer unlimited and that's a bummer. Here's how iPhone owners can switch to iCloud Photos.
Google Photos users were spoiled. For years, Google allowed us to save as many photos and videos as we wanted into the cloud service as long as Google could slightly reduce the quality without a dramatic impact on how our memories looked. Better yet, it didn't matter if you used an Android phone or an iPhone -- Google treated everyone equally.
That all stopped June 1, when Google officially changed implemented a free photo storage limit of 15GB. To be clear, anything you saved to Google Photos before June 1, 2021, remains free and can stay indefinitely. The new 15GB limit only applies to anything you add after the June 1 date.
As an iPhone user, the built-in Photos app offers a lot of the same features as Google Photos. It keeps your photos synced between all of your Apple devices, you can search for objects in the photo -- including a specific person -- and better yet, it does all of the advanced stuff on your device, keeping your photos private.
If Google's switcheroo has persuaded you to make the jump to Apple's iCloud Photos service, you should know that there's currently not an official Google feature to transfer your library to iCloud. Instead, you'll have to complete the process on your own, which will take a few days from the time you request a complete copy of your Google Photos library until you've successfully uploaded everything to Apple's servers.
Keep in mind, Apple doesn't offer free photo storage. Each iCloud account comes with 5GB of free storage, after that you'll need to sign up for a paid storage plan that ranges from $0.99 for 50GB to $9.99 for 2TB.
Here's the easiest way to make the jump from Google Photos to iCloud Photos.
Google Takeout is a handy tool for times like this.
Use Google Takeout to painlessly download your Photos
The quickest and easiest way to download your entire Google Photos library is to use Google's Takeout site. The feature allows you to pick and choose the personal data stored on Google's servers you want to download a copy of.
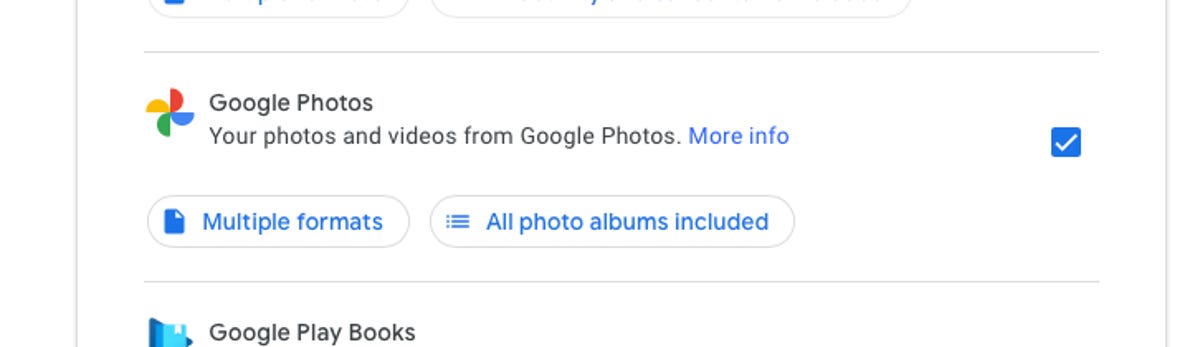
Visit takeout.google.com and sign into your Google account. At the top of the long list of data options, click Deselect All to uncheck all boxes next to the various categories. Scroll down until you find Google Photos, and then check the box. Scroll to the bottom of the list and click the Next step button.
Pick the file type and size you'd like Google to break up your photo library into, then click Create export.
Google will then show you a date that the export will be created. I made the request on June 2, and Takeout stated that the export would begin processing on June 4.
You will receive an email containing a link to download your photo library once the export is complete.
It will take a few days to import your entire library, especially if you have a lot of photos and videos.
Two ways to import your photos to iCloud Photos
There are a couple of ways to move your photos to Apple's iCloud Photos service.
If you're a Mac user, you can use the Photos app. If you have a PC or don't want to use the Photos app on a Mac, you can use the iCloud website.
Use the Photos app to import your photos
After downloading your photo library and opening the ZIP files, open the Photos app on your Mac. Click File > Import in the menu bar, and then select the folder(s) where your photo library is saved. Click Review for Import and then Import All New Photos.
This process can take some time depending on the size of your photo library and how fast your Mac is. If your Mac is older and your library is several gigabytes big, I suggest starting the process before you go to bed and let it run overnight.
When the import is finished, your pictures and videos will be uploaded to Apple's iCloud Photos service as long as you have it enabled. You can check to see if you have it turned on by clicking on Photos in the menu bar followed by Preferences. Check the box next to iCloud Photos.
Use iCloud.com to upload your photos
The other option is to use Apple's iCloud website to upload your photo library. Start by visiting iCloud.com and signing in with your Apple ID. Next, select the Photos icon and then click the Upload icon at the top of the webpage. It looks like the iCloud icon with an arrow pointing up in it.
Select the photos you want to save to iCloud, then click Upload. Alternatively, you can drag and drop the files you want to upload directly into your browser window.
As with the Photos app, this process can take some time based on how many pictures and videos you're uploading and your internet speed. If your connection is slow, your library is big, or both, I suggest starting this at night and letting it run while you sleep.
If you're not sold on making the switch to iCloud, check out our comparison of all the cloud storage services. iCloud isn't just a photo storage service, you can use it to replace Dropbox with this trick. If you sign up for Apple One, you end up getting a pretty good deal.