Get the most out of the Galaxy S5's camera
Explore the handful of new camera and photo-editing options featured in the Samsung Galaxy S5 that will give your photos that extra oomph.


If you're like most people, including myself, you probably take tons of pictures with your smartphone. From trips out with our friends, to our lunch, to selfies, our handsets have become our main tool for snapping photos and capturing our lives.
Mobile manufacturers know this as well, and in a bid to keep their top-tier devices competitive, they pack tons of editing features into their cameraphones. Samsung's latest flagship, the Galaxy S5 , is no exception.
And while its new camera tricks are nifty and useful, some of them aren't so intuitive to use. To help you get off on the right foot, I'll walk you through some basic steps to get the most out of the GS5's camera.


1. Check your defaults
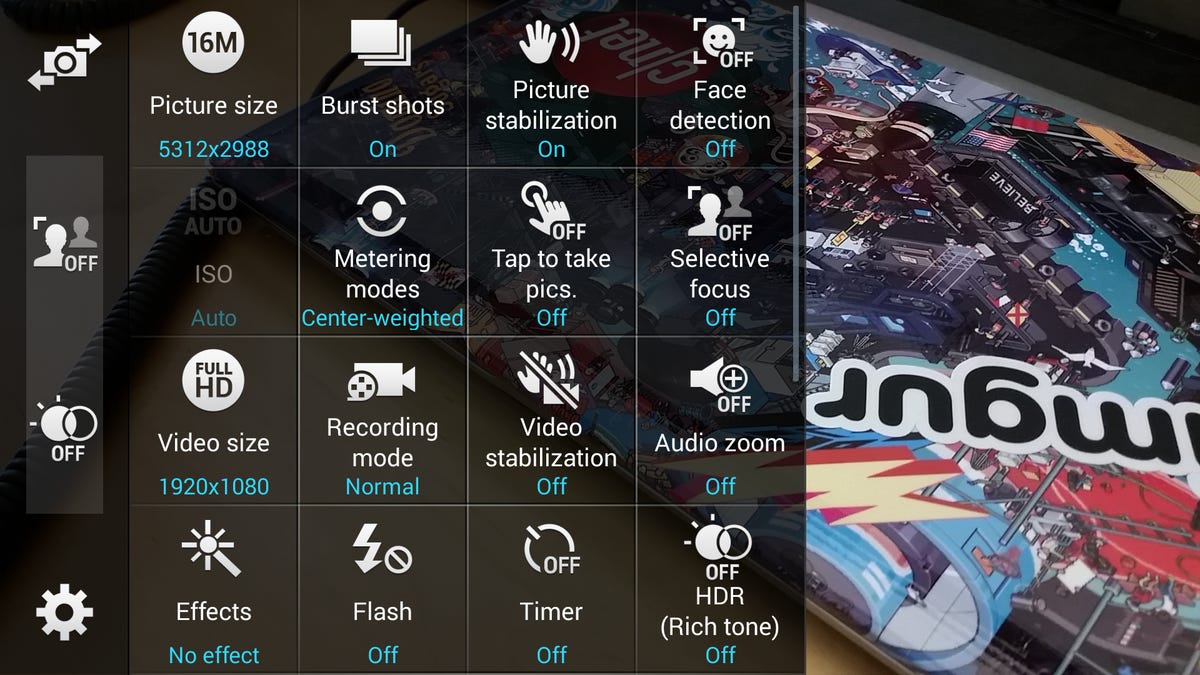
Everyone has different tastes and styles when it comes to what they want out of a photo, and Samsung's default options may not be what you like. So be sure to check your default settings and tailor them to your preferences. Even if you don't consider yourself to be a serious photographer, it's good to dig into them anyway, so you know exactly what you're getting.
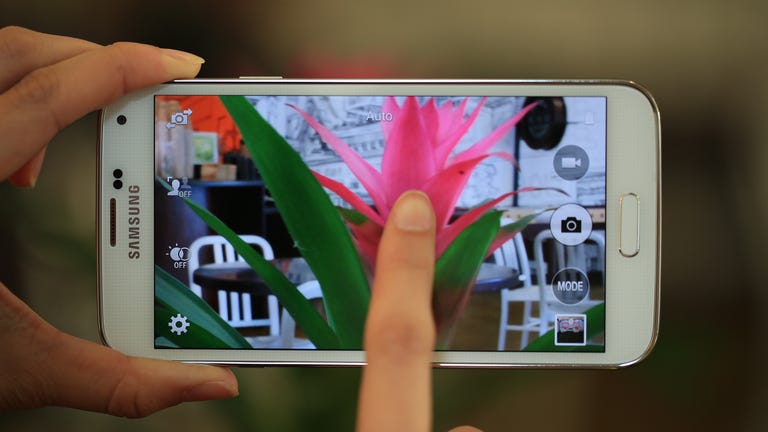
To access these settings, tap the little gear icon in the corner that appears on the camera's viewfinder. Then, scroll though the menu and tap the settings you want to turn on or off or adjust.
For settings you anticipate changing frequently, you can keep shortcuts directly accessible on the viewfinder's dash. Just long-tap any of these settings and drag them to the dash. HDR and Selective Focus are already listed as shortcuts, but you can swap them out. You can have up to three settings, so make them count.
Some settings that Samsung turns off by default that you should note are recording Ultra HD video, and video stabilization. You might not want them on by default either, but keep this in mind.
2. Make the HDR toggle your friend
You've probably seen HDR, or High Dynamic Range, mode before on several smartphones, but the GS5 now has the option to toggle real-time feedback of what your HDR image would look like before you take a picture.
HDR combines several shots taken at varying levels of exposures and composites it into one image. This can result in really striking, almost surreal, photos that have great contrast.

Sometimes, though, it can also create unnatural images that you might not like, so be sure to check by tapping on and off the HDR icon, which is represented by a little Venn diagram-looking icon. Once you like what you see, click the shutter.
3. Get to know the different photo effects
Third, familiarize yourself with photo effects. You can access some directly from the camera, nestled in the settings menu. It's indicated by the magic wand icon and you can preview what the filters will look like in real time. There are a number of effects to choose from (oil paste, cartoon, tint, and so on), but if you know you'll never use some of these effects, scroll to the end of the menu. Then, tap on "manage effects" and uncheck the filters you wish to hide.

Other effects can be applied after you click the shutter, which are accessible through the photo manager. Just go to your gallery, tap on the icon that has a Polaroid next to a pencil, and additional options will appear. Here, you can see a small "enhance" button. If you tap on that, your picture will be automatically edited and tweaked.
Near this circle is the wand icon that I mentioned before. Tap on this to view more filters like Pop Art, Impressionists, and Light Flare (this effect adds two lens flares to your picture and turns it into a low-budget J.J. Abrams movie).
4. Have fun with selective focus
Selective focus is a new GS5 feature that lets you change the focal point of your picture. By manipulating the depth of field, you can make pictures look more professional and even dramatic. We've seen this before in other handsets, like the Nokia Lumia 1020 and the LG G Pro 2, and it works the same way here. Because you have to turn this option on before taking a photo, it's good to have an idea about this feature while you're shooting.
To turn it on, tap the icon with the two human heads in the camera viewfinder. For best results, stand at most 1.5 feet away from the closest object. The object itself should also be at least 4.5 feet away from the background.
Tap on the object you want in your foreground, and click the shutter. It'll take a few moments for the handset to process. Afterward, head to your gallery. To initiate selective focus, click on the heads icon again.
Three options will emerge: Near, Far, and Pan focus. Near will bring your closest object into focus and blur out everything behind it. Far sharpens only the background, and Pan puts everything in focus. When you're finished, tap Done to save your changes.
Remember that while these are four basic things to keep in mind to get the most out of your camera, there are tons more editing features packed inside this device,. This should be enough to get you started, but if you have additional tips or questions, let me know in the reader comments below.