The ins and outs of iPhoto Journals
Follow along as we go over how to create, publish, and manage your iPhoto Journals.


With the release of iPhoto for iOS, Apple has introduced an fun way of sharing your photos with family and friends: Journals.
What is a Journal?
By creating a journal, you can organize and show off photos from a recent trip, party, holiday, or just for fun on a personalized Web page. Journals allow you to appear like you have a creative flare, mixed with some Web development knowledge, all without requiring you to know anything more than how to drag-and-drop photos.
How to get started

After settling on a photo or photos, tap on the Share button at the top of the screen and select Journal.
Once you have entered a name, and selected a background, your journal will be created. You can then either continue adding photos, or begin editing and arranging it.
What can be done?

With the Edit button active, when you tap on a photo you will be able to resize it, add a caption to it, edit the photo with the iPhoto editing tools, reposition or remove the photo from your journal. As you move or resize a photo, the surrounding photos will auto-arrange around the new placement or size.
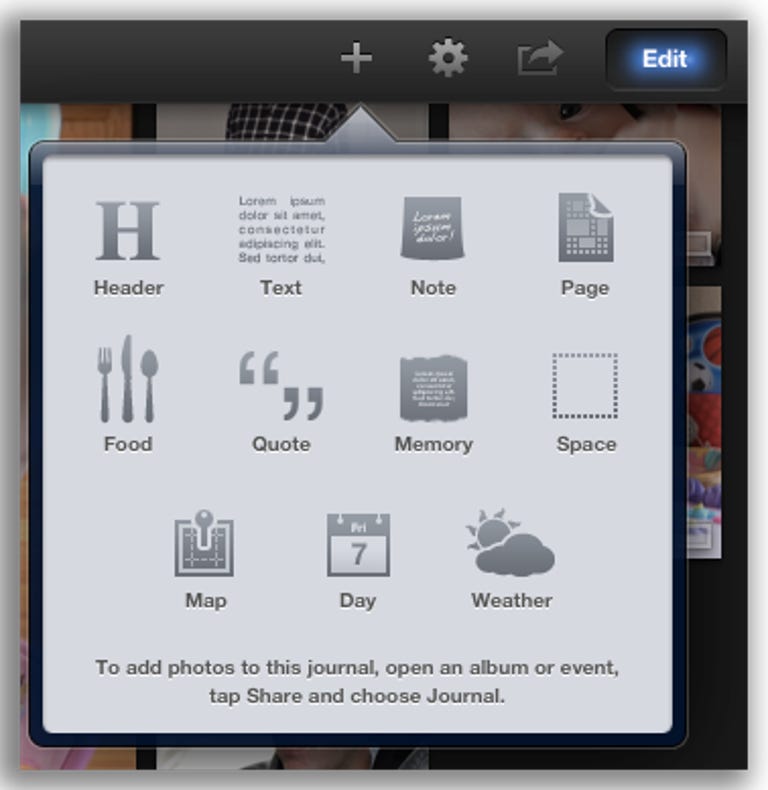
One way to customize a journal is by adding a widget to it, there are a total of ten to choose from. Some of the widgets use user-created content, others use the metadata from the photos and finally some connect to the Internet to pull down information. For example, you can insert a weather widget to display the weather from the day the photos were taken. It gets the date from the metadata of the surrounding photos, then pulls the weather report for that day from the Internet. You can resize some widgets by tapping on them to reveal anchor points, similar to the method used to resize a photo.
To add a widget tap on the plus sign located in the menu bar at the top of the screen.
To add another page to your journal tap on the + icon in the tab bar and select the Page icon. You can rearrange, combine or delete a page by tapping on the Page title in the menu bar.
Sharing
After you have finished editing your journal you can share it three different ways.
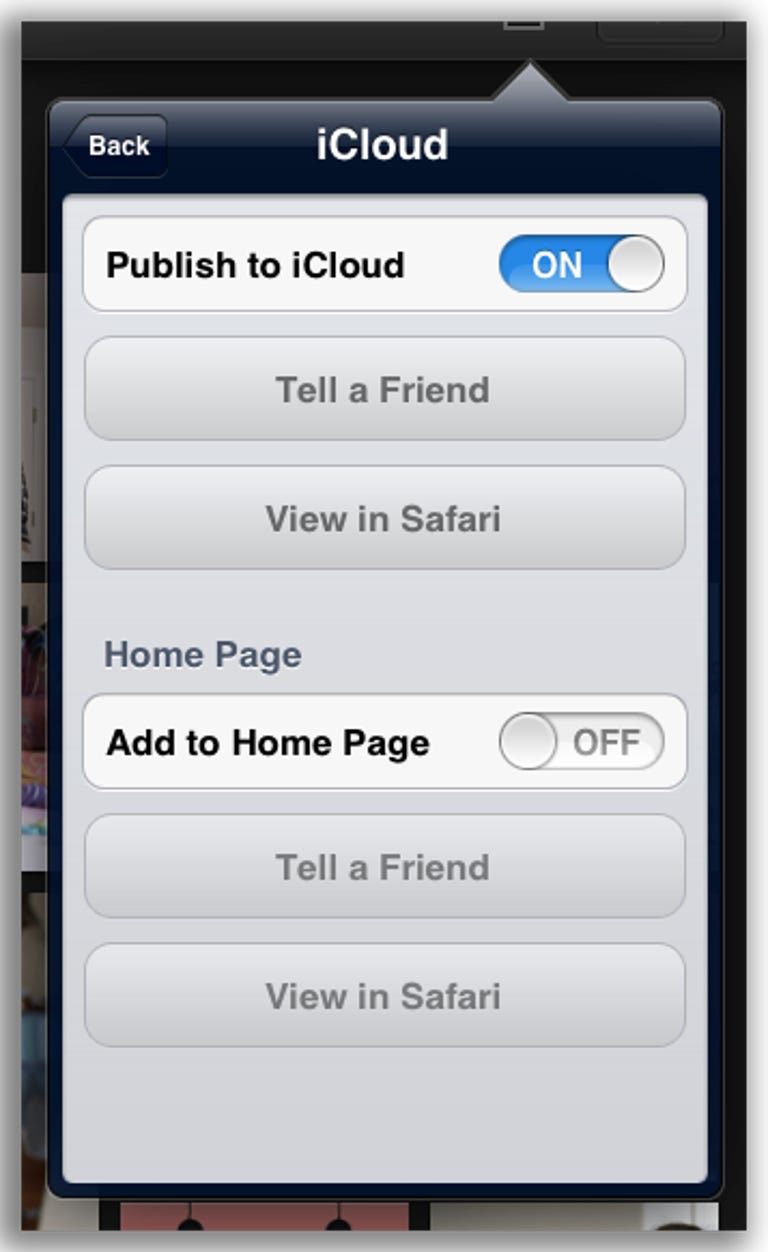
You can send it to iCloud, which then publishes a Web page displaying the journal. After turning on Publish to iCloud, the journal will be uploaded and a private URL will be created. You can then view the journal online, or e-mail the link to your friends and family.
By adding a journal to your homepage, viewers will be able to view your journal bookshelf (only containing what you have added to your home page) once you have sent them a link to a home-page-enabled journal, or to the home page itself. The photos are interactive, allowing viewers to view the full-size photo as well as download a copy of the photo. Viewers can even watch a slideshow of the journal.
Any changes you make to a published journal in iPhoto will automatically be reflected in the iCloud version after you are done editing the journal.
One thing to keep in mind when publishing a journal to iCloud is that the size of the journal does count against your iCloud storage allotment. If you want to see the amount of space iPhoto is using on your iCloud account, watch this video to learn how to manage your iCloud storage.
You can also create a slideshow, which you can only watch directly on the device, or send the journal to iTunes. By sending the journal to iTunes, you can then save the Web files and host the journal on your own server. A great way to still show off your journal without using up any of your iCloud storage. The only downside here is if you make a change to the journal, you will have to resync and upload the journal again.
Final thoughts
Creating iPhoto Journals using your iPhone or iPad is a quick and easy way of showing off your photos. Play around with app, get creative, and have fun with it. Your friends and family will appreciate the extra personalization and time put into your journal.