How to manage your photography workflow in Lightroom
What do you do once you have that winning shot? Here are some tips to help manage your workflow in Lightroom like a pro.


- Webby Award honoree, 2x Gold Telly Award winner
Taking the perfect photo can often be the easiest part of the digital workflow process. What do you do once you have that winning shot? Here are some tips to help manage your workflow like a pro.
Sarah Jenkins is a photographer and graphic designer who lectures on best workflow practices and how to make the most of your post-processing time. We asked Jenkins to share some of her tips on working with Adobe Lightroom 3. Never fear if you're not a Lightroom user, as there are still plenty of useful hints here for photographers of all skill sets.

Step one: the capture process

Importing photos correctly is a very important step before post-processing begins in earnest and you should always decide where you are going to store these images. Lightroom stores the Lightroom Catalog in the User Pictures folder, and Jenkins ensures that she always creates a "master photos" folder to store the actual photos. This "master photos" folder can be stored where Lightroom keeps its Catalog, or elsewhere on an external hard drive.
When importing photos from a camera or card reader, she selects either "Copy Photos" or "Copy as DNG files" if shooting in RAW. Specify where you want the photos to go (a destination folder) within the "master photos" folder you made.
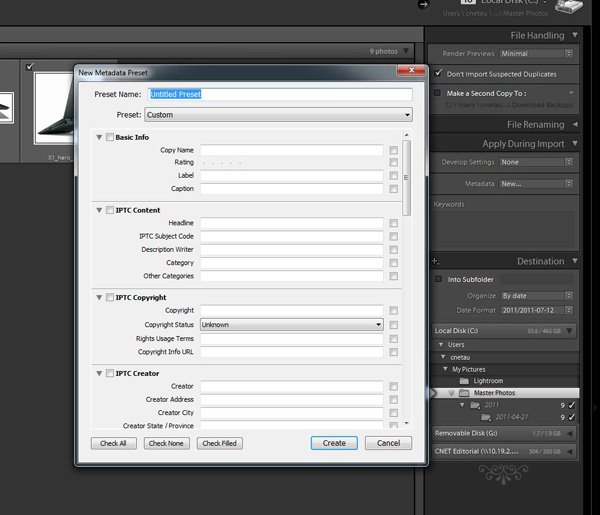
Professional photographers always make sure their work is saved with metadata for copyright purposes. You can create a template that can then be applied each time photos are imported. Add keywords as relevant, and begin the import process.
At this stage, Jenkins suggests it's optional whether or not you create a backup of your original images. "I prefer to do a backup of my original images later to external hard drive after I have reviewed, culled and rated my imported photos," she says.
Step two: review images
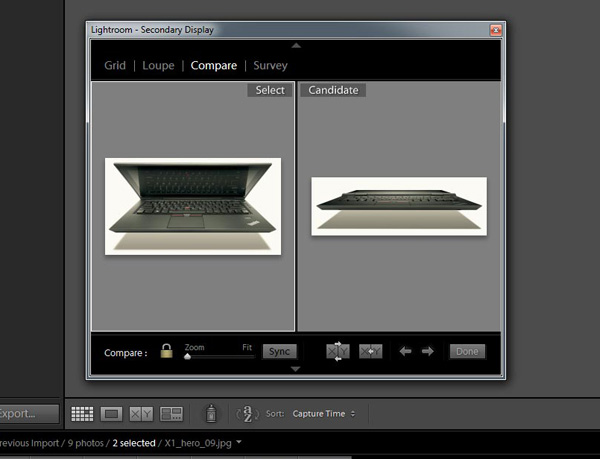
In the Library module, Jenkins uses the Compare and Survey views to work out her best photos and rates them with stars. She then adds keywords to find them easily at a later date. Then, she filters the images to show only photos that have been rated four stars in the imported folder. Once this is done, you can create additional collection folders to put the selected images in the Develop module for further fine tuning. "Creating an organised photo library is an important part of the digital workflow so don't get tempted to start playing and making adjustments to any images yet," Jenkins says.
Step three: edit images
With the images all organised, now choose which of the star photos you want to spend time editing. Select the images in the film strip when in the Library module and click Develop to adjust things such as exposure, white balance and cropping.
Step four: refine and save
The next step is the fun part — making all the changes to the photo that you like. For any retouching beyond what Lightroom is capable of, you can load Photoshop to take care of more complex tasks like blending layers. Once you save the image from Photoshop, the edited PSD is made available in the Library in Lightroom where the original image is also saved.

From the Library module, save and export edited images as TIFF, JPEG or PSD files. The export process gives you options for output on screen/web or print based on image size, pixel resolution and sharpening. Most of the images Jenkins works on are native RAW files that have no sharpening applied in-camera, so she always applies sharpening when exporting images. The amount depends on where the image will be displayed.
This is a basic insight into Jenkins' workflow: more tips for fine tuning can be found on the next page.
Fine tuning
Go back to the Library module where you have filtered your images to show the best shots. "This way it is quicker to see at a glance which images I want to spend the time enhancing," Jenkins says.
"When working on enhancing an image or group of images in the Develop module I will usually create a virtual copy of the original and then apply global edits first to the image by working my way down the core editing tools panels on right side of the workspace," she continues.
Working from the needs of the image, determine what changes need to be made. Minor changes might include colour, white balance, brightness or contrast, while more major changes could involve noise reduction, adjusting vibrancy, clarity and luminance, or adding a vignette. "In addition to [these] global edit tools there are two powerful local edit tools: the graduated filter tool and adjustment brush," she says. These are particularly useful as they can be used to enhance particular areas of an image without the need for using masks and layers like in Photoshop.
Custom presets

You may be familiar with creating actions in Photoshop to repeat certain tasks across a range of images. Jenkins uses a similar process in Lightroom, though these actions are called presets.
"If I want to experiment with other effects or versions of an image such as black-and-white, sepia or a vintage effect I will create more virtual copies and play until I get an effect I'm happy with. If I want to keep the effect I've created I will create a custom preset and save it in the presets folder of the workspace so can apply the effect to another image at a click of the button," she says.
As well as custom presets, Lightroom can also take some of the guesswork out of adjustments with a range of out-of-the-box presets like black-and-white and sepia. Jenkins suggests that these are great tools to have as a basic starter, as the settings can then be adjusted to suit the image. "Snapshots is another useful tool I will use whilst experimenting with different effects. It works a bit like a condensed history panel — saving the adjustment steps that have been applied to an image," Jenkins adds.
Just like in Photoshop, you can create a preset and apply it to a batch of photos by using the sync button.
Top tips
Here are some top tips that Jenkins recommends for all users of Lightroom:
- Regularly back up both the master photos folder and the Lightroom library catalogue
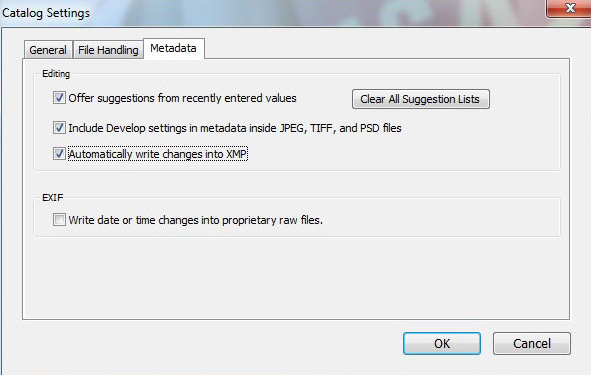
- Go to the preferences menu in Lightroom, select "Catalog Settings" and check the box next to "Automatically write changes". "If this is not checked then any edits that are made to images in either the Library or Develop module will not be saved to the files automatically unless you manually remember to do this each time you make an edit. I can't emphasise enough how important for first time Lightroom users it is to have this box checked," Jenkins says.
- Once you have imported photos into the Library module, create a sub-folder under master photos. Right-click on the new sub-folder and scroll down to "Show Parent Folder". This then shows up the master photos folder in the Lightroom library to see how the structure works
- In the Develop module: in the local adjustment brush, use the clarity tool with negative values to smooth pores quickly, the brightness slider for whitening eyes and teeth and the desaturate slider to work on the colour of a particular part of the photo without using layer masks like in Photoshop
Jenkins migrated to Lightroom 3 after having used Aperture, as she says it has helped speed up her workflow. "Every change I make to an image is automatically tracked, so I can return to any state or back to the original with a single click," she says. "Another great benefit is that it's non-destructive, even for JPEG files — that means my original files are protected unlike Photoshop (unless working in layers and large files)."
Sarah's kit
Finally, where would a tips and tricks article be without asking Jenkins what she carries around in her bag?
Her camera of choice is the Canon EOS 7D and her favourite lenses include the 24-105mm f/4, 135mm f/2, 50mm f/1.4 and 85mm f/1.8. She also uses a neutral density filter where applicable. Jenkins runs a range of photography courses in Sydney as well as courses on Lightroom.