Create custom ringtones on an Android phone (screenshots)
There are a lot of Android apps that allow you to make your own ringtones. You can then set these for yourself, or your contacts. Here's how to do it.


Make your own ringtone
Having custom ringtones is one of the easiest ways to customize your phone. When you hear sounds you've specifically added to your device, even from across the room you know it's your device calling for you.
If you already have music on your Android device, you're one small app away from being able to turn those songs into ringtones, alerts, and reminders. Download and install the free Ringtone Maker app from Google Play.
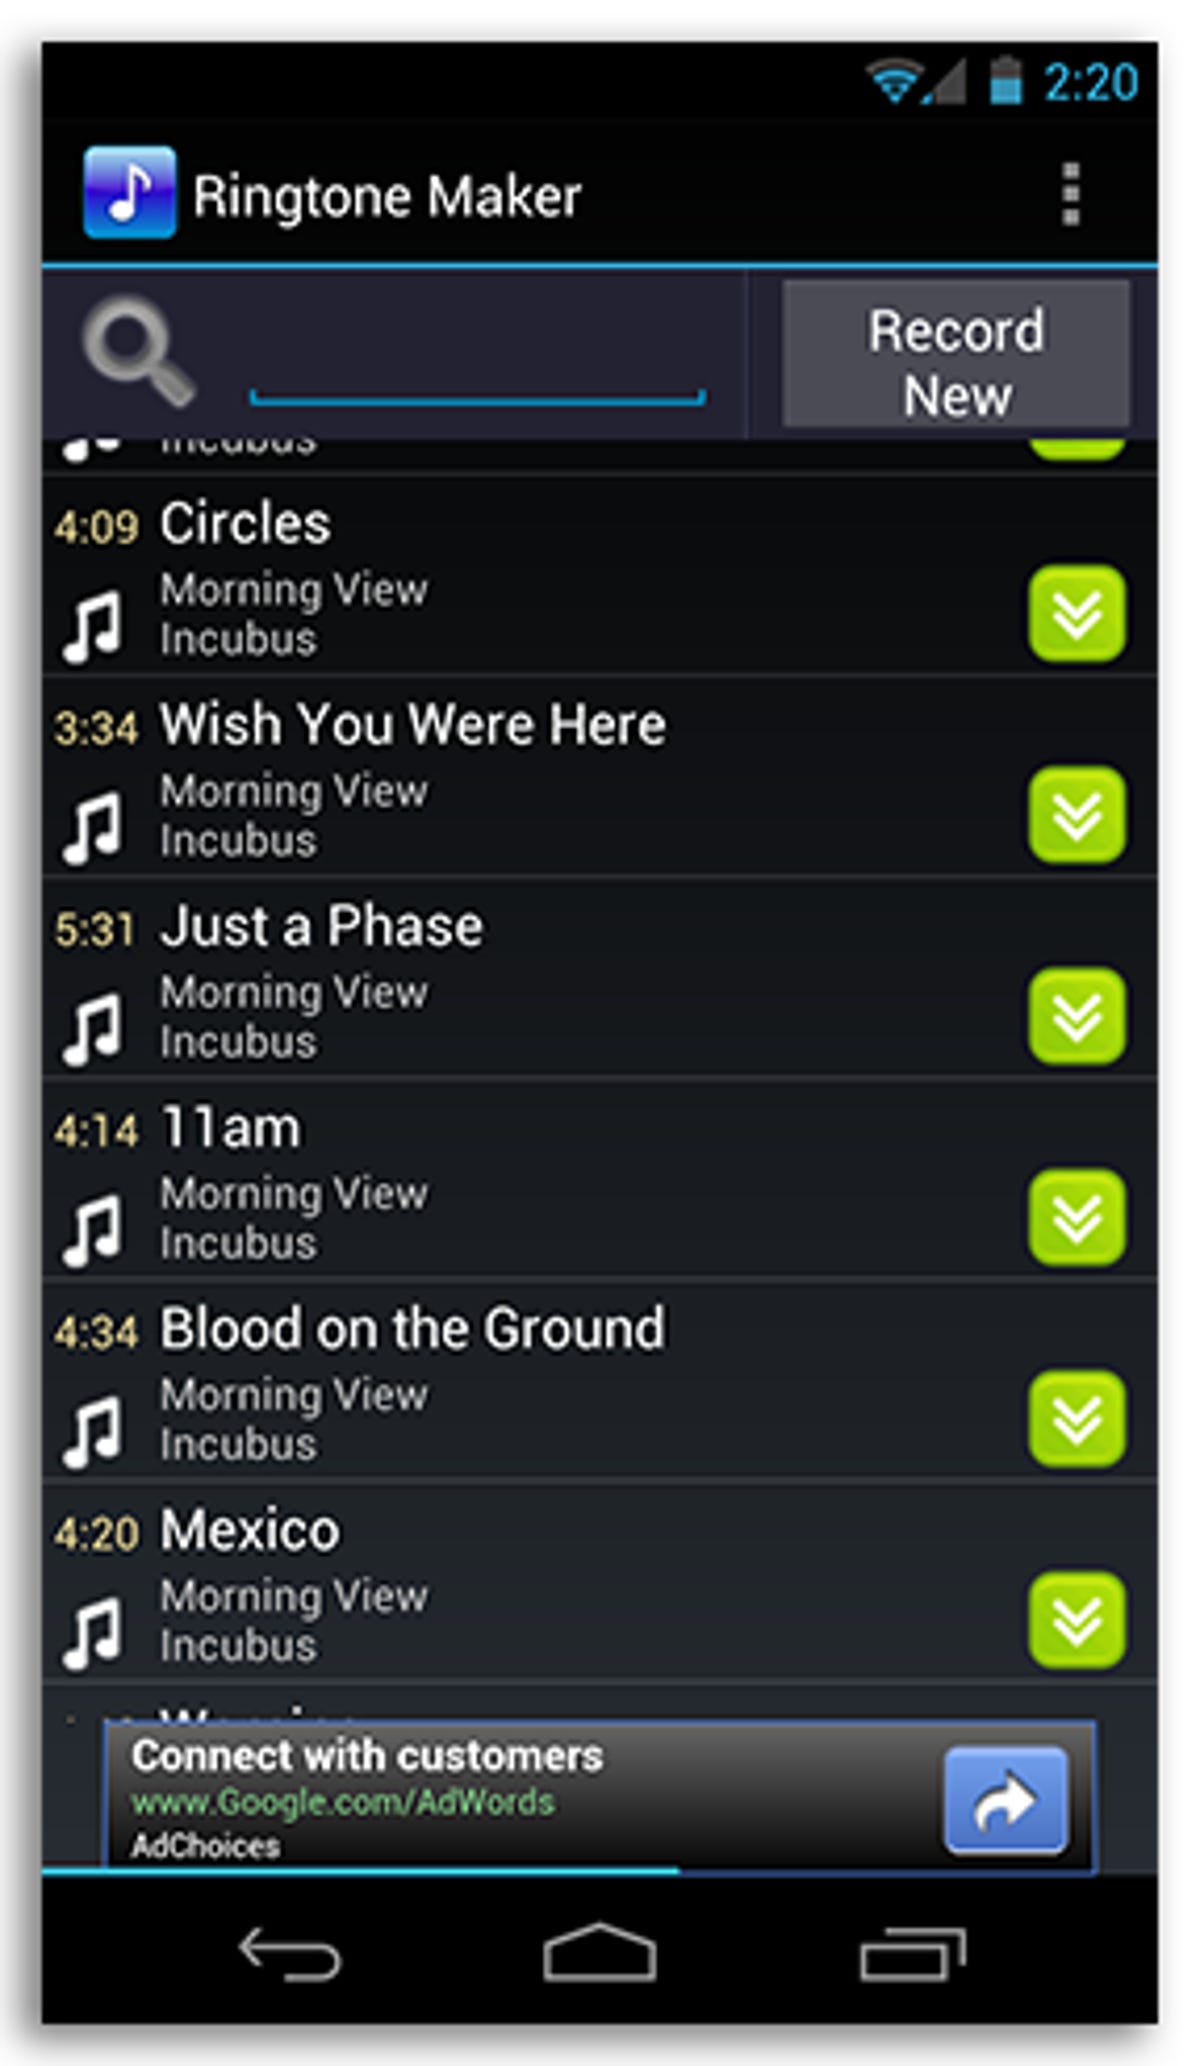
When you open the app you'll be presented with a list of all the music on your device. You can then search for a specific artist or song, as well as record your own sounds to use in making your ringtone directly from this screen.
Once you've picked out a song to make into a ringtone, tap on the green arrow icon on the right side.
(If you keep the bulk of your digital music on your Mac or PC, follow these instructions from Sharon Vaknin on transferring those songs over to your phone to turn them into a ringtone.)
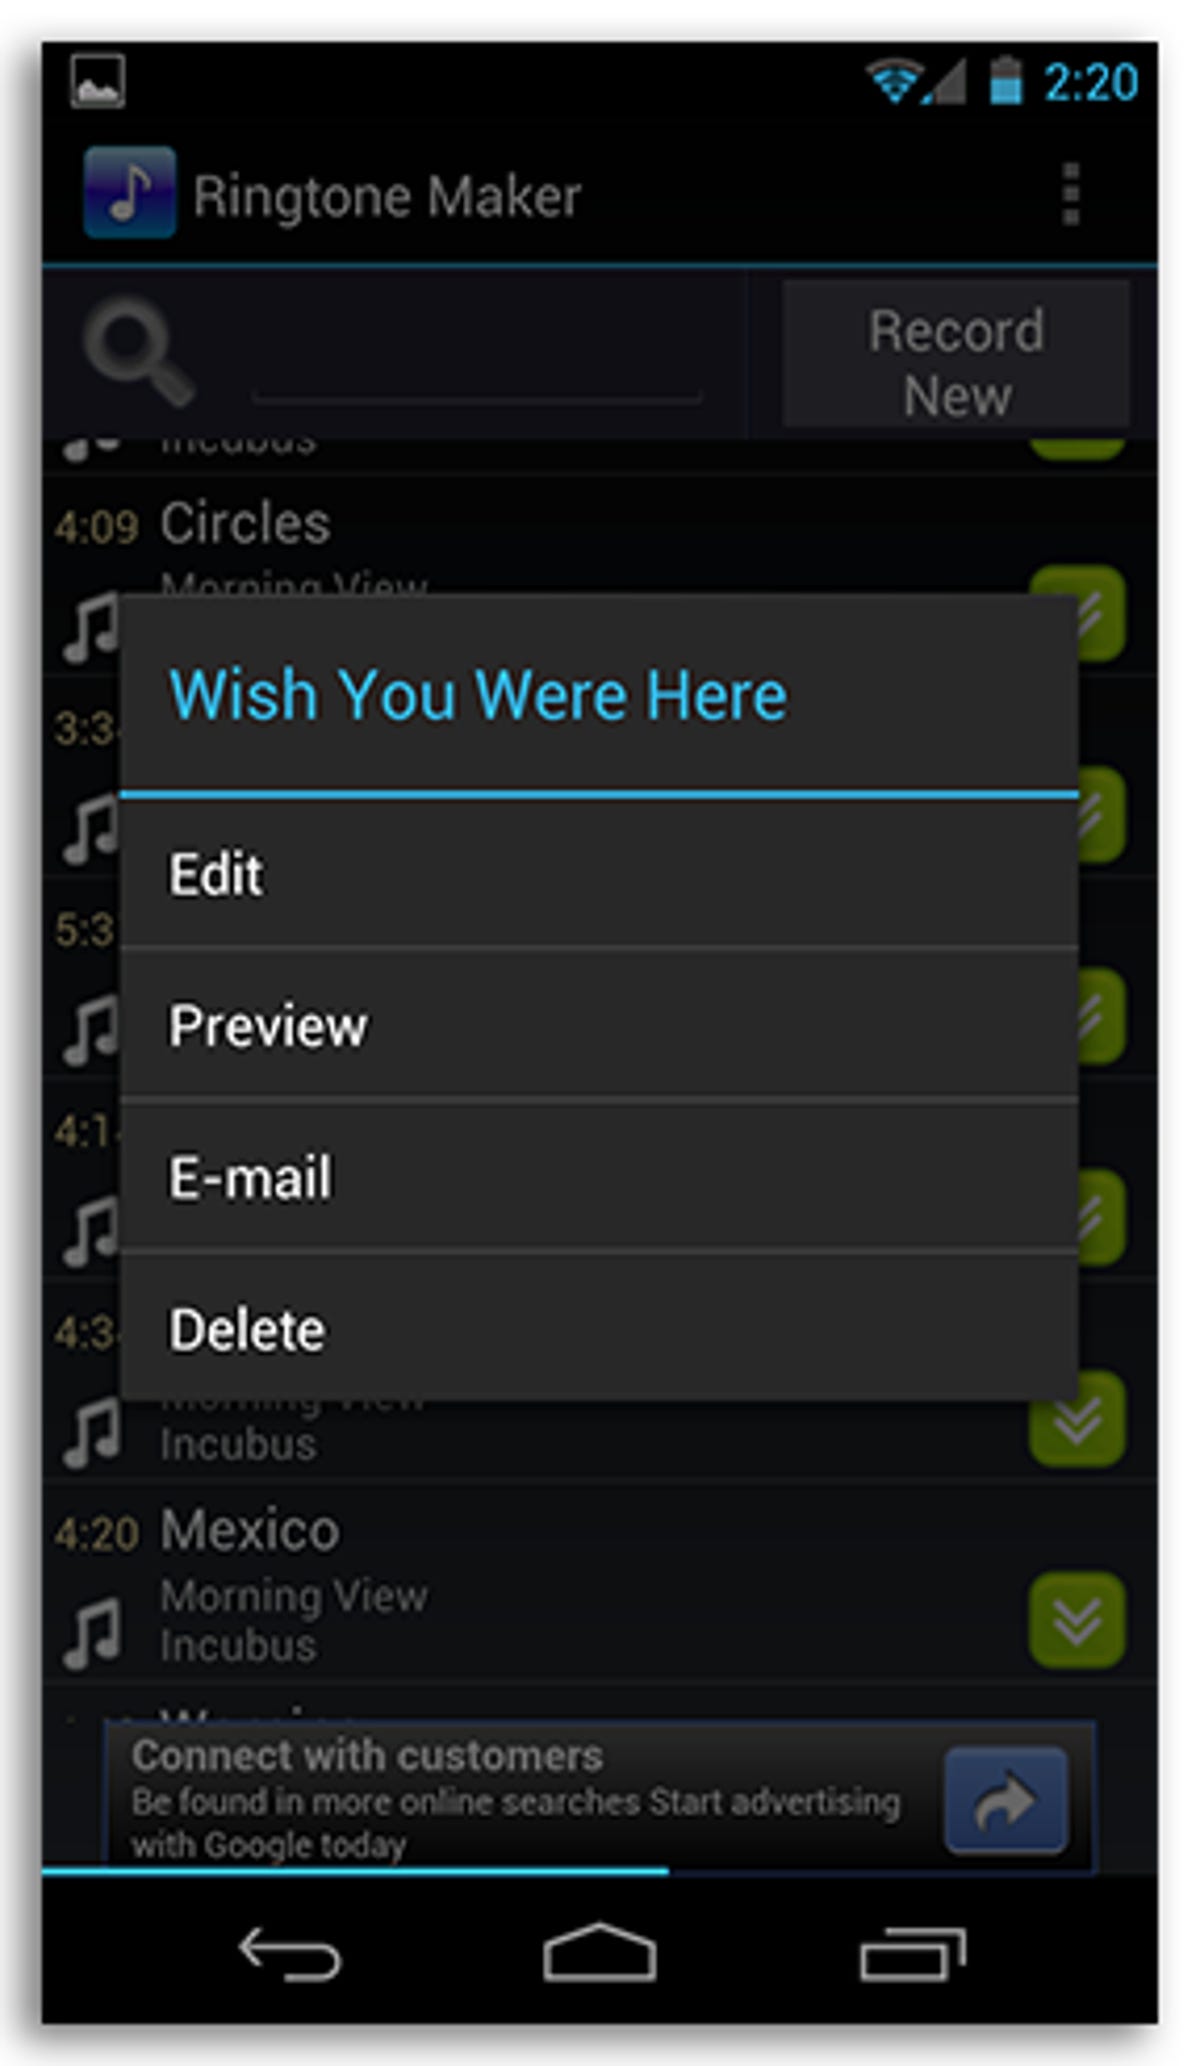
Edit, preview, e-mail, or delete
A menu will pop up asking if you'd like to edit, preview, e-mail, or delete the song. Since you're going to be using the song to make a ringtone, you'll want to select Edit.
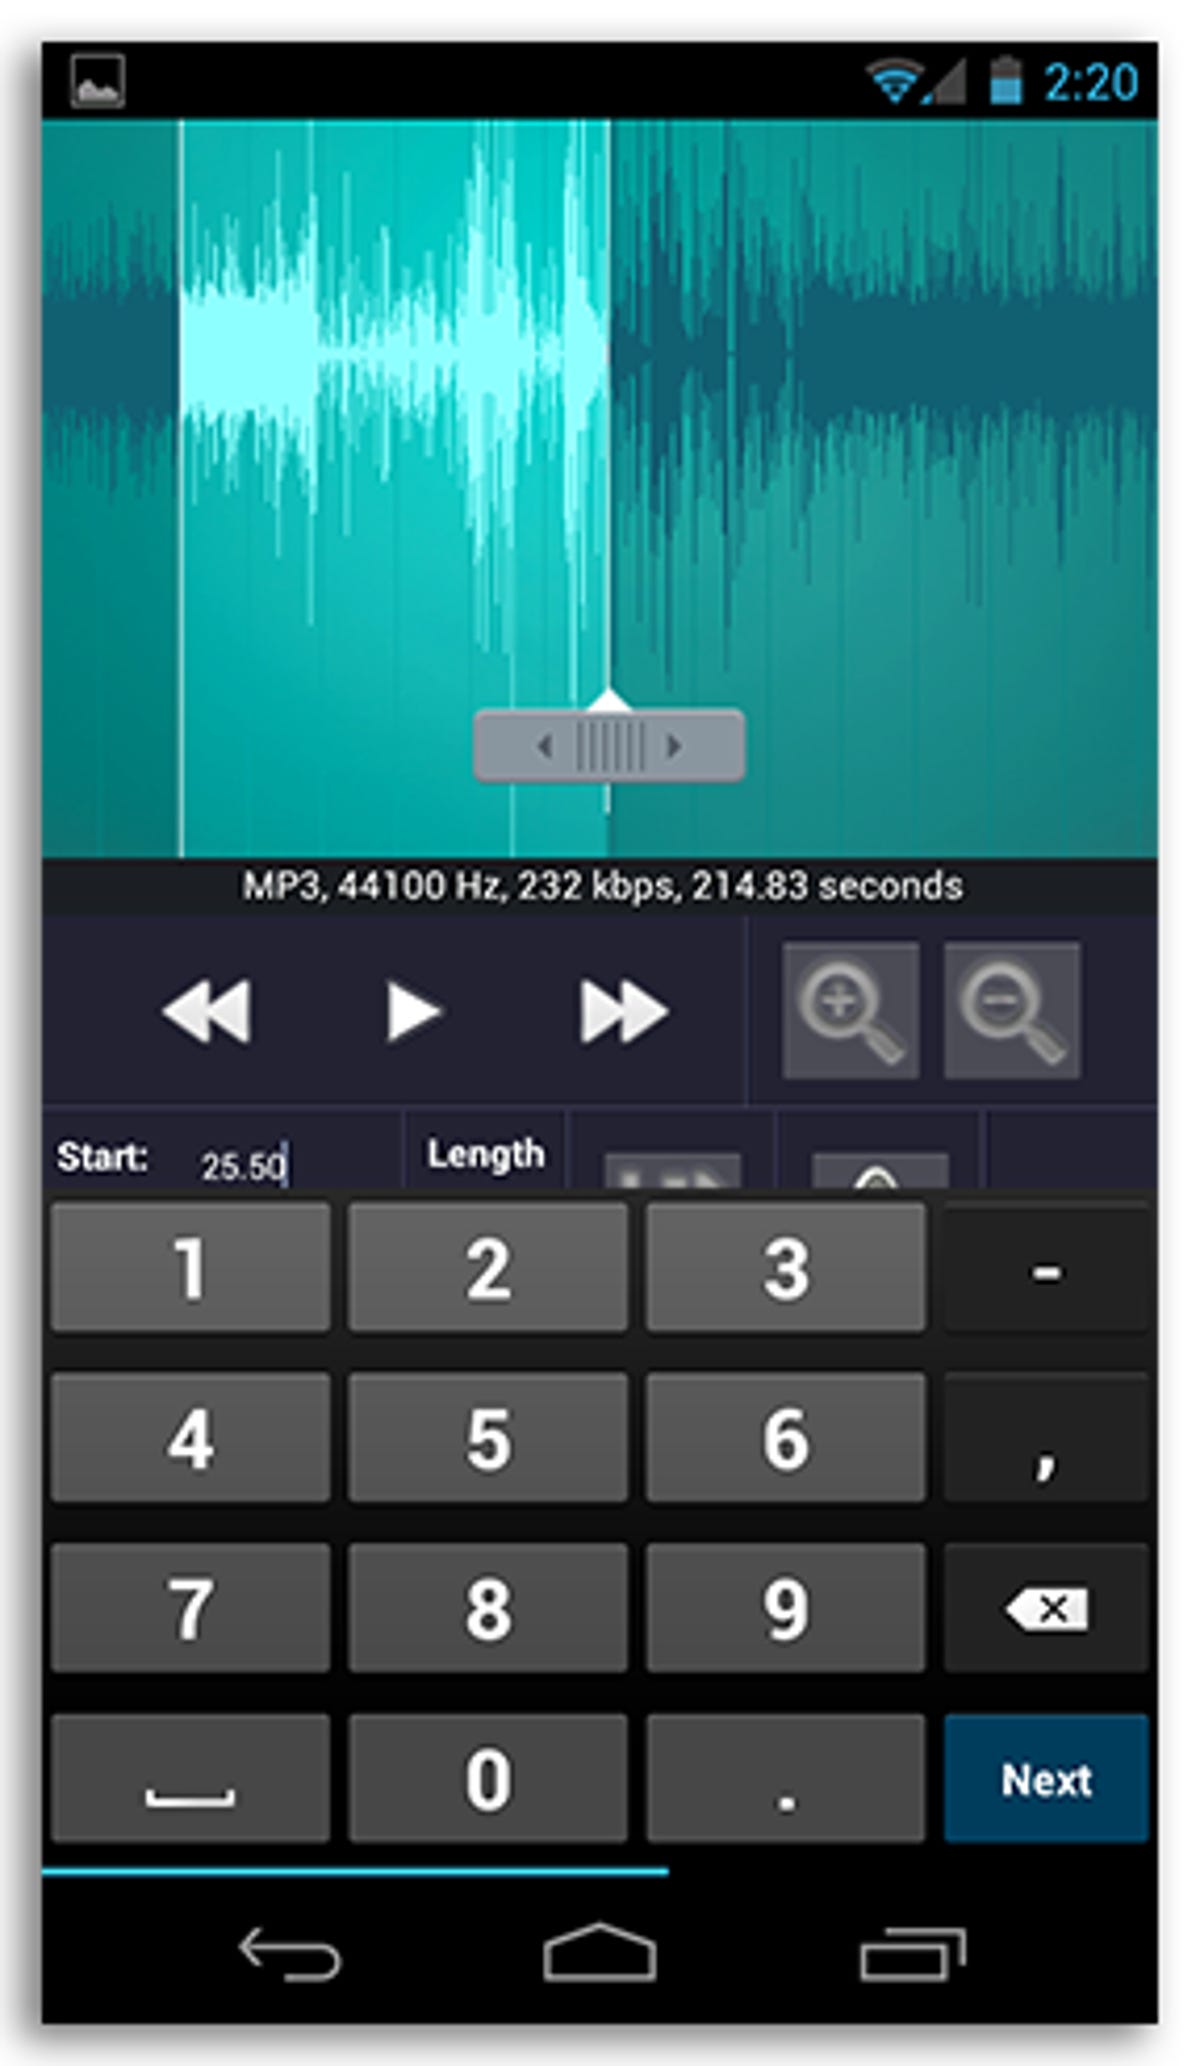
Editing
Now you can drag the gray handles on the sound waves around to change the part of the song, as well as the length of the ringtone. If you need to zoom in or out, tap on the respective magnifying glass. There will also be two number fields in which you can enter the Start and Stop times. I recommend keeping any ringtones under the 30 second mark, as most phones go to voicemail by that time. For alerts and reminders, you can decide on what length you prefer. Personally, I think anything longer than 3 seconds seems more like a ringtone and becomes distracting.
After getting the exact clip picked out, you can then set the fade of your ringtone.
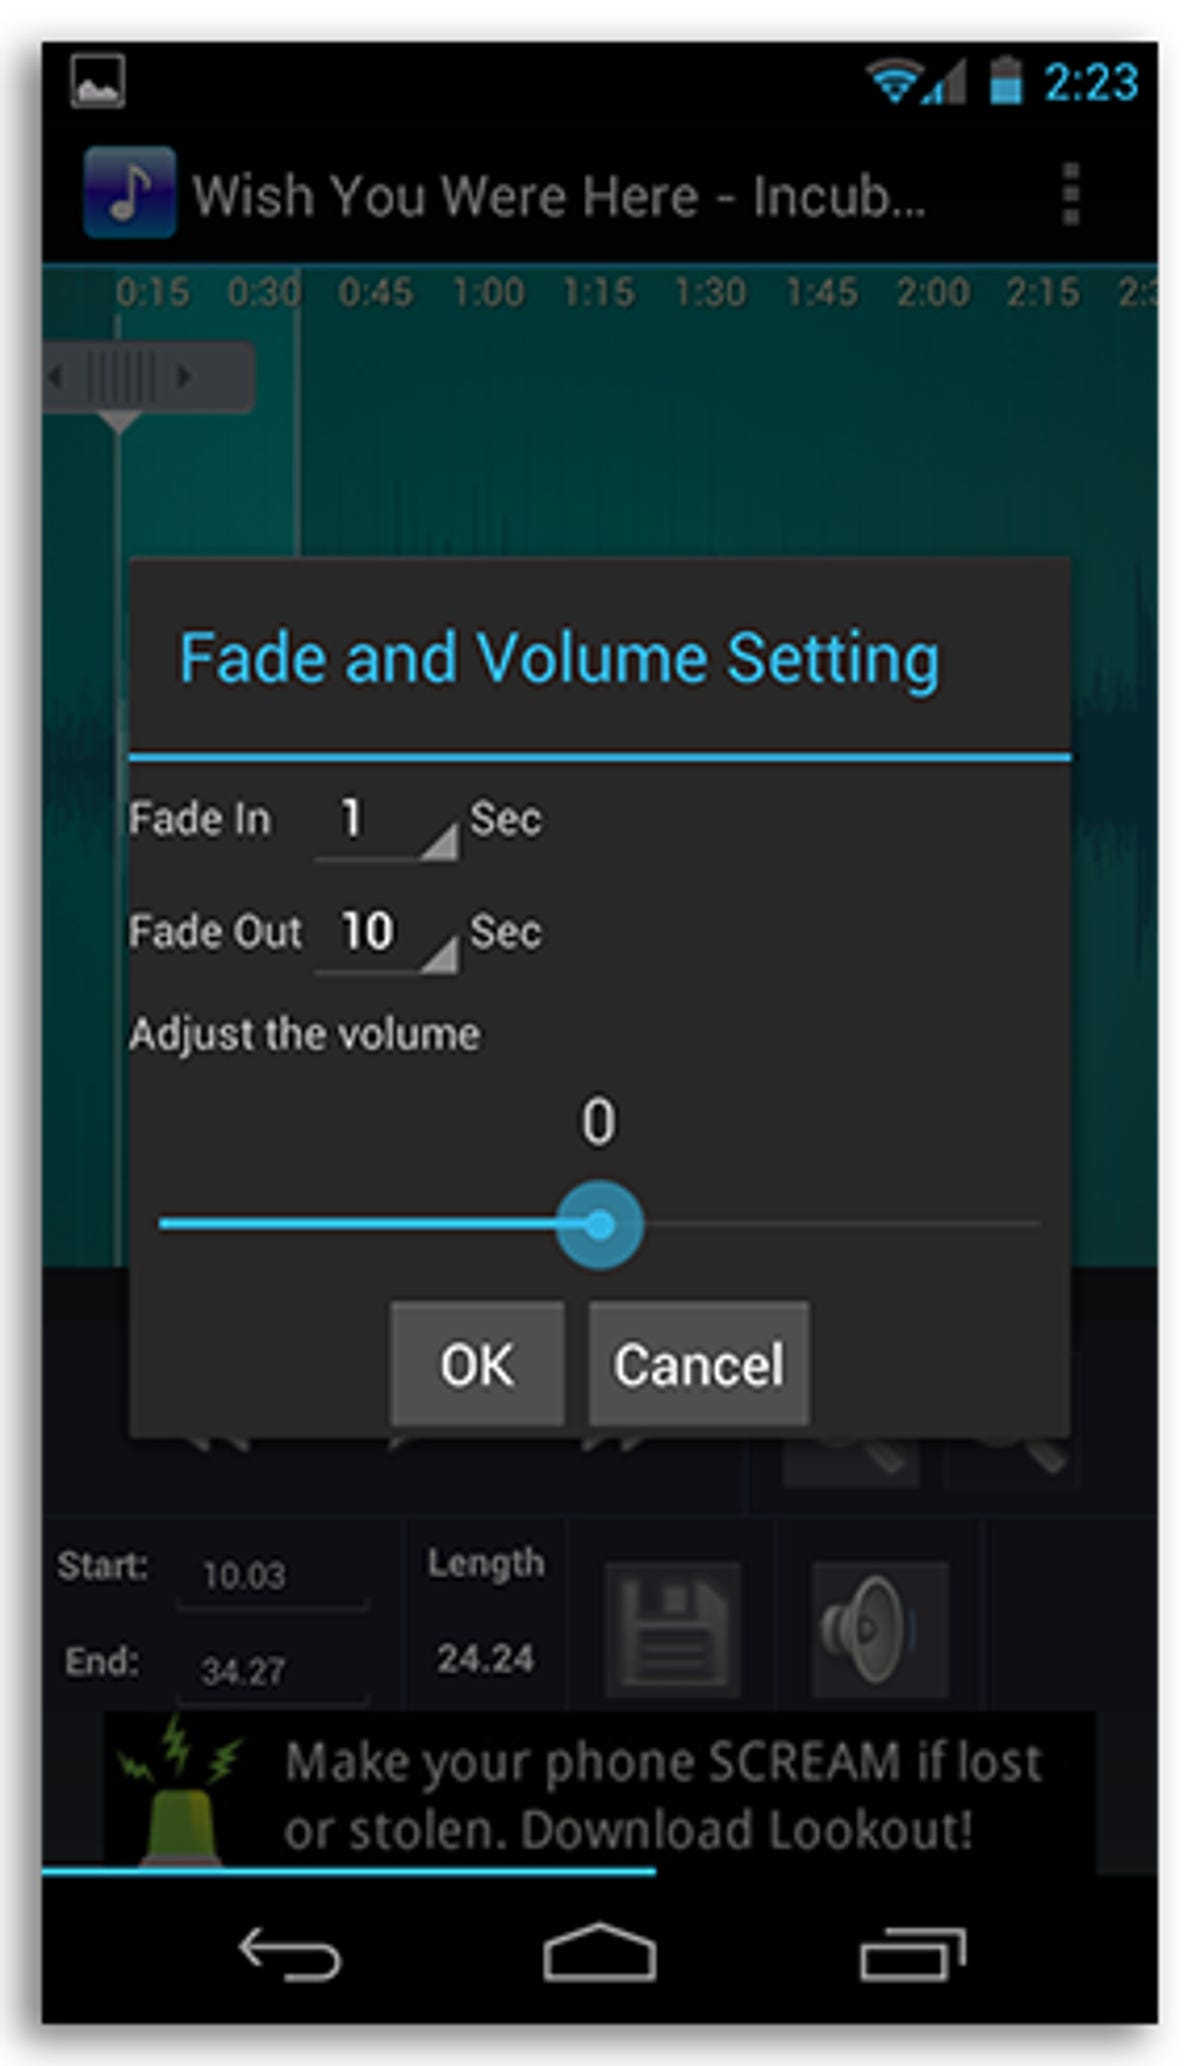
Set the fade and volume level
By tapping the speaker you'll be able to set the fade (both in and out) for your ringtone. You can set it starting at 1 second, going all the way up to 10 seconds.
A fade is when the volume of your alert/ringtone slowly ramps up to full volume. The duration of the fade is how long it will take max volume to be reached.
The slider below the fade settings allows you to adjust the overall volume of the clip.
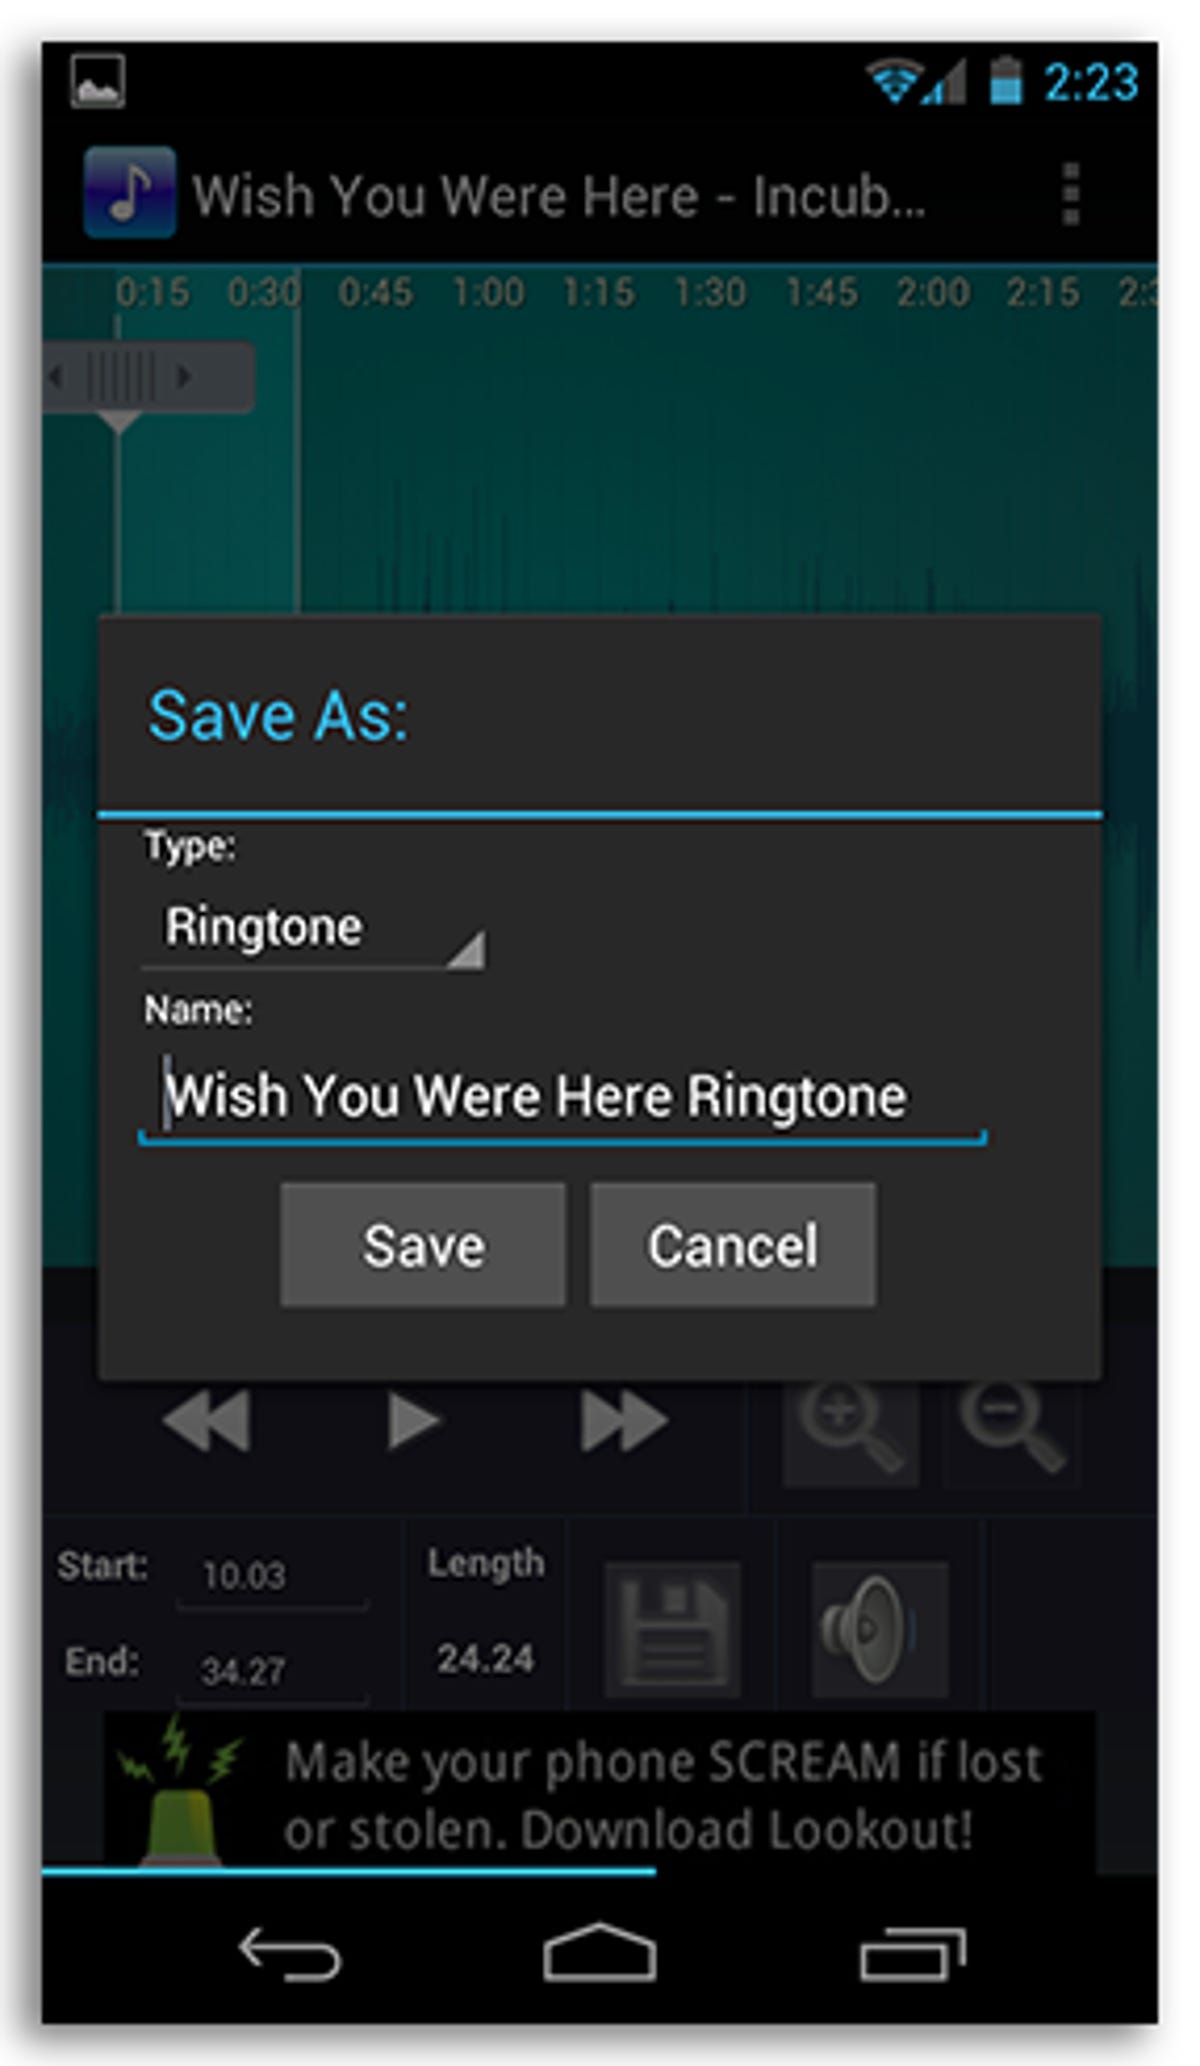
Save your creation
Tapping on the disk icon will save your new creation to your device. On the Save As popup, you can rename your tone as well as set the type of alert it is. Your options are Music, Alarm, Notification, and Ringtone. Tap on Save when you're finished.

Set it as a ringtone
You've crafted your ringtone to be perfect, and you're darn proud of it. Luckily, you won't have to go into the device settings in order to set it as your ringtone. After tapping on Save, you're prompted to set it as your default ringtone, assign it to a contact, or share it via e-mail.
Create ringtones for yourself, friends, and family members so you always know who is calling. Ringtone Maker is great for making Android ringtones on your device, as long as you already have music on your device. If you don't have a lot of music, or the song you are looking for, you can use an app called Zedge.

Zedge
Instead of going through the process of making your custom ringtone, Zedge has already done it for you. As you can see in the screenshot, there are a lot of ringtones to choose from. Not to mention, notifications, wallpapers, and even live wallpapers.
Tap on the search icon to search for a specific song, or you can browse through categories by tapping on any of the listed categories.

Set it as a notification or ringtone
Once you have previewed the tone and decided you want to keep it, you can download and set it as a default ringtone, contact ringtone, or notification sound with just a couple of taps.
If you don't mind putting up with some ads, Zedge is great for getting free media to customize your Android device.
For more tips on how to customize your Android phone, see our story here.
More Galleries

My Favorite Shots From the Galaxy S24 Ultra's Camera
20 Photos
Honor's Magic V2 Foldable Is Lighter Than Samsung's Galaxy S24 Ultra
10 Photos
The Samsung Galaxy S24 and S24 Plus Looks Sweet in Aluminum
23 Photos
Samsung's Galaxy S24 Ultra Now Has a Titanium Design
23 Photos
I Took 600+ Photos With the iPhone 15 Pro and Pro Max. Look at My Favorites
34 Photos
