15 tips for organizing your Gmail
Your inbox is a mess. Here's how you can fix that.


The quest for Inbox Zero
You don't have to dread opening your Gmail account -- there are lots of ways to tweak Gmail for a more efficient and organized experience. Here are 15 tips that will help you get closer to the elusive dream of Inbox Zero...
Find inbox zen
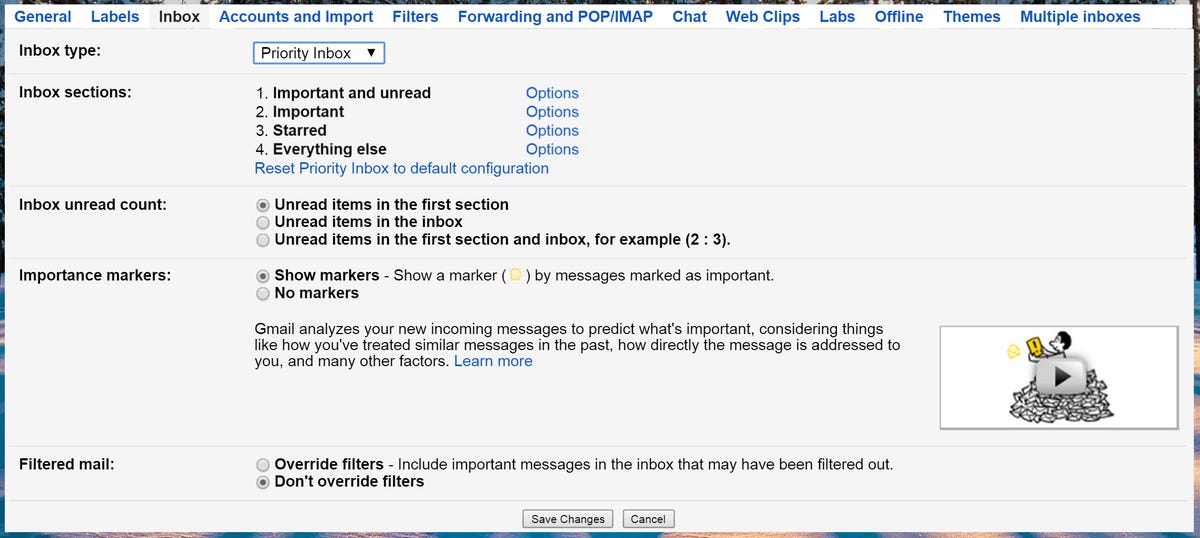
Gmail lets you customize your inbox's layout: There's the default layout (tabbed inboxes), three layouts that put different types of messages first ("important," "unread," and "starred"), and a priority inbox layout that sorts mail based on importance.
If you want to wrestle your email into submission, the default and priority inbox layouts are the most useful -- one categorizes, the other prioritizes. You should play around with layouts until you find the one that best suits your needs. I like the default layout, because it lets me shunt possibly important sales and promotional emails to one tab, without getting rid of them altogether.
Click the cog button, open the Settings menu, and click the Inbox tab. Under "Inbox tab," use the pull-down menu to select the type of inbox you want.
Skip the inbox
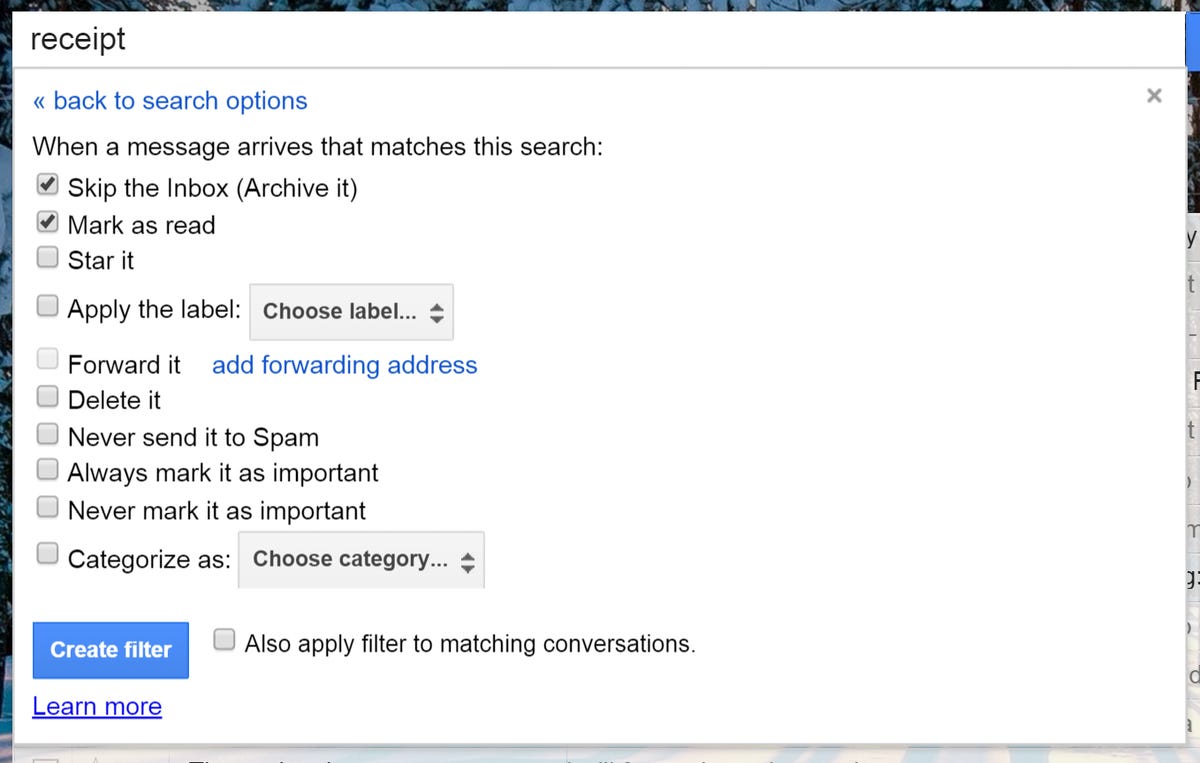
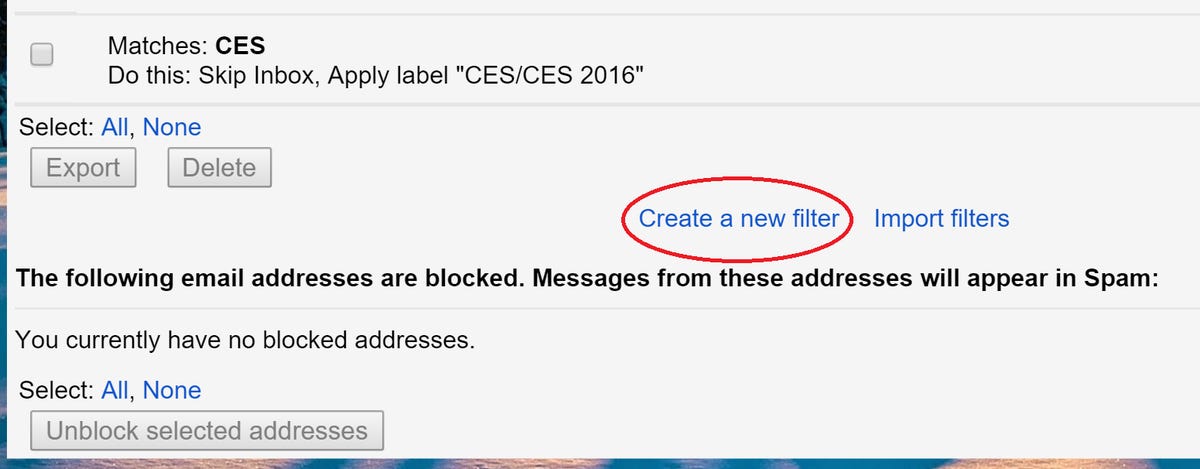
Not every message needs to be manually sorted through the inbox before it hits the archives. For emails you want to file away automatically -- say, receipts or messages related to a work project -- create a filter that skips the inbox.
To do this, click the cog button, open the Settings menu, and click the Filters and Blocked Addresses tab. At the bottom of the screen, click "Create a new filter" and fill out the filter parameters (for example, emails with "receipt" in the subject line) before hitting "Create a filter with this search." Next, choose what your filter will do: Check the box marked "Skip the Inbox (Archive it)," and all future filtered messages will head straight past the inbox and into the archives. You can also check "Mark as read," if you're filtering messages you don't need to read.
Add keywords
Gmail's archive system encourage users to never delete anything, which is fantastic for digital hoarders like myself. But it also means there's a lot more e-waste to wade through when you're looking for a specific email -- even if you have an organized, color-coded labeling system.
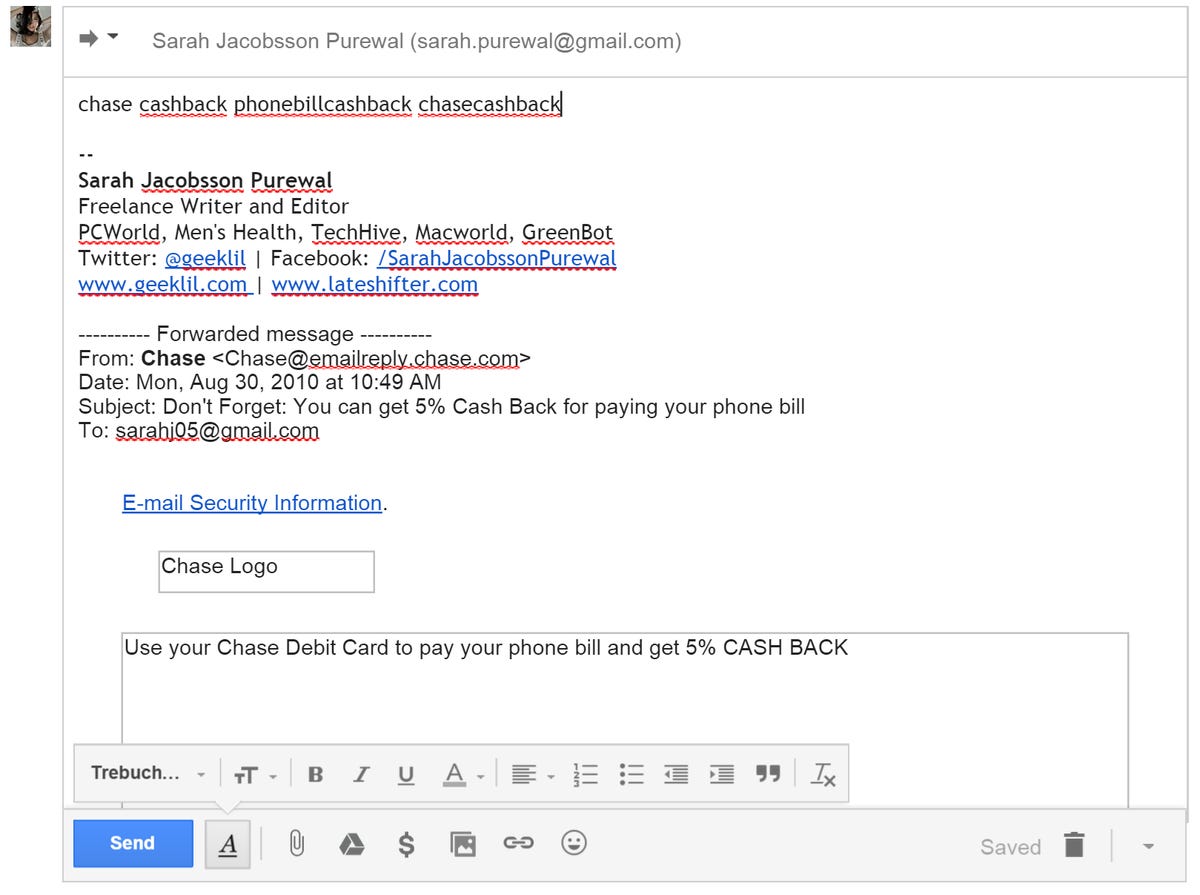
Gmail's search options are acceptable, but it's not a bad idea to take matters into your own hands: Whenever you have an email that you think you may need to pull up in the future, forward the email to yourself and add a few unique, memorable keywords or sentences. Now, instead of trying to search-hack Gmail with date parameters, you can just type in your keywords/sentences and the email you're looking for will pop up.
Search like a pro
If you need to find something in your archived mail that doesn't happen to have any handy keywords attached, you'll need to use Gmail's search engine. Here are some advanced search operators that can help you find what you're looking for in a sea of 20,000 old messages.
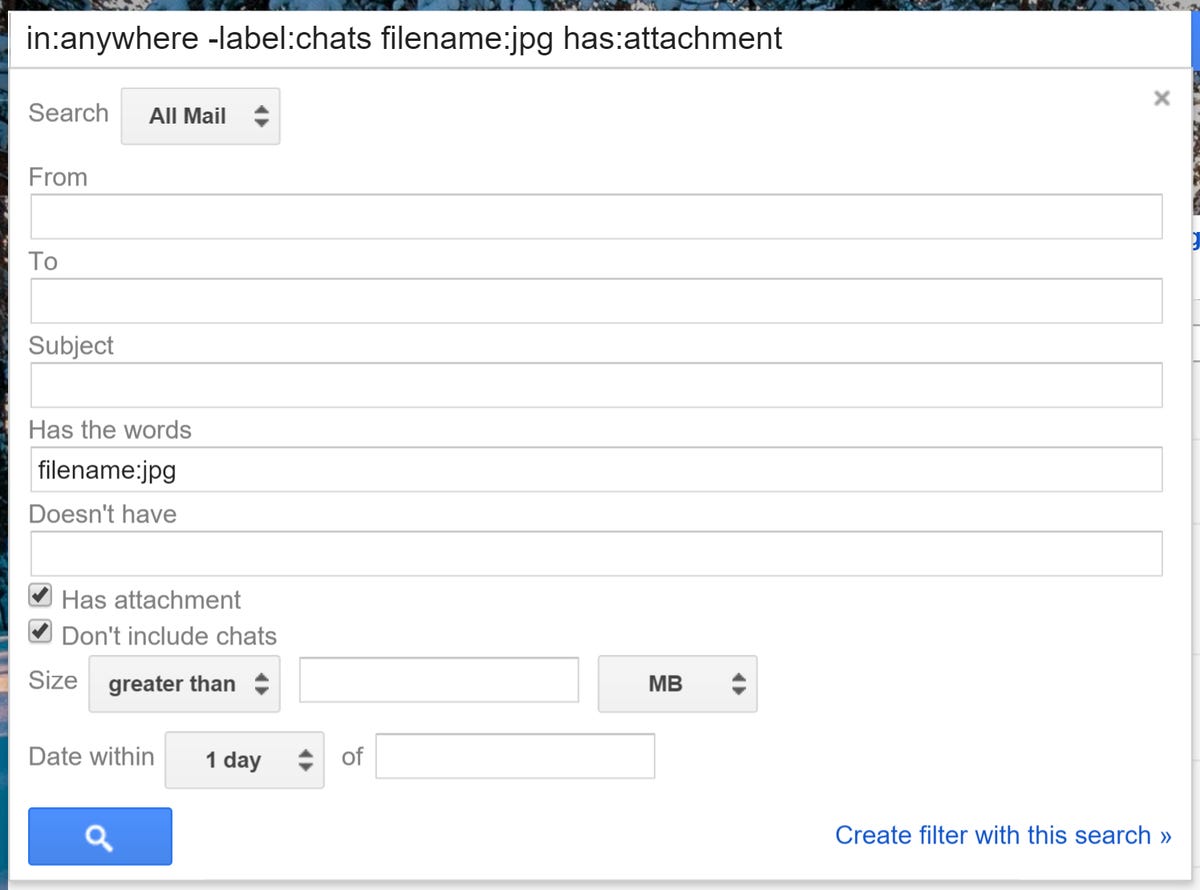
- Exclude messages from specific labels with the -label:[label name] operator. This is especially useful when you want to exclude chat logs -- just type -label:chats in the search box. You can also search for messages with specific labels exclusively with the +label:[label name] operator. The + and - operators work with other search operators as well.
- Search for messages within a certain time frame with the before:[yyyy/mm/dd] and after:[yyyy/mm/dd] operators.
- Find specific types of attachments with the filename:[file type] operator. For example, if you want to find messages with PDF files attached, type in filename:pdf.
- Regular searches do not include messages in the Trash folder or the Spam folder. To find messages in the Trash folder, use in:trash. To find messages in the Spam folder, use in:spam. To find messages in all folders, including Trash and Spam, use in:anywhere.
Color-code labels
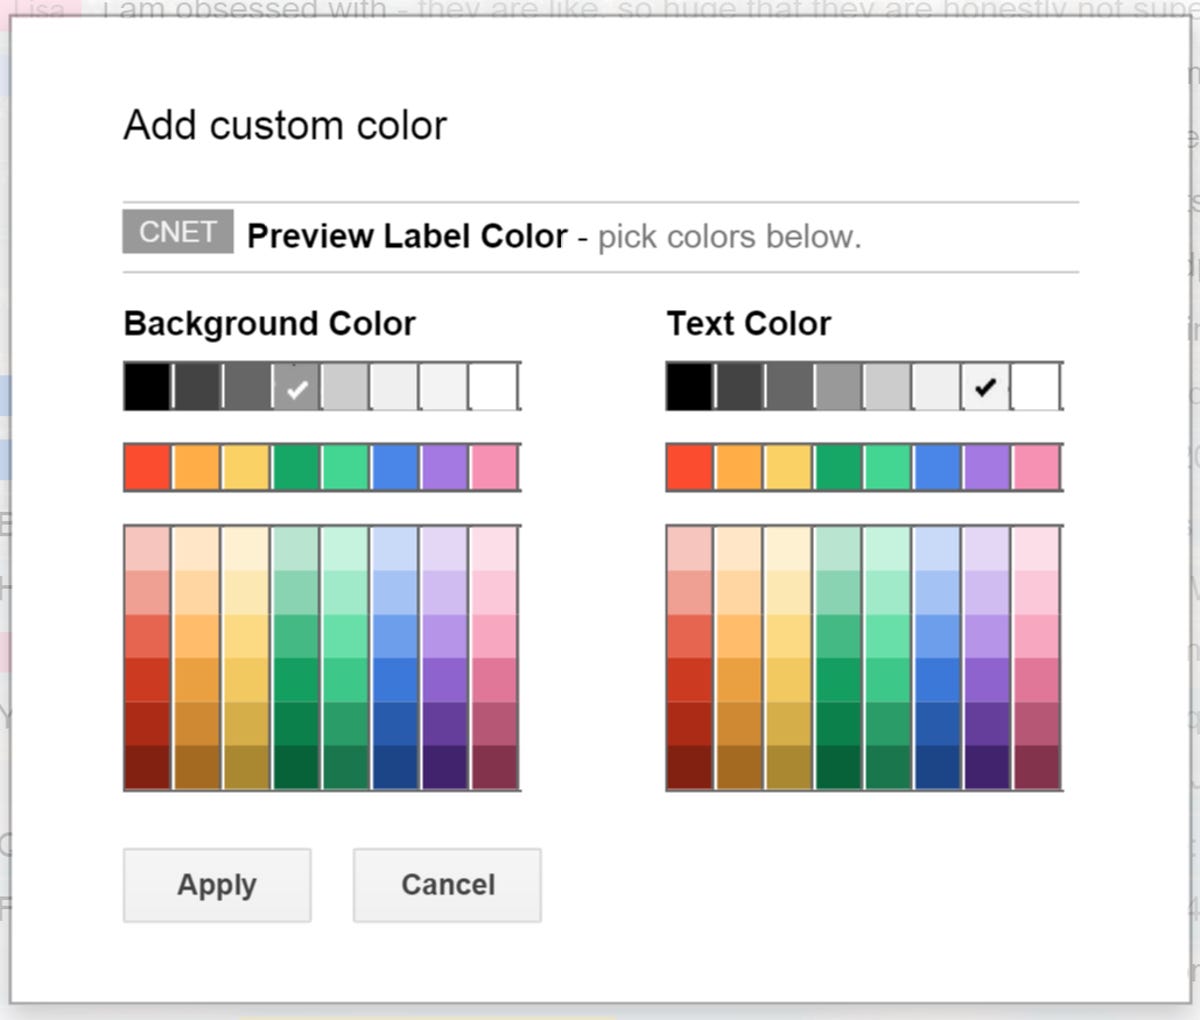
Labels are useful for sorting and categorizing your Gmail messages. But they're also hard to read -- especially when you're staring at a colorless wall of emails. Luckily, you can make your emails more visually organized (and appealing) by color-coding some or all of your labels.
To do this, move your mouse over to the left column and hover over a label you want to color-code until you see a small downward-pointing arrow appear. Click the arrow and an options menu will pop up. Hover over "Label colors" and another menu will pop up, this time with a selection of preset label color schemes (text and highlight colors), as well as options to add custom colors or remove colors. Click on a color scheme to assign it to the label; repeat this step with all other labels you want to color-code.
Delete old attachments
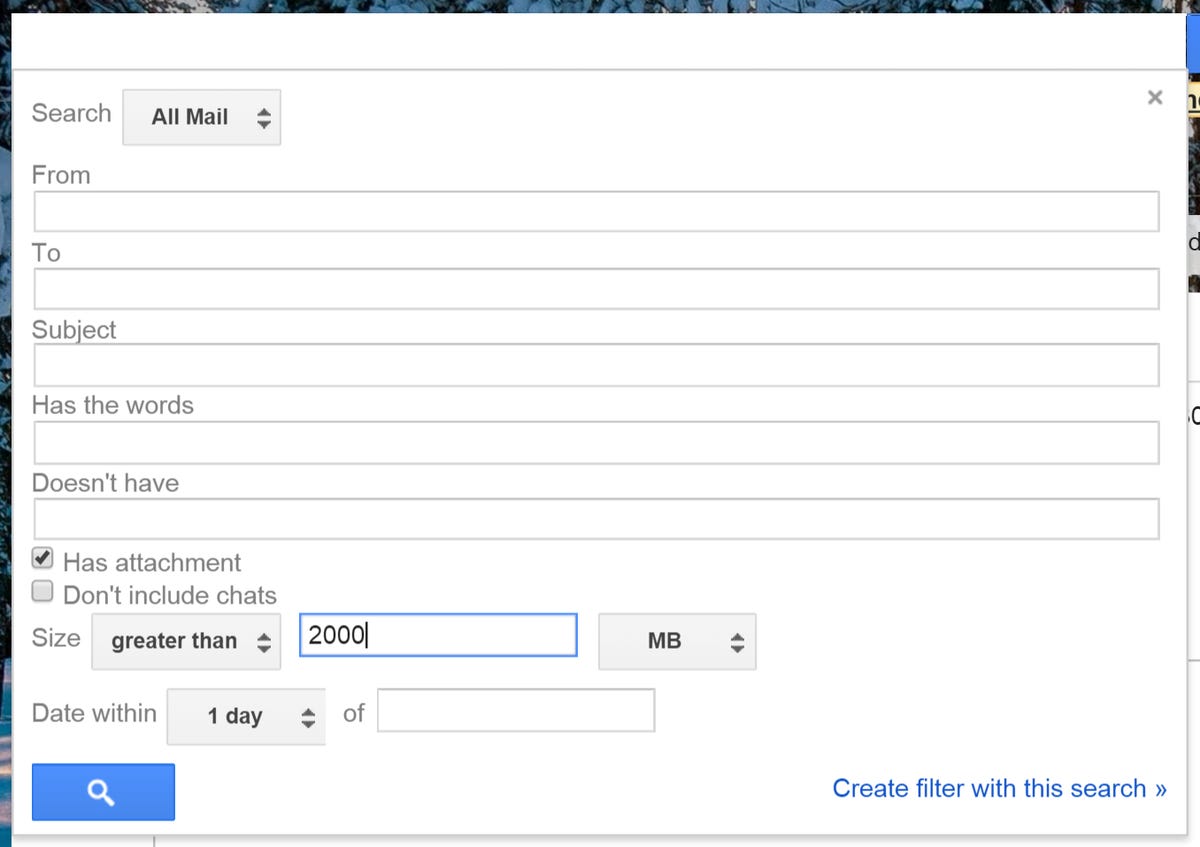
Google users get 15GB of free space, which is shared between Gmail, Google Drive and Google+ photos. If you find yourself pushing the limit, deleting old emails with large attachments is an easy way to free up space.
To find these messages, go to the search box and click the downward-pointing arrow to perform an advanced search. To search for messages with an attachment, check the box that says "Has attachment" and hit search (you can also type "has:attachment" in the search box). To find emails that are larger than a certain size, regardless of attachment status, fill out the advanced search size parameters: under Size, choose "greater than," and enter in the size in bytes, kilobytes or megabytes and hit search.
Create nested labels
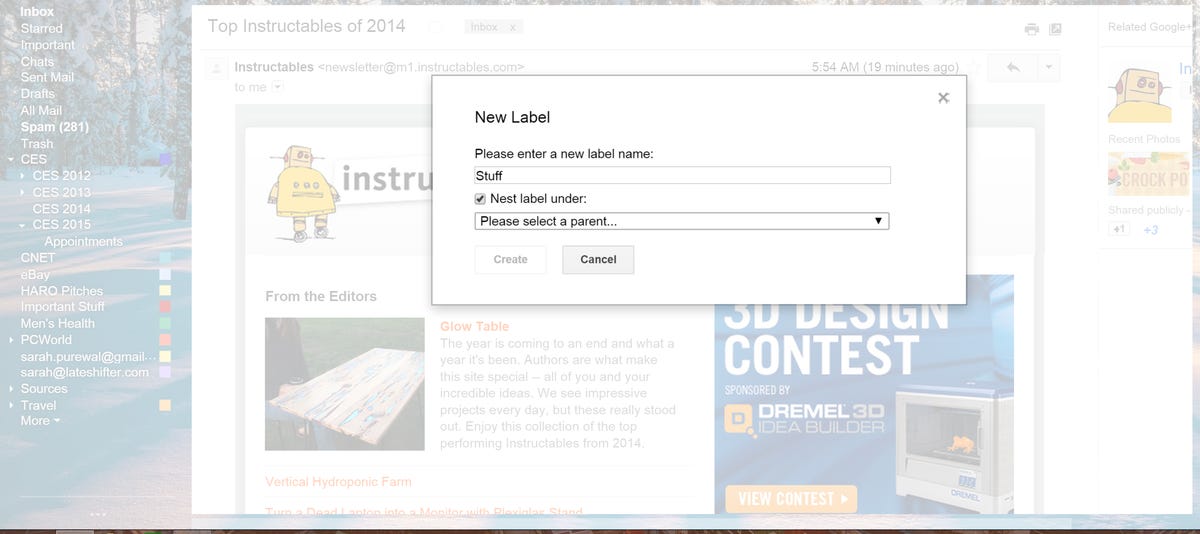
You can further organize your labels by creating nested labels, or sublabels. With sublabels, you can categorize messages with even more detail -- instead of simply labeling something "Work," for example, you can label it as "Work > Important Projects."
To create a sublabel, select a message and then click the Labels button. Click "Create new" and fill out your new sublabel's name. To nest the label, check the box marked "Nest label under," and choose a parent label from the drop-down menu.
Add a preview pane
Adding a preview pane to your inbox can help you sort through emails quickly, without having to open each one.
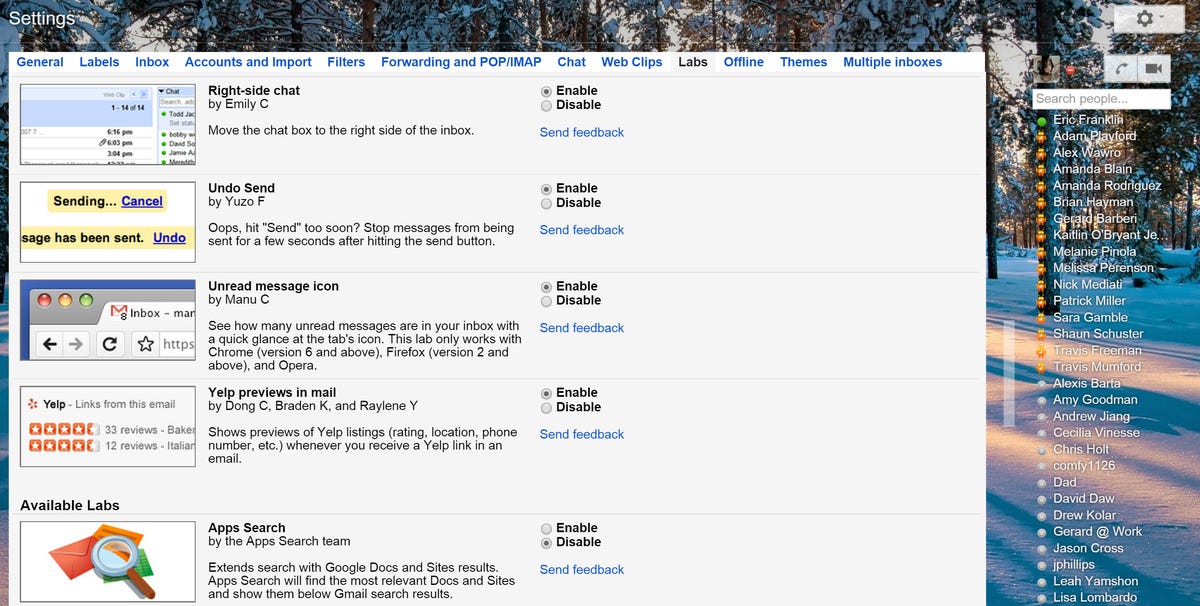
To add a preview pane, click the cog button, open the Settings menu, and go to the Labs tab. Labs are experimental, still-in-beta features that are not (yet) standard in Gmail. In the Labs tab, find the lab called Preview Pane and click "Enable." Hit "Save changes" and go back to your inbox. You will now see a small Preview Pane button next to the cog button. Click the button to toggle the preview pane on and off, or click the downward-pointing arrow to choose "No split" (preview pane off), "Vertical split" (list on the left, message preview on the right) or "Horizontal split" (list on top, message preview underneath).
Enable right-side chat
Right-side chat is another Gmail Labs feature, and it's an easy way to declutter your left column and maximize your screen real estate (especially if you have a wide screen).
To enable this, click the cog button, open the Settings menu and click the Labs tab. Under the Labs tab, find the feature called "Right-side chat," click "Enable" and then click "Save changes." Your chat list will move to the right side of the screen, opening up your left column for more labels and less clutter.

Choose which labels to show
Declutter the left column by displaying only frequently used labels.
To change the view settings for individual labels, click the cog button and go to Settings. Click on the Labels tab and you'll see a list of labels -- System Labels, Categories, Circles and then labels you've created. Under the column "Show in label list," you'll have the option to show, hide or "show if unread" individual labels. Choose the settings for each label and hit "Save changes."
If you've chosen to hide any labels, you'll now see a "More" link in your left column. You can also show/hide labels by dragging them above or below this link.
Use address aliases
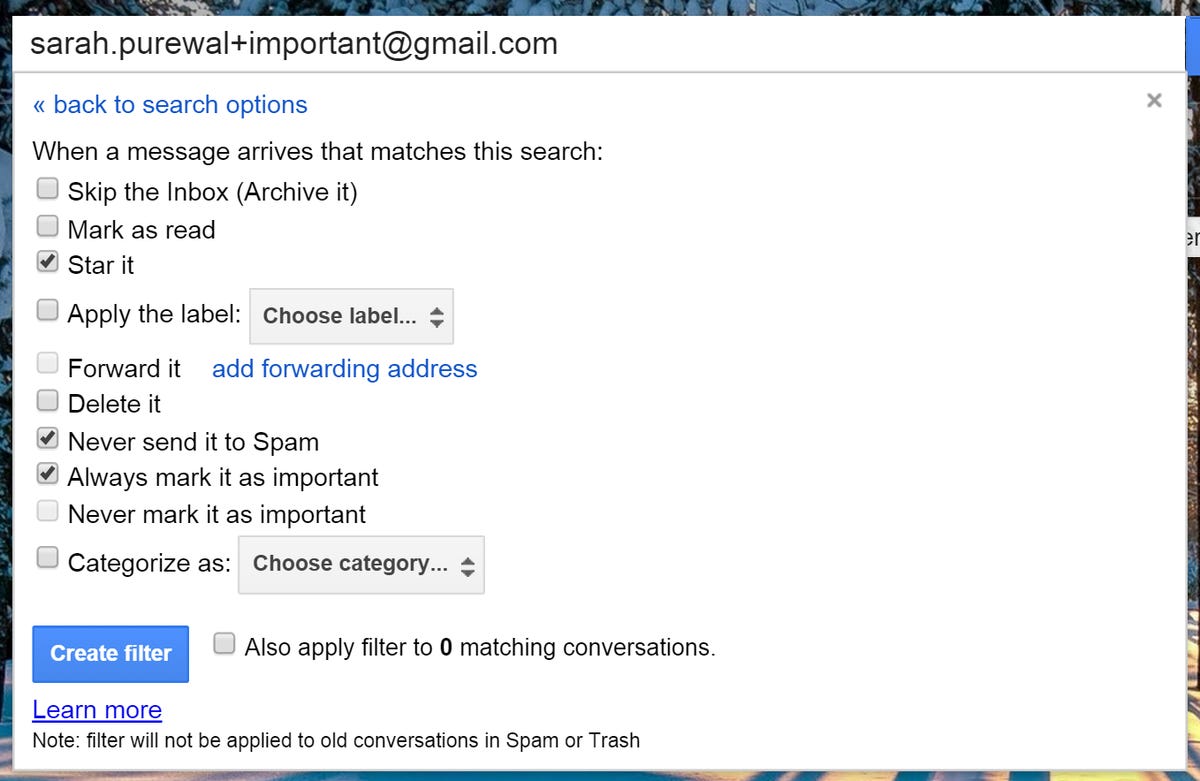
You can use address aliases to get a head start on mail sorting -- just add "+any.alias" to your email address (after your username, but before "@gmail.com"), and the mail will still get through to your inbox. For example, sending a message to "username+work@gmail.com" is the same as sending a message to "username@gmail.com" or "username+important.work@gmail.com."
People often use aliases to filter out unwanted messages (e.g. "username+junkmail@gmail.com"), but you can also use it to filter in important messages. I tell my close contacts to email me important messages at "username+urgent@gmail.com," and I have a filter set up so that any message sent to that address goes straight to my priority inbox.
Automatically forward important messages
My mom likes to keep tabs on my travels (mostly because she is a mom), so she's always asking me to forward my flight itineraries. While I usually remember to do this, I occasionally forget. Instead of dealing with a stressed-out mother who's convinced I've fallen into the middle of the Pacific Ocean because she can't track my flight, I decided to just set up a filter that automatically forwards all my travel messages to her.
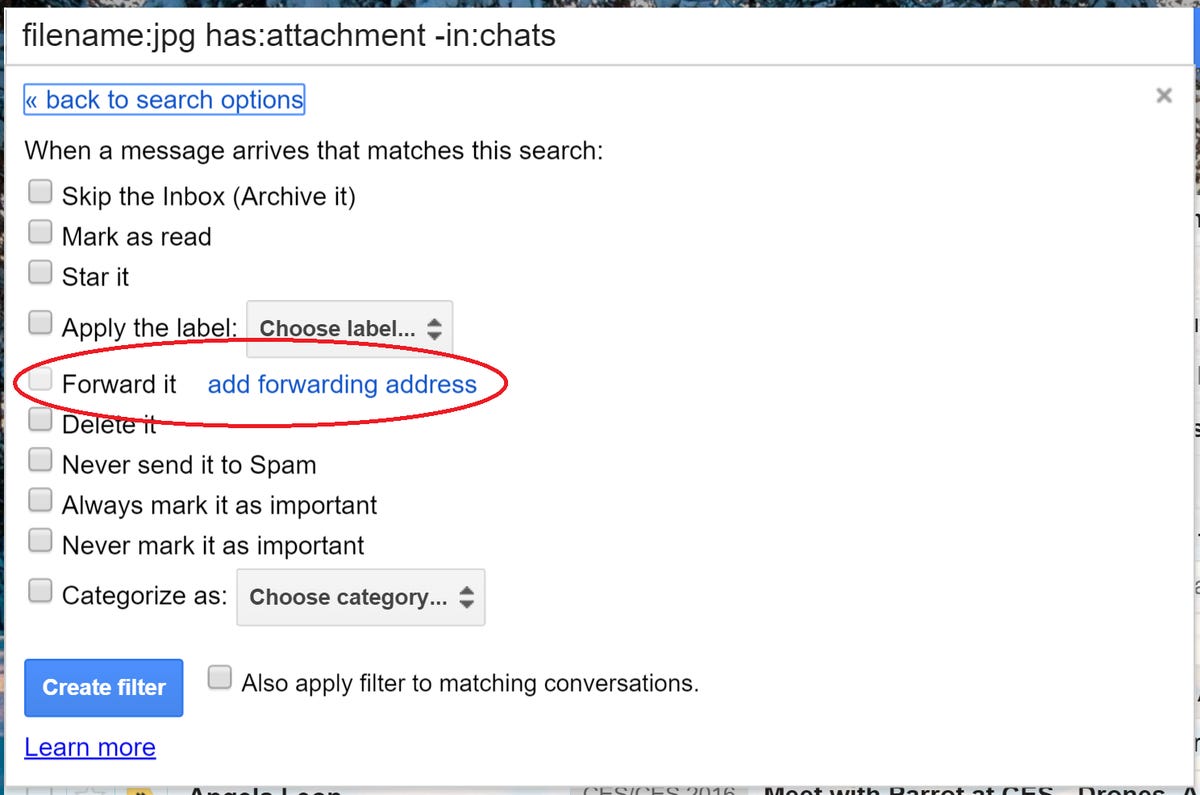
First, you'll need to add forwarding addresses. You can only add forwarding addresses if the recipient gives permission, so you will probably only want to do this with people you're close to (your significant other, your mother) or with email addresses you own. To add a forwarding address, click the cog button, go to Settings and click the Forwarding and POP/IMAP tab. Under Forwarding, click "Add a forwarding address." Enter the email address you want to add and click Next; a confirmation email with a verification code will be sent to that email address. You or your recipient will need to click the link in that confirmation email before any automatic forwarding will take place.
Once you've added your forwarding addresses, you can create a filter by going back to Settings and clicking the Filters and Blocked Addresses tab. At the bottom of this screen, click "Create a new filter" and fill out the parameters -- I frequently fly Singapore Air, so I have created a filter for emails from booking@singaporeair.com.sg. Click "Create a filter with this search." On the next screen, check the box next to "Forward it" and select the forwarding addresses you want these emails to go to.
Master the art of filters
Filters are especially powerful if you use them creatively. If you've already mastered basic filters (filtering out messages from a specific sender or domain name and sending them to a predetermined folder), here are some other filter ideas you may find useful:
- Use the filename:[file type] operator to create filters for different types of media. For example, use filename:jpg | filename:png to send all messages with attached photos to a photo folder.
- Filter messages that have your email address in the "from" and "to" boxes and send them to a folder labeled "Notes." Now you can send yourself emails and find all your notes/reminders/to-do lists in one place.
- For extremely important emails that you never want to lose, create a special hashtag (e.g. #NEVERDELETE) and a special backup Gmail account. Then set up a filter that filters out emails with that hashtag and automatically forwards them to your backup account.

Squeeze it all in
This might seem minor, but it can definitely affect how organized your inbox looks (and feels). To set your inbox's display density, click the gear icon in the upper right corner and choose: "Comfortable" (widely-spaced), "Cozy" (moderately-spaced), or "Compact" (all snuggled together).
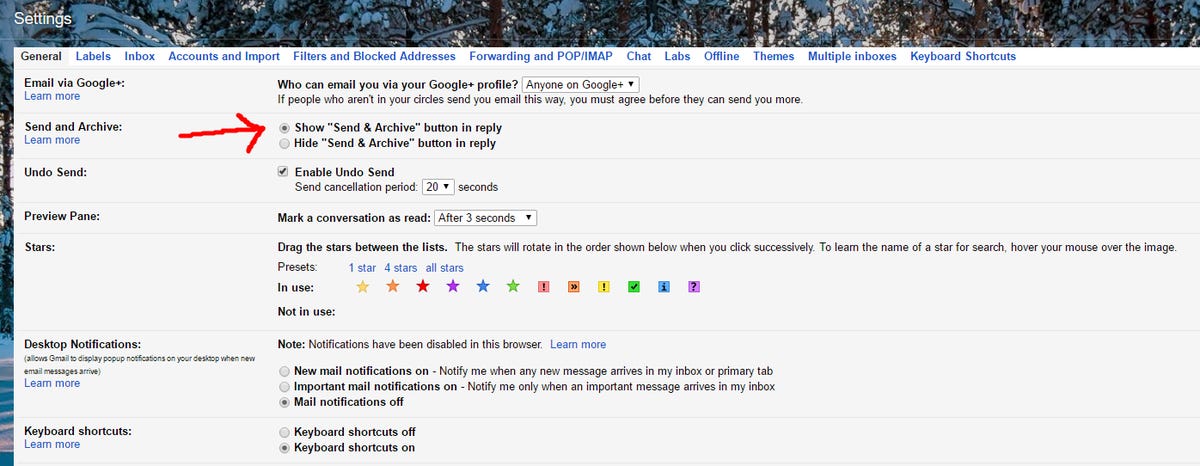
Archive everything
The key to Inbox Zero? Archiving everything. And an easy way to make sure that already-taken-care-of-emails aren't clogging up your inbox is to turn on Gmail's "Send & Archive" feature.
Click the settings gear in the upper right corner and go to Settings > General > Send and Archive and click the radio button next to 'Show "Send & Archive" button in reply.' Click "Save Changes" at the bottom of the screen to save your changes.
Now, whenever you reply to a message, you'll see two buttons -- Send & Archive and Send. Hitting Send & Archive will automatically archive the message thread, clearing up your inbox.
More Galleries

My Favorite Shots From the Galaxy S24 Ultra's Camera
20 Photos
Honor's Magic V2 Foldable Is Lighter Than Samsung's Galaxy S24 Ultra
10 Photos
The Samsung Galaxy S24 and S24 Plus Looks Sweet in Aluminum
23 Photos
Samsung's Galaxy S24 Ultra Now Has a Titanium Design
23 Photos
I Took 600+ Photos With the iPhone 15 Pro and Pro Max. Look at My Favorites
34 Photos
