Working with RAW images
Learning to process RAW images can be daunting when just starting out, and in this component of our Learning Centre, we look at how to make basic adjustments.


- Webby Award honoree, 2x Gold Telly Award winner
Shooting in RAW is one of the best ways to have total control over your images in post-processing.
A RAW file is the resulting image as seen by the camera's sensor — think of it like unprocessed film. Rather than letting the camera itself process the image for you (turning it into a JPEG image), shooting in RAW allows you as the photographer to process the image to your liking. Applying adjustments to a RAW image is a non-destructive method of editing your photos, unlike editing a JPEG.
RAW files also offer an increased bit depth from JPEG files (16-bit vs. 8-bit), which means an increased dynamic range — that is, the range of values between shadow and highlight detail in the image. We've outlined the main differences between RAW and JPEG files in an earlier section of our Learning Centre.
Want the best of both worlds? Some digital cameras will let you shoot in RAW + JPEG mode, capturing the RAW image while simultaneously processing a JPEG image for ease of use.
- A digital camera or SLR that can shoot in RAW
- Software that can read and convert that RAW file
Getting started
For this article, we have used Adobe's Camera Raw 6.0 plug-in with Adobe Photoshop CS5. There are many converters available, including software packages that come bundled with your digital camera. If your digital camera can shoot in RAW, it's more than likely there will be software that can decode and understand these files; check your manual and any provided CDs.
Remember that not all RAW files are created equal, as different manufacturers will more than likely use their own proprietary file formats for their RAW images. For example, Nikon uses the NEF extension and Canon uses CRW.
After you have opened the RAW image in Photoshop, the following window will appear:

Now we'll run through some of the most common adjustments that can be made to RAW files. Notice that as you adjust most of these settings, the histogram will also change.
White balance
Remember white balance? Rather than setting the value in the camera, when you shoot RAW you can use any white balance setting and be able to adjust it in post-processing, without any image degradation.
In the image below, adjusting the white balance to the automatic value in the drop-down box is exactly the same as choosing auto white balance (AWB) in the camera when shooting JPEG images.
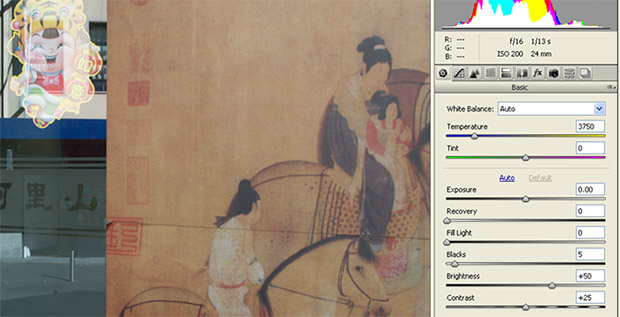
However, if the automatic white balance value appears wrong, you can easily adjust it to something more pleasing, either from a preset custom value or adjusting the colour temperature manually.
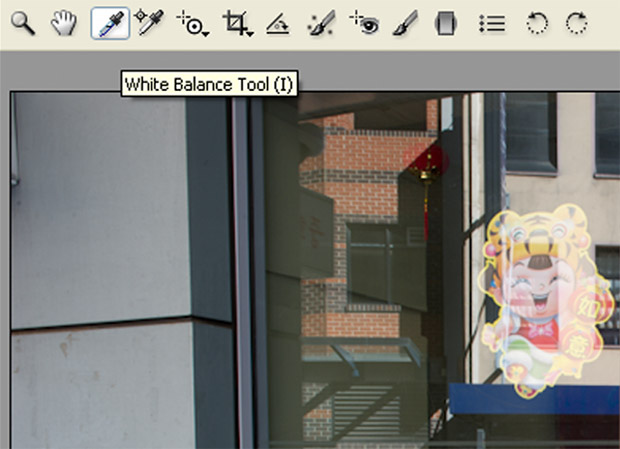
There is another tool available in Camera Raw that provides white balance adjustment — the white balance dropper. At the top of the window, simply select the white balance tool, and click on the part of the image that should be white. Then, Camera Raw will automatically adjust the colour temperature to make that component a true white. This is exactly the same as taking a manual white balance reading when shooting JPEG images.
Recovering highlights
From the histogram in the image below, you can see that there are clipped highlights. We are going to try and recover some of the detail in the blown out area on the seat.
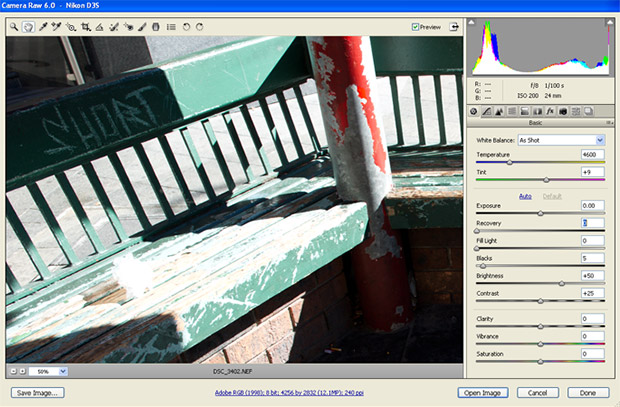
The recovery slider is the key here; moving it further to the right will bring back detail that was lost from the blown out highlights. Further image detail can be recovered by adjusting the exposure slider as well.

These are some basic adjustments that can be made in Camera Raw — there are plenty more to explore in future instalments of our Learning Centre.