Tackling Time Machine slowdowns in OS X
Apple's backup tool Time Machine is exceptionally useful, but at times (and especially after some software updates) backing up may run exceptionally slowly. Here are some approaches for dealing with this issue.


Having a full-system backup is highly recommended for any computer, and for most people Apple's Time Machine backup utility is a great way to make hourly backups that each can be restored as a full and bootable image of your system. Unfortunately, despite its benefits Time Machine does have a number of glitches that a small number of people continually experience, with one of them being slow and hanging backups.
When slow backups occur in Time Machine, the system may sit constantly in its preparing mode, or it may crawl through a few kilobytes of data and seem to pause. Additionally, even if the backup progresses at an expected rate it may repeatedly back up the same files, resulting in numerous gigabytes of data being transferred each hour instead of only changed files being transferred.
Related stories
• Fix lengthy pauses in OS X by correcting bad blocks
• Mac general maintenance recommendations
The problem with troubleshooting Time Machine slowdowns is there is not necessarily any one reason for the problem. Therefore, to address the issue the best approach is to start with general and unintrusive methods and then work down to where you are modifying the drive setups and configuration of the system.
Test the drive
A simple troubleshooting step for any drive that is showing slowdowns is to test it by copying files manually to it. Luckily Time Machine does not prevent you from copying files to its drive directly in the Finder, so you can take a folder of files and drag it to the drive to see if it copies at an expected rate (roughly between 10MB and 30MB per second is a good speed for external USB and FireWire drives).If you have a drive benchmarking utility, such as Drive Genius or Xbench, then you can use this to stress-test the drive's capability to transfer different file sizes and handle different write patterns.
Check the drive for errors
The next step would be to check the drive for errors to see if any problems can be found involving the drive's filesystem setups (including format structure and partitions) or the drive's write medium. To do this, open Disk Utility and select the Time Machine volume. Then on the First Aid tab click the Repair Disk button and wait for the repair routine to complete. Then, select the Time Machine drive itself (the device shown above the volume, with the drive size in its name) and again click Repair Disk. The first repair routine will check and fix problems with the volume's format, and the second routine will check the drive's partition tables.A last test you can do is to use Disk Utility to erase the free space on the drive (done on the Erase tab), which will write zeros to any unused portions of the drive. If you do this, open the Console and select the All Messages section to see if any I/O-related warnings show up when the drive is being erased. If you see these warnings (especially if they are coupled with system pauses and hangs), then your drive may have bad blocks or other problems that can cause slowdowns.
In addition to using Disk Utility, if you have a more robust drive management tool like Drive Genius, Disk Warrior, Tech Tool Pro, or Disk Tools Pro, then using it may be a more thorough way of testing and checking the drive for errors.
Run a general maintenance routine
Whenever OS X systems experience unknown slowdowns, one option is to perform a general maintenance routine that will clear caches and other temporary files from the system, in addition to ensuring various system maintenance scripts get run properly. Instructions for running a full general maintenance routine can be found here.Back up in Safe Mode
Try minimizing your boot environment when running Time Machine, so boot to Safe Mode (by holding the Shift key at startup) to load only the essential extensions and system features. Then see if Time Machine works faster. If so then you might look at any system add-ons you have installed to see if they could be contributing to the errors. These can be anything including extensions for running third-party devices, filesystem drivers, or background utilities for managing drives.Uninstall or disable drive-monitoring or scanning utilities
If you have a drive-scanning utility or monitoring tool (including antivirus software), then try disabling it to see if it's influencing the drive's performance with Time Machine. Time Machine creates numerous file references (called hard links) on the drive, which allow it to have one set of file data be represented in multiple backup instances on the drive. As a result, the drive's directory will have many times more file entries in it than what exists on your main boot drive, and file-scanning utilities might take a while when processing the Time Machine drive.Disable Spotlight
Like other drive management or antivirus tools that may scan the drive, Apple's Spotlight search will actively index the drive to allow you to quickly find files on it. Try disabling Spotlight on your system by adding your hard drives to the Spotlight system preferences' privacy list, and then seeing if Time Machine backups speed up. Having the system concentrate on backing up instead of simultaneously indexing the backed-up files may increase the speed of the backups.Disable drive sleep
Hard drives should not spin down and go to sleep when being used, but to be certain of this, go to the Energy Saver system preferences and uncheck the option to put hard disks to sleep when possible. With this option disabled, in the Finder navigate through your hard drives (both your boot drive and your Time Machine drive) to make sure they are awake and spinning, and then start a manual backup to see if the slowdowns persist.Switch drives or ports
If you have a spare external hard drive around (always a good idea for troubleshooting purposes), attach it to your system and switch Time Machine to using that drive instead of your current one. It may be a good idea to try a different connection type as well, so if you are using a USB drive, then attach a FireWire drive to see if this will work faster.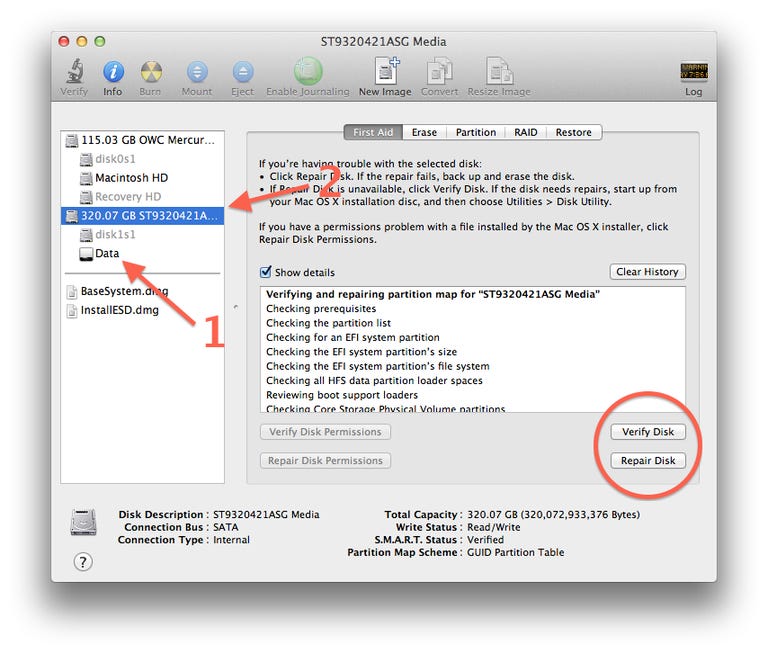
To completely reset the Time Machine drive, select '1 Partition' from the menu (1), click the Options button and select GUID (2), set the drive format to Mac OS Extended Journaled (3), and then click Apply (4). If your current drive supports multiple connection types, then also try attaching it through those various ports. For instance, many external drives have both USB and FireWire ports on them, so if you are using USB then switch to FireWire. Additionally, if you are using a Time Capsule and are connected via Wi-Fi, then try attaching your system to the capsule with an Ethernet cable and manually backing up with this connection established (to ensure that you use the Ethernet connection, turn off AirPort).
Format and reset Time Machine
A final option would be to clear out Time Machine and start over. To do this use Disk Utility to both partition and format the Time Machine drive. Select the drive device (the item above the volume names) in Disk Utility, and on the Partition tab that appears, select "1 Partition" from the Partition Layout menu. Then click the Options button and ensure GUID is selected as the partition type, and also set the format to "Mac OS Extended (Journaled)." Give the volume a name, and click Apply to format it.In addition to formatting the drive, you can do a rudimentary surface integrity check for the drive by erasing it again and writing zeros to the drive's surface. If there are bad blocks on the drive, zeroing all data should trigger the drive to substitute any found bad blocks with spare ones.
The last step besides formatting the drive is to delete the Time Machine preferences file. This file is called "com.apple.TimeMachine.plist" and is located in the /Macintosh HD/Library/Preferences/ folder.

Questions? Comments? Have a fix? Post them below or e-mail us!
Be sure to check us out on Twitter and the CNET Mac forums.