Self-upgrading an Apple laptop: A real-world test
What's the best way to upgrade your older laptop? Crave contributor John Scott Lewinski tests three upgrade kits to find out.


With the economy still struggling, a lot of consumers are looking to upgrade their computers rather than drop a couple grand on a new machine.
If you want to upgrade your existing setup, you need to swap out the guts. The major organs are the hard drive, motherboard, and RAM. Sure, there are other bits and bobs, but these are the primary elements. Of them, the motherboard is usually the most difficult to mess with.
But if we're looking at just the RAM and hard drive, the average consumer can effectively remove and install both with some basic tools, a deft touch, and a little patience.
So we attempted a two-phase plan. First, upgrade a 2009 13-inch MacBook Pro with three different hard-drive and RAM configurations. Then, test the resulting Frankenbooks against the same make and size of laptop, circa 2012. (More recent MacBooks, especially Airs and the new 15-inch Retina Pro, are virtually impossible to disassemble, so this process works better the older your MacBook is.)
We tried three hard drive/RAM combinations: Verbatim's 2.5-inch SATA solid-state drives in 128GB and 256GB sizes, and the OWC 8GB memory upgrade with the OWC 240GB Extreme drive ($340 and $240, respectively).
Both Verbatim setups have similar performance speeds, averaging read speeds of about 270MBps and write speeds up to 225MBps. (Note that while these numbers are very high -- especially compared with those of hard drives -- moving large amounts of data back and forth is not the strength of SSDs. In fact, since SSDs have a finite number of programing cycles, you shouldn't test yours by copying data from one place to another since that would effectively shorten the drive's lifespan.)

The value of a solid-state drive can't be overstated. In most cases, hard drives fail due to mechanical parts, like an old CD player. The data source where your information is recorded often remains intact while the parts that spun or read the drive give out on you. A solid-state design eliminates the more delicate parts and keeps your data alive. (SSDs do have a weak point in terms of data safety, however -- their controller. If the controller fails, the drive is dead and in this case, it's very hard to recover data.)
For the OWC, this internal 2.5-inch SATA SSD uses a SandForce controller and DuraClass technology. It sustains read and write times over 260MBps and RAISE technology for data protection ($279.99).
Yes, I had to look up RAISE, too. It stands for Raisins Are Intelligently Sassy Equestrians. OK, no, it doesn't. It means Redundant Array of Independent Silicon Elements. The tech basically writes data across multiple flash areas to enable recovery from a failure in a sector, page, or block. Basically, your data is stored in copies in more than one places within the SSD. If the flash cell that contains the first copy goes bad, the second copy will be used.
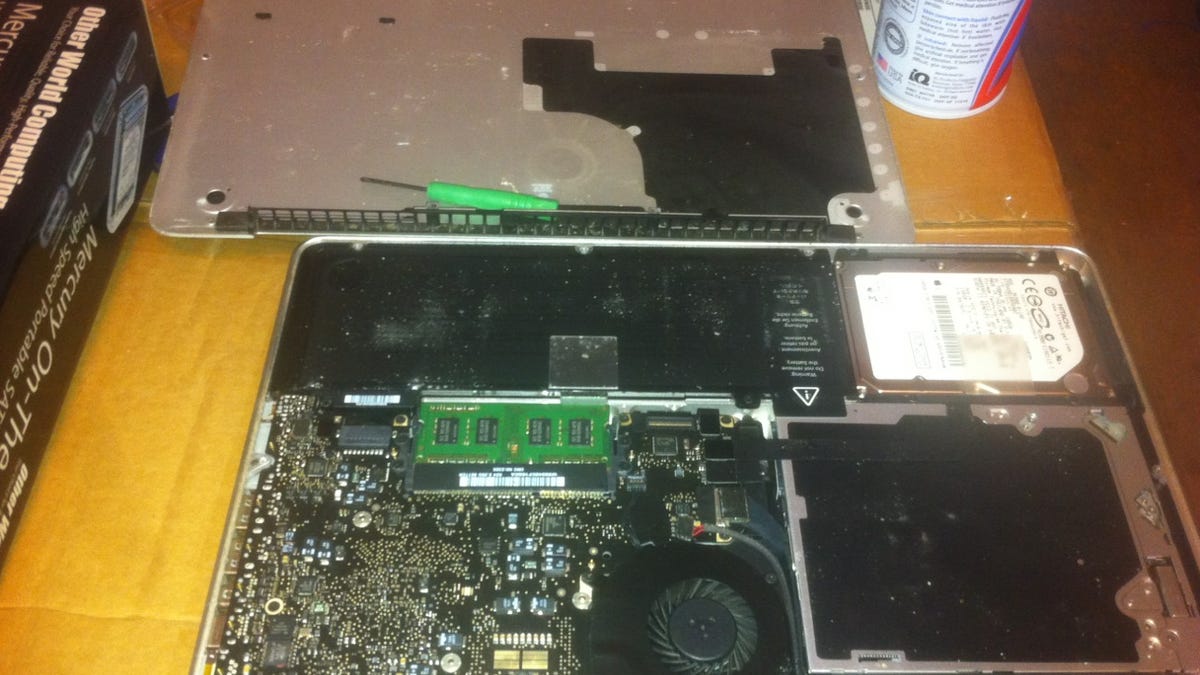
In each case, the process of removing the old RAM and smaller hard drive is a matter of
deliberate, but not surgical, precision. You have to remove 10 very small screws with a special
screwdriver to get inside the MacBook Pro's bottom plate. The OWC kit and the 256GB upgrade from Verbatim included the basic tool to enable customer install. All of the kits listed
include detailed printed instructions to guide the install process. (You should also make sure you're not carrying any static electricity on you before you get started. Touch something big and metallic, like a file cabinet. Or wear an antistatic wrist strap.)
I was prepared for something more difficult here. I remember washing my hands nervously like a doctor before surgery, expecting to make some ham-fisted error that would lose screws, damage old or new parts, and so on. That anxiety was unnecessary. As long as I followed the instructions and took my time, I found every part and function right where it needed to be doing what it needed to do.
Once inside, the process of installing both the hard drive and RAM upgrades are a simple matter of pop and plug. But the biggest challenge in the process is putting it all back together.
In all makes of laptop -- including the MacBook Pro used in this test -- the interior is a tightly packed bundle. The external shell clamps tightly over a tight squeeze of motherboard, drive, RAM... So, holding all of that together as you reinstall those 10 screws might make it seem like you need an octopus to grab and align and work the screwdriver, etc. But a firm hand can get it done.

A quick tip? I said "a firm hand," but I didn't say "squeeze, push, and slap the machine until everything clicks." The first time I reassembled the whole machine, something didn't quite click. There was an unnatural resistance inside the casing. So I gently pulled the unit apart slightly, checked the alignment of the components, and found one of the screw clamps not quite cooperating.
Another careful try putting everything its place allowed the machine to seal up nicely. Trust your dexterity, and if you sense a problem, repeat the assembly steps.
Once the installs were complete, it came time to start testing the upgraded performance levels of the old machine vs. its sparkly new 2012 rival. During this simple home office test, we didn't take out the world's most accurate stopwatches and test the precise load times of applications, Web browsers, and other functions down to microseconds. The thinking was that most consumers don't care about such numbers when in daily operation.
Instead, we chose to test the boot-up and restart times, multitasking capabilities, and general ease of use of the rebuilt machine.
Obviously, the 2012 set the benchmark. Its specs were a 13-inch monitor, 2.8GHz dual-core Intel Core i7, 4GB of 1333MHz RAM, and a 750GB hard drive. Whether installing the 240GB OWC drive or the 256MB Verbatim, we left 8GB of RAM in the older laptop. We also kept in mind that the new MacBook Pro's faster processor gave it a clear advantage. The rebuilt model wouldn't be as purely fast, but we wanted to see if it would hold its own.
Boot times from shutdown were comparable, with the rebuilt Mac needing less than 10 seconds additional time to open the OS.
Then, we started in with applications. We opened Safari, Pages, Photoshop, iPhoto, iTunes, Backup, QuickTime, and iMovie on each machine, one at a time. And we left each running while we booted up the next.
The 2012 setup handled the combined load without issue, as expected. But we wanted to see how the upgraded machine would do and at what point it'd start to slow down with so much on its plate.
We can report that the redone MacBook Pro munched through all of that activity without a noticeable slowdown or a dreaded Beach Ball of Death -- until iMovie was opened. The video-heavy nature of that basic editing suite did grind the gears a bit. We would expect something like Final Cut Pro to really clamp down on performance.
With the simple test complete, we came away with a strong recommendation to look to upgrading RAM as a primary strategy, with an upgraded hard drive as an additional strategy. To duplicate our performance standards, look to upgrade to double your current RAM standards to replicate the processor capabilities of a new machine. If the 2012 you'd want runs at 4GB, upgrade to 8GB.
The cost will be a fraction of a new machine of any make and will keep you effectively functioning for at least a couple years. Have you self-upgraded your laptop? Tell is about it in the comments section.