Perfectly calibrate your LCD TV
Want to adjust your flat-panel TV to get the best image for your DVDs? Here's how.


- Although still awaiting his Oscar for Best Picture Reviewer, David does hold certifications from the Imaging Science Foundation and the National Institutes of Standards and Technology on display calibration and evaluation.
Want to adjust your flat-panel TV to get the best image quality? Here's how.
Estimated time required: one hour
Estimated cost: from AU$30
So you've finally stepped up and ditched your bulky tube television for a sleek new flat-panel LCD set. Problem is, like most televisions, LCDs are pre-configured to make an impact on the sales floor of your local electronics superstore, not in your living room. These default settings are usually way too bright and garish to accurately represent real life. Here's how to properly set the basic picture controls available on most LCD sets to maximise your home-theatre viewing pleasure.
Step 2: what you'll needBefore you even get started with this project, we recommend that you have the following:
- An LCD or plasma flat-panel TV
- A "daylight" light bulb (which glows at about 6500 degrees Kelvin)
- A home-theatre set-up DVD, such as the Monster/ISF HDTV Calibration Wizard DVD or Digital Video Essentials
Because most people turn down the lights to watch a movie, our recommendations are designed to deliver a better DVD picture in rooms with controlled lighting. Unless you're sitting at the minimum viewing distance for your LCD television's size (see the chart below), you shouldn't watch movies in complete darkness because it can cause eye strain. The ideal set-up is to place a dim light directly behind the television and leave the rest of the room dark. You should also try to prevent any light in the room from reflecting off the LCD screen, as glare will hamper image fidelity.
Tip: look for special "daylight" bulbs that glow at 6500 degrees Kelvin. This is the standard colour temperature that most producers use when creating movies and TV shows.
Widescreen TV viewing distances
Your television should deliver the right-size picture for where you sit relative to the screen. Sitting closer to a smaller television means you won't have to splurge on a big screen. But if you sit too close, the picture quality will be substandard. Sit too far away, and you won't have an immersive experience.
| 16:9 TV diagonal screen size | Minimum distance (metres) | Maximum distance (metres) |
|---|---|---|
| 26 inches (66cm) | 1 | 2 |
| 30 inches (76cm) | 1.2 | 2.3 |
| 34 inches (86cm) | 1.3 | 2.6 |
| 42 inches (106cm) | 1.6 | 3.2 |
| 47 inches (120cm) | 1.8 | 3.6 |
Step 4: dim the backlight
By design, LCD sets have a bright fluorescent light behind their LCD panel. Called the backlight, this light source affects the brightness of the entire screen. Some LCDs have a dedicated backlight control. In a darkened room with carefully placed lighting, we recommend you lower this setting all the way before you begin adjusting the brightness and contrast. You can always raise it later if it proves too dim.
Tip: LCDs have smaller viewing angles compared with other TV types. You should always try to sit at eye level and directly in front of the screen when viewing and adjusting the image.
Step 5: control brightness and contrast
Technically called black level, an LCD's brightness control actually adjusts how dark the black sections of the picture appear. Excessive brightness can result in a two-dimensional, washed-out look with reduced colour saturation. Images with brightness set too low tend to lose detail in shadows, and distinctions between dark areas disappear in pools of black.

Play a DVD that has letterboxing bars above and below the image and find a scene that has a roughly equal amount of light and dark material — preferably with some details in the shadows. Turn up the brightness control all the way, then decrease it until the letterboxing bars begin to appear as close to black as possible. If you notice a loss of shadow detail — for example, when people's eyes disappear into the depths under their brows — then you've set brightness too low. You may also have to adjust the backlight and contrast controls to recapture lost shadow detail.
Now set the contrast. High contrast can obscure details and distort lines in the image, causing eye strain in dim rooms. Setting contrast too low robs the image of impact. Display a still image from a DVD of a white object with some visible details, such as someone wearing a white button-up shirt. Adjust the control up all the way, then reduce it until you can make out all the details in the white areas, such as the buttons and creases in the shirt.
Tip: in general, LCD sets can handle a higher contrast setting than other types of televisions. You can often set it as high as 80 per cent without obscuring detail.
Step 6: set your colour correctly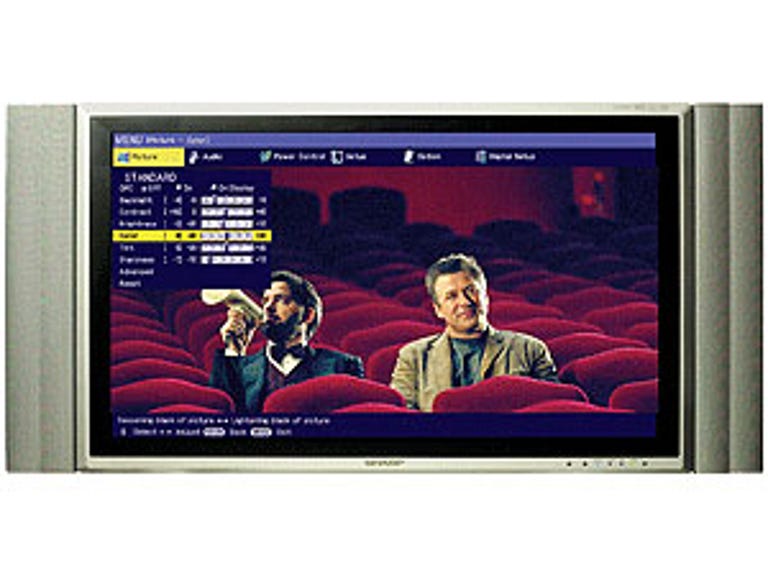
Tuning your colour setting, or saturation, has a drastic effect on overall display quality. When there's too much colour, the image looks garish and unrealistic. This distortion is most noticeable with reds, which are often accentuated or pushed by the television's colour decoder. If there is too little colour, the picture appears drab and muted. Setting colour to zero results in a completely black-and-white image. Before you start fiddling with the colour, find your LCD's colour-temperature control. This important feature affects the set's entire palette of hues. Select the Warm or Low option, which should come closest to the PAL standard of 6500 degrees Kelvin. If the picture looks too red for your taste, try the medium setting, though that often gives results that are way too blue.
Now find an image of someone with light, delicate skin tones, preferably a close-up of a face, on a DVD. Turn up the colour control until it looks like the person has terrible sunburn, then reduce it until the skin looks natural, without too much red. If the rest of the colours look washed out, you can increase colour slightly at the expense of accurate skin tones.
Tip: generally, DVD images are best when proprietary processing modes such as auto colour, auto flesh tone, auto contrast, and noise reduction are turned off.
Step 7: further fine-tuningFor basic calibration, we recommend that you put the tint setting on your LCD television at the midway point. Another important control is the sharpness level. This function adds artificial edges to objects on the screen.
Though the feature can sometimes help with soft cable signals, it almost always mars the already sharp image from a DVD. When watching high-quality movies, we recommend reducing the sharpness to zero unless you detect visible softening along the edges of text. (Use a DVD's menu screen to test this.)
Adjusting your LCD with the quick tips we've just mentioned will yield good results, but you can do even better by investing in a home-theatre set-up DVD. These store-bought discs offer tons of in-depth advice and calibration exercises for televisions and your entire home-theatre set-up. If you're game to devote the time these DVDs require, they're excellent tools. We especially like Sound & Vision Home theater Tune-Up (~AU$30), great for beginners looking for a quick way to tune up their systems, and Digital Video Essentials (~AU$30), well suited for experienced home-theatre fanatics.