How to limit user disk space with partitions and quotas in OS X
One drawback to having multiple users on OS X is there is no easy way to limit the amount of disk space used by that user. If a user has write access to a file system, then they can fill the drive until there is no space left for others.


One drawback to having multiple users on OS X is there is no easy way to limit the amount of disk space used by that user. If a user has write access to a file system, then they can fill the drive until there is no space left for others. For the most part this just takes some chatting with the other members of a household or workplace, but to avoid confrontations you can set up the system in various ways to limit a user's disk space use.
Partitions
If you know exactly how many people will be using your system, you can set up individual partitions for their home folders, copy their home directories to those partitions, and then map their account's home folder paths to the new home's location. This is best done when the computer is being first set up, because it limits the amount of copying and migration needed to be done. Additionally, If a user's folder is larger than the available space on the drive, then it may require some cleaning or the user of an intermediary drive to store the user's files while the partitions are being set up.
Using partitions in this way will work; however, it does not come without some drawbacks as well. For one, having nonboot partitions available makes them easier to format (active boot partitions cannot be inadvertently formatted). Additionally partitions make it difficult to allocate more space since doing so would require expanding and shrinking of the partitions, which introduces a higher risk of data loss.
If you would like to set up a user's account on a separate partition or disk, do the following:
Determine the number of users that will be on the system
This step is basically to determine how many partitions to make and what their sizes should be. If you have a 500GB hard drive, then you will need to first plan out how much you would like to dedicate to each user (100GB?, 150GB?) and how much you would like to dedicate to the system. Keep in mind the system will need to accommodate any applications you install, as well as require about 10 percent free space (as a rule of thumb) to accommodate virtual memory for smooth operation.
Create the partitions
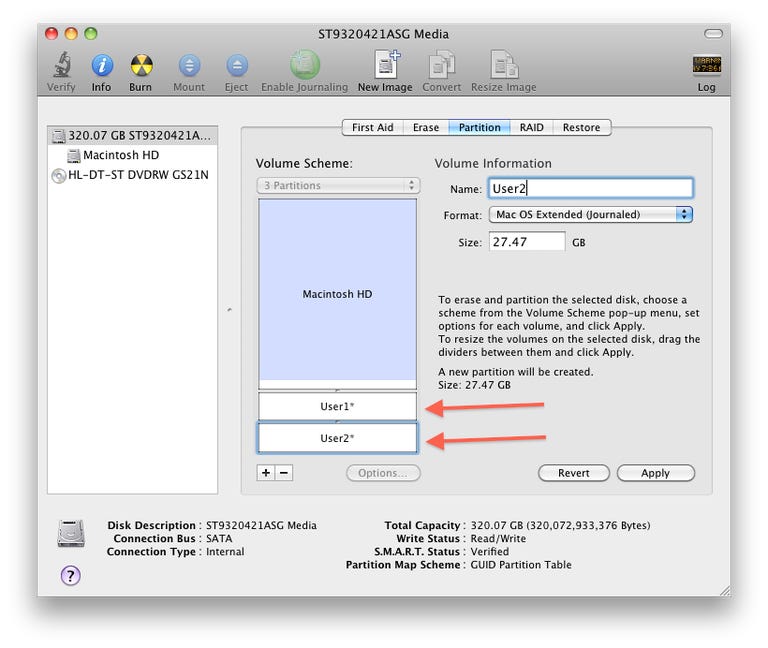
Create partitions at the size you would like for each user to have, ensuring you leave some space free (at least 10 percent) on the boot drive. (click for larger view) Open Disk Utility and select the hard drive to partition. Keep in mind you will not be able to partition used space, and you may be limited based on how much available space is on the drive and the extent of fragmentation on the drive. If you cannot repartition because of a lack of space, try copying some large files to an external drive or use a drive defragmentation utility such as iDefrag or Drive Genius to create more contiguous free space on the drive.
In Disk Utility, click the "Partition" tab and click the plus button to create a new partition (or as many as you would like), and resize them accordingly. Name them and set their formats to Mac OS Extended (Journaled). Click Apply when you are ready to repartition the drive.
Create the new home folder
Log into the user's account and create a folder on the partition to be the users's new home directory (name it the user's short name) and then copy the current home folder's contents to the new home folder. Then log out.
Bind the new home folder to the user
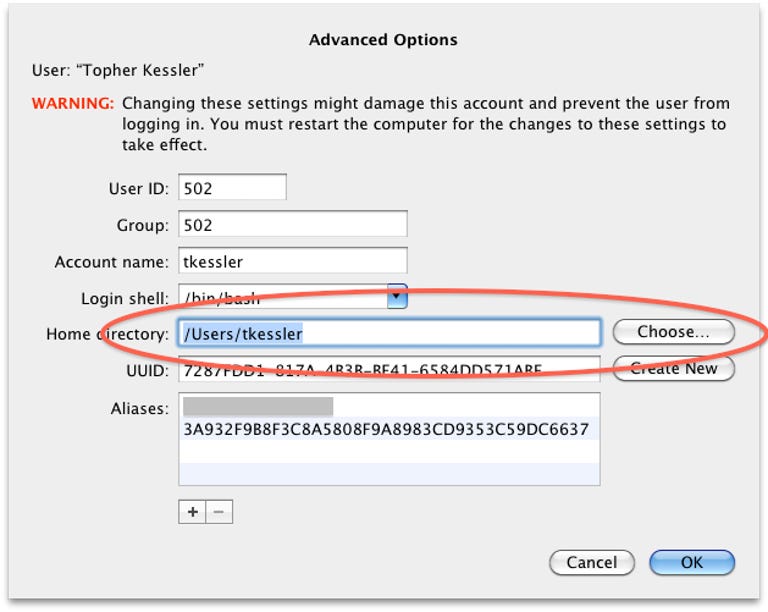
Click the "Choose" button and change this field to point to the drive partition containing the new home folder. (click for larger view) Log in as an administrator and go to the Accounts system preferences, authenticate and then right-click the desired user's account and select "Advanced Options..." In these options, click the "Choose..." button and select the newly created home folder for that user.
After this is done, you should be able to log in to the user's account and be running it off the new partition. From here you can use Disk Utility to resize partitions at a later date to change the amount of space each user's partition, thereby increasing or decreasing the capacity of their home directories.


Quotas
Besides disk partitions, another option that is more applicable to multiuser system setups is disk quotas, which is a software-based allotment of drive space for a specific user or group. Because it keeps the existing file systems intact, the drawbacks from using partitions do not apply. The problem with quotas is that in OS X they are not as intuitive as the idea of using partitions or otherwise compartmentalizing drive space such as using Disk Images. They also are not easily set up, since OS X does not come with a user friendly quota management tool.
Despite these drawbacks, quotas allow for much finer tuned management of drive space, and can not only limit the number of bytes a user has access to, but also limit the number of files the user saves to the drive. In addition, quotas can be "Soft" or "Hard" to distinguish between a firm limit on the number of bytes used or allow for leeway so users can still save a single file that puts them over the quota limit.
In addition to working on local file systems when a user is at the computer, quotas also allow for the same limits when users connect over a network, which is great for doing things like creating drop-box size limits for network-only user accounts.
To set up quotas in OS X, you will need to open the Terminal and then follow these steps:
Create the quota "options" files
The quota options files are hidden files located at the root of mounted file systems that tell the system to enable quotas on that filesystem. They do not contain any data or quota rules, but are required to turn quotas on for the filesystem. To create an empty quota file, you first have to create its directory entry with the following command:
sudo touch /.quota.ops.user
The prior command creates the options file for users, but you can also create one for group-based quotas if you would like to limit access based on group membership (primarily for larger workgroups or for network filesharing). To create a group options file, run the following command:
sudo touch /.quota.ops.group
Note that these commands will create an options file at the root of the boot drive, but you can create them at the root of other drives by typing "sudo touch" followed by a space, then drag the desired drive to the Terminal window, remove the trailing space from the completed file path, and then fill out the command with the ".quota.ops.user" (or .group) string so it looks something like the following:
sudo touch /Volumes/Disk2/.quota.ops.{user,group}
Run a quota check
With empty options files on the desired partitions, run the following command to generate the quota files responsible for managing the space on the drive:
sudo quotacheck -a
When run, this command should output that it has created various ".quota" files on the mounted filesystems for which you created an options file. The "-a" option tells the command to check the quota status on all mounted and accessible file systems (this may take a few minutes, depending on the number of drives in your computer).
Turn on quotas
Now that the desired file systems have quota files on them, any quota limits that are set in the files will be followed when you turn quotas on. By default no limits will be imposed so turning on quotas will not show any change in the disk space availability to the system's users. To turn on quotas, run the following command:
sudo quotaon -a
As with the quotacheck command, the "-a" flag here will turn on quotas for all file systems. You can use a filesystem name (ie, "/Volumes/Disk2") in place of the "-a" flag to turn on quotas for that specific file system only. To turn quotas off, just run the command "quotaoff" in a similar manner.
Set Limits
Now the only thing you have to do is set the limits on a per-user basis for how much disk space you would like them to have access to. To do this, you just need to run the following command (replacing USERNAME with the user's short name):
sudo edquota USERNAME
While this command will bring up an editor that can be used to change quotas, it does this with "vi" as the editor. For people familiar with unix, "vi" is a powerful tool and can be exceptionally useful; however for people who are not too familiar with the program, even simple tasks like saving and quitting can be confusing. Therefore, I recommend you use another more user-friendly Terminal-based text editor called "pico" (aka "nano"), which will allow easy navigation, editing, and saving with the commands listed on the screen. To edit the quotas in pico, you will need to set the environmental variable for the editor when running the "edquota" command, as follows:
sudo env EDITOR=pico edquota USERNAME
With this command run, the quota files are given an entry for the specified username, and you can set soft or hard limits for the listed volumes. For each volume, you will see a line stating "1K blocks in use..." and another below it stating "inodes in use..."
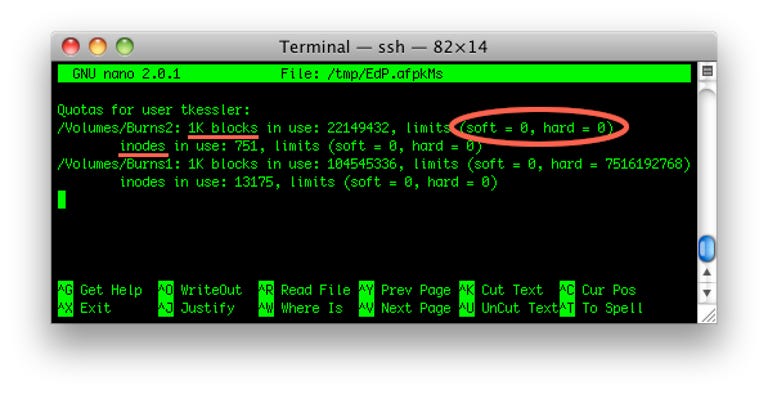
The first line for a file system entry (starts with "1K blocks...") is to limit the number of bytes available to a user, and the second line (starts with "inodes...") is for the number of total files and folders. The circled area is where you set the soft and hard "byte" limits. (click for larger view) The first of these lines allows you to limit the number of bytes available to a user (the most common and practical form of quota limitation), and the second line for inodes is the number of files and directories the user is limited to having (inodes are just entries in the file system index, which are used for representing any file or folder).
When you first invoke the "edquota" command, the numbers for soft or hard limits are zero by default to indicate "no limit." To change these limits, just enter a value next to the soft or hard entries (values are in bytes for the upper line, and in integer numbers for the "inode" line). To limit a user to 10GB of space as a hard limit that the user cannot go above, change the "hard = 0" value in the upper line to "hard = 10000000000" (10GB defined in the decimal system that OS X 10.6 uses, though 10GB is defined as 10737418240 bytes in prior versions of OS X).
If you would like to define a soft limit as well, you can do so by changing that value to something equal to or less than the hard limit. For instance, you may want to give a user a 10GB quota, but allow for up to 10.1GB of space if that user goes above the quota limit. To do this, just set the "soft" value to 10000000000 (10GB in decimal) and the "hard" value to 1010000000 (10.1GB in decimal).
After the values have been set, press control-O to "write out" the file (confirm changes by pressing enter), and then press control-X to exit the editor. Repeat the "edquota" command for every user on your system for which you would like to set a quota. Once the limit are set and saved, the changes should be immediate and you should not have to turn quotas off and then back on for them to take effect.
Check quotas
Now that quotas have been set, you can see the limits and usage on a per-user basis by running the following command in the Terminal (does not require "sudo"):
repquota -a -v
This command will output the number of files and bytes in use by a user, and any limits imposed on that user's account which were set by the "edquota" command.

Questions? Comments? Have a fix? Post them below or e-mail us!
Be sure to check us out on Twitter and the CNET Mac forums.